Recording yourself on Mac can be useful for many reasons, whether creating a presentation, making tutorial videos, or just making a video for fun. Whatever the reason, the process is relatively straightforward. Macs offer a variety of tools that make it easy to record high-quality videos. You can use built-in apps like QuickTime Player and Photo Booth, which come with all Macs, to record yourself directly from your screen. Or, if you need more advanced features, plenty of third-party apps like Aqua Demo and AceThinker Free Screen Recorder Online offer extra control and editing options. These tools let you capture your screen, audio, and webcam so you can create polished, professional videos. In this guide, we'll explore how to record yourself on Mac with both built-in and third-party options. So make sure you finish reading this guide to find the best method for your needs.
| Solutions | Brief Information |
|---|---|
| How to Film Myself on Mac Using QuickTime Player | Check the steps on how you can record yourself on Mac using QuickTime Player Learn More |
| How to Video Yourself on Mac Using Photo Booth | Another built-in Mac recorder that can help you record yourself Learn More |
| How to Record Yourself on a Mac in High-Quality | The best way to record yourself on Mac in high-quality Learn More |
| How to Record Screen and Yourself on Mac Using Online Tool | An online screen recording tool that allows you to capture both screen and webcam Learn More |
| Frequently Asked Questions | FAQs about recording yourself on Mac Learn More |
| Final Thoughts | Recap of the solutions Learn More |
How to Film Myself on Mac Using QuickTime Player
| Type of Screen Recorder | Built-in App |
| Limitation | You can only record microphone sound, not internal sound. |
| Effectiveness | 75% |
The first tool we’ll cover is the built-in QuickTime Player app. QuickTime is a media player that can also be used as a screen recording tool. It lets you record your whole screen or a selected portion. In fact, it is ideal for making tutorials and recording presentations on Mac. Furthermore, you can also record your webcam and audio simultaneously for a more comprehensive recording. Moreover, this built-in tool is perfect for users who don’t want an additional third-party screen recorder. See the steps below to record yourself on Mac using QuickTime Player.
User Guide:
- First, search for and launch the QuickTime Player using Spotlight search. Then, click the File menu at the top right corner and select the New Movie Recording option from the list. Your webcam will then show up, and you can see yourself on the screen.
- Next, go to the "View" menu and choose "Float on Top." This option ensures that your camera window remains visible above any other application windows open on your desktop. After that, return to QuickTime Player and select "File" from the top menu again. This time, choose "New Screen Recording." The recording control panel will then appear on your screen.
- Once you're ready to start recording, click the red "Record" button in the control panel. Then, to stop or finish recording, either click the stop button in the recording control panel or use the keyboard shortcut Command-Control-Esc. Finally, save your recording by going to File > Save. Choose a folder on your computer to save the video file and rename the file for easy access.
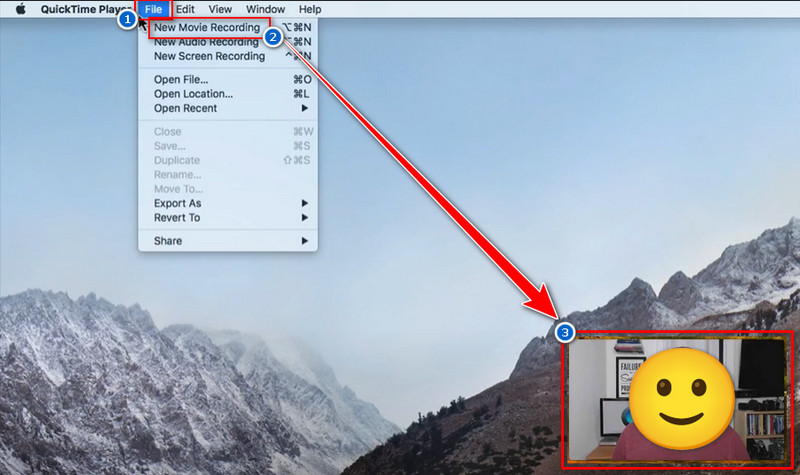
Open QuickTime Player on your Mac, and select "File" > "New Movie Recording".
It will open a “camera window”, which you will use to record your face.
How to Video Yourself on Mac Using Photo Booth
| Type of Screen Recorder | Built-in App |
| Limitation | It only records from the webcam, so you can’t capture screen content. |
| Effectiveness | 45% |
Photo Booth is another built-in app that's perfect for recording yourself on a Mac. It primarily captures photos or videos directly from your Mac's camera, allowing you to record yourself presenting PowerPoint or doing other activities. Furthermore, it offers various effects and filters that allow you to add fun, quirky styles to your photos and videos. Additionally, you can quickly share your captures via email, messages, or uploads to social media. However, the quality of the videos recorded through Photo Booth is not as high as those from Quicktime Player. Check the steps below on how to record a video of yourself on Mac.
User Guide:
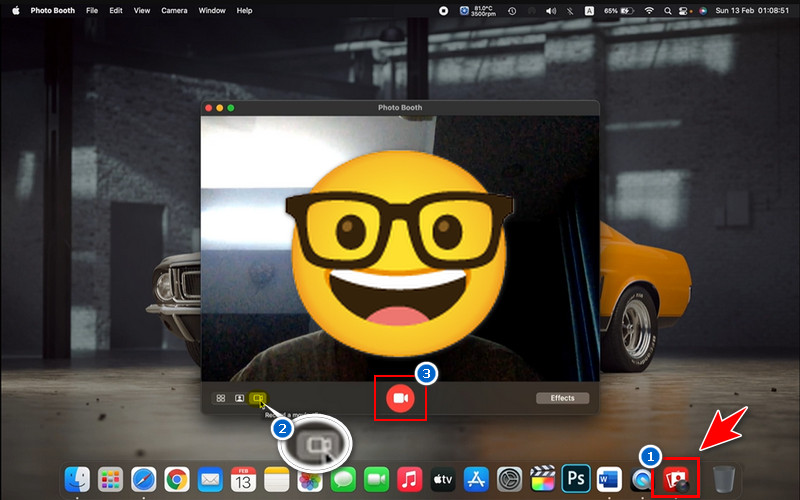
- Locate the Photo Booth app on your Mac by going to the Applications folder or using Spotlight search. Once open, you'll see a live preview from your Mac's built-in camera. Make sure you're in a well-lit area to capture a clear video.
- At the bottom left of the Photo Booth window, switch from the photo icon to the video icon to record a video. This mode will allow you to capture moving footage instead of still images. Position yourself within the frame and make any necessary adjustments.
- When you're ready, hit the Record button to start recording yourself. Once you're finished recording yourself, click the same button to stop. Your recorded video will appear in the filmstrip at the bottom, where you can review or save it.
How to Record Yourself on a Mac in High-Quality
| Type of Screen Recorder | Third-party app |
| Limitation | Not available on Linux OS |
| Effectiveness | 100% |
If you are looking for a 1080P screen recording tool to record yourself on Mac, opt for a third-party tool like Aqua Demo. Aqua Demo is reliable screen recording software that lets you capture yourself with up to 4K resolution in 60fps. This means you will provide a clear, crisp, and high-quality video suitable for professional-looking videos. In addition, it lets you simultaneously record the screen, both internal and microphone sound, and the webcam. Furthermore, Aqua Demo comes with annotation tools such as lines, shapes, text, highlighter, etc., that you can use to enhance your videos in real-time. Aqua Demo is the best screen recording tool because you can schedule your recording using its Task Scheduler, so you don’t need to record yourself manually. To get started with Aqua Demo, follow these steps:
Step 1. Acquire the Screen and Webcam Recorder
To start recording, you must download the Aqua Demo file installer from the official website. You can also hit the download button above this guide. Make sure to go through the installation process and launch the screen recorder on your device.
Step 2. Configure the Screen Recording Settings
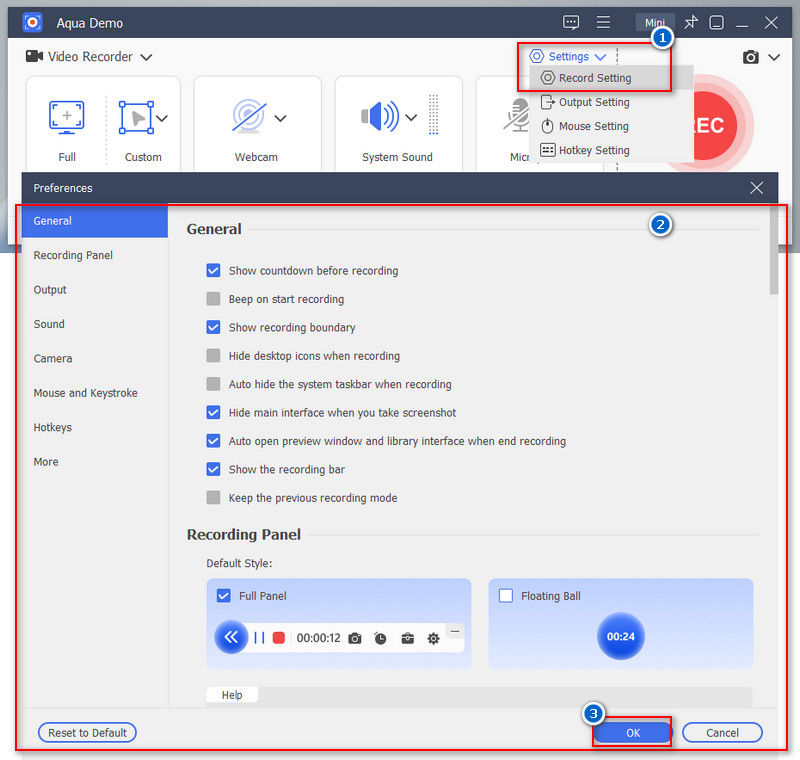
Once you have launched the tool, you can configure the screen recording settings according to your preferences. On the tool's interface, click the Settings dropdown and select the Recorder Settings option. From there, start modifying the video quality, audio quality, frame rate, directory settings, etc. according to your preferences.
Step 3. Start Recording Yourself and Webcam
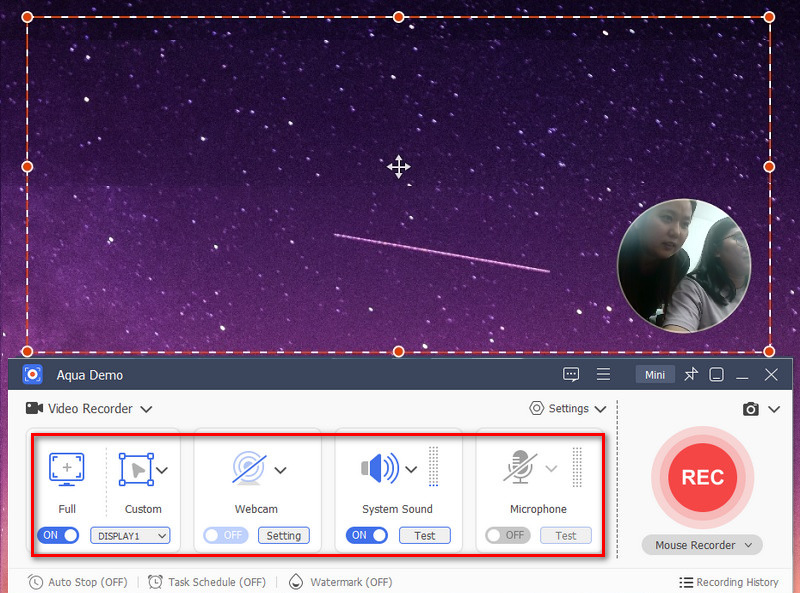
Before you screen record, you must enable your webcam and position it to capture your face. Then, choose the capture window to capture the entire screen or select a specific area. After that, toggle the buttons under the webcam, system audio, and microphone, and hit the "Rec" button.
Step 4. Stop the Recording Process
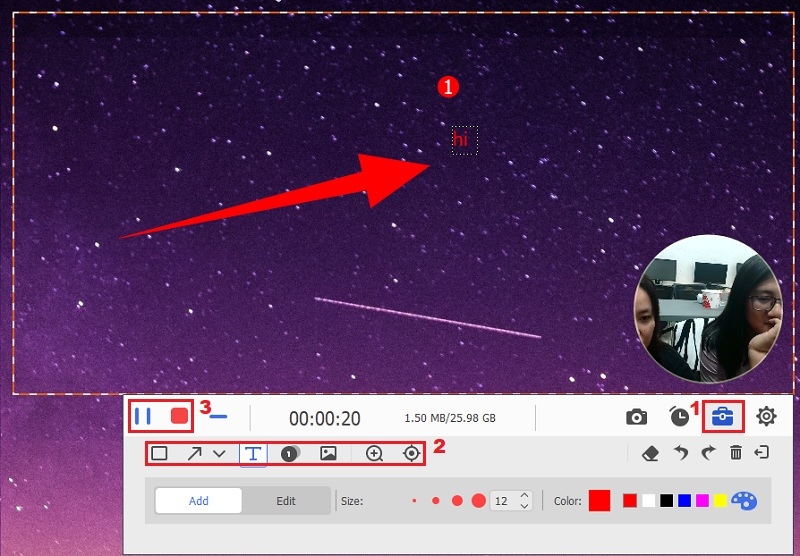
While recording, you can annotate the important details of your presentations or your computer screen. The recording software also gives you the option to pause your screen recordings. When you're done, click the "Stop" icon. A preview window will appear afterward. Here, you can review your recording and edit it if you want to.
How to Record Screen and Yourself on Mac Using Online Tool
| Type of Screen Recorder | Online tool |
| Limitation | Need an internet connection every time you use it. |
| Effectiveness | 100% |
Another way to simultaneously record your screen and audio (internal sound and microphone audio) and webcam is using AceThinker Free Screen Recorder Online. It is an online screen recording tool that allows you to record yourself on a Mac. It is perfect for users who don't want additional apps installed on their Mac devices since it works online. You can also visit our tool on any browser you have on your device, including Chrome, Safari, Firefox, and more. Furthermore, this tool lets you save your high-resolution recording up to 720p in MP4 format. This means that your recordings will have a professional quality look. Moreover, people love it because even though it's an online tool, it has no advertisements that can interrupt you when you're recording. See the guide below to learn how to record yourself and screen on Mac using this reliable tool.
Step 1. Visit the Online Tool
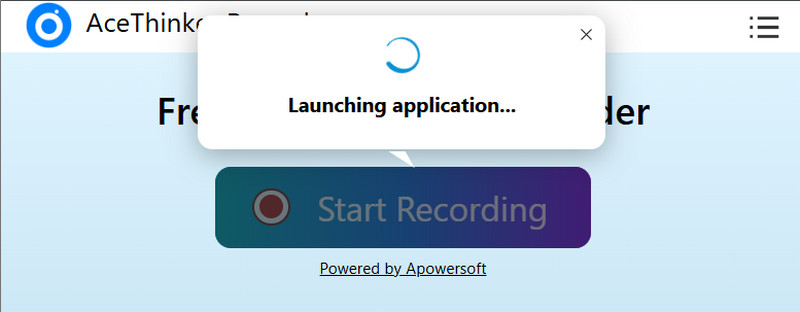
On your Mac device, open a browser and search for AceThinker Free Screen Recorder Online. Once in its main interface, click the Start Recording button and hit the Download button from the pop-up to get its launcher. After that, follow the wizard prompts for installation to complete the launch.
Step 2. Set the Recording Tool and Webcam
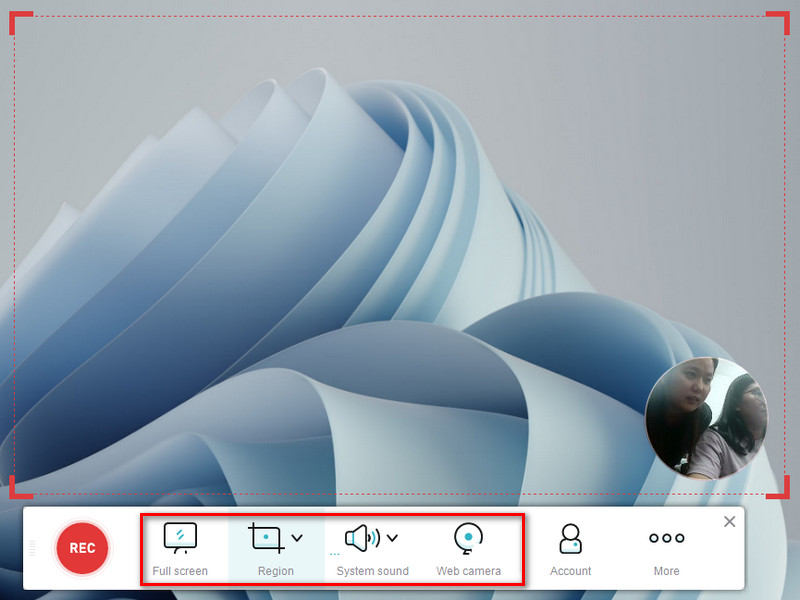
Next, attach your webcam device to your Mac and place it in the correct place so it can capture you properly. Now, open the tool's control panel and select the Region option to customize the area you want to record. Then, enable the Webcam option to see your face on the preview window.
Step 3. Start Recording Yourself and the Screen
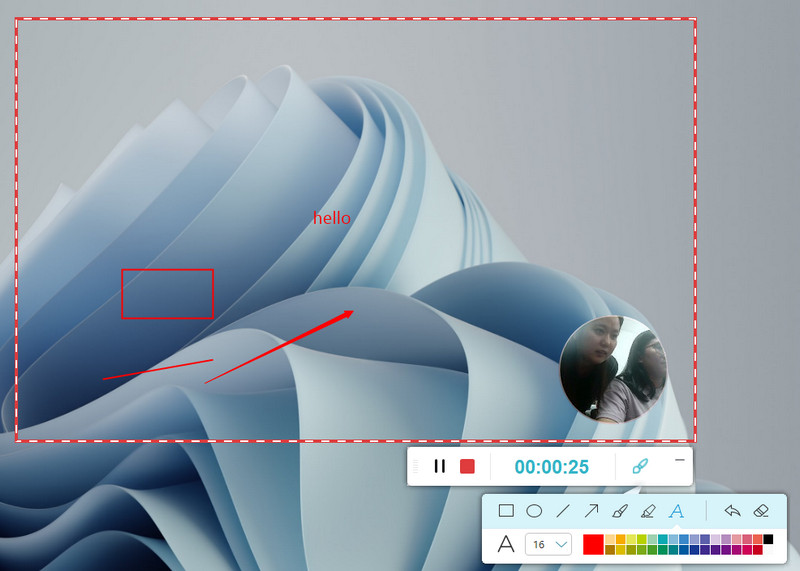
Once all set, click the REC button to start the recording process. While recording, you can use the annotation tools to highlight the important parts of your topic on the screen. If you wish to end the recording, click the toolbar's red box icon.
Step 4. Save the Recording
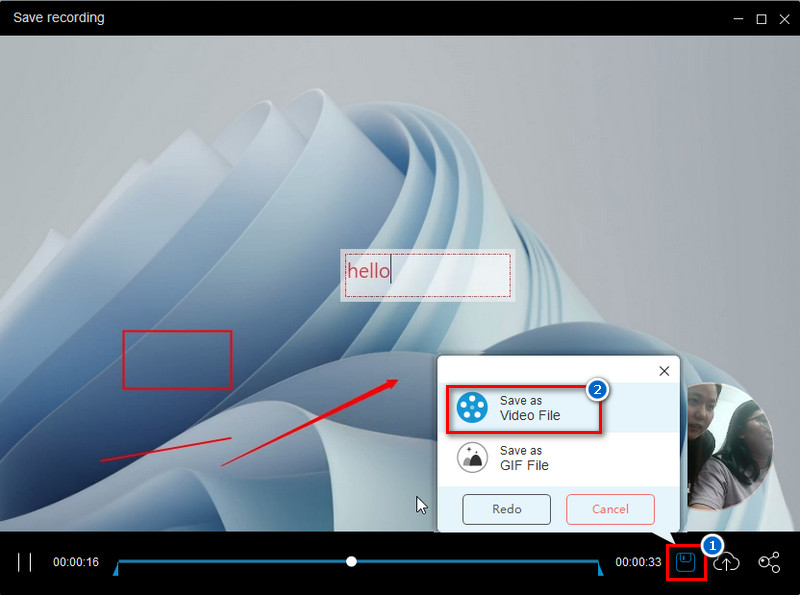
After you stop the recording, the preview window will appear on your screen. Here, you can trim the recorded video to remove the recording's excess starting and ending points. Finally, save the video by clicking the memory card icon, selecting the Save option from the pop-up menu, and choosing a designated folder to store the video on your Mac.
Frequently Asked Questions
Can I record my screen and webcam on a Mac at the same time?
Yes, using Aqua Demo and AceThinker Free Screen Recorder Online. They both allow you to record yourself and your Mac screen without restriction. Furthermore, the recorded video result is high resolution, up to 4K.

How can I improve video quality when recording on my Mac?
Use a well-lit environment and clean your Mac’s camera lens for clearer footage. For higher-quality recording, you can connect an external webcam, as most Macs have basic built-in cameras.

Does QuickTime record audio on Mac?
QuickTime can record audio from your microphone, but it doesn’t automatically capture system audio (sounds from apps or videos). To capture both, you’ll need to install additional software like Soundflower or Blackhole.

Final Thoughts
Recording yourself on a Mac offers various options, from QuickTime Player and Photo Booth for quick, built-in solutions to powerful third-party tools like Aqua Demo and AceThinker Free Screen Recorder Online for advanced features. Whether you want to capture your screen, webcam, or both, each method has unique advantages depending on your goals. Built-in apps provide easy access, while third-party tools deliver higher quality and customization options, making it easier to create professional videos. That's why we encourage you to experiment with different tools to find the best one for you.


