FaceTime has surged in popularity as a go-to platform for video calls, offering seamless communication across Apple devices. This Apple application can be a powerful tool for connecting with friends and family, conducting meetings, and more. However, there may be instances where you need to record a FaceTime call. Recording FaceTime calls have become increasingly important for personal and professional purposes, letting users capture important moments, meetings, or interviews for future reference or sharing. While Apple does not provide a native recording feature within the FaceTime app, several methods and third-party tools are available to record FaceTime call. This article aims to deliver a comprehensive guide on effectively recording FaceTime calls on various devices. By mastering the recording process, users can leverage FaceTime's capabilities to connect better, collaborate, and communicate in personal and professional settings.
| Sections | Brief Information |
|---|---|
| Record FaceTime on iOS Devices | A comprehensive process on how to record FaceTime calls with audio using the built-in recorder of iOS Know More |
| Video Capture FaceTime Calls on Mac | A step guide in recording FaceTime calls with QuickTime Know More |
| Reliable Screen Recorder for Recording FaceTime Calls | A detailed instruction to record FaceTime calls utilizing a robust screen recorder Know More |
| Frequently Asked Questions | Some important details in recording a FaceTime calls Know More/ |
| Conclusion | A brief highlights and tips on recording FaceTime calls with audio on different devices Know More |
Record FaceTime on iOS Devices
Most users make FaceTime calls using their iPhones, iPads, or other iOS devices. Before, recording FaceTime had become a challenge for iOS users, but Apple has introduced a built-in recorder that makes this much easier. The first and most straightforward method of recording a FaceTime call is utilizing the screen recording feature built into iOS. This native screen recording functionality was introduced in iOS 11 and enables users to capture the entire screen, including the Facetime call. The recorded video is saved in high quality with clear audio, ensuring the call is properly captured. Here are the steps to enable the screen recorder and how to record a Facetime call with audio on iPhone:
Step 1: Enable Screen Recording
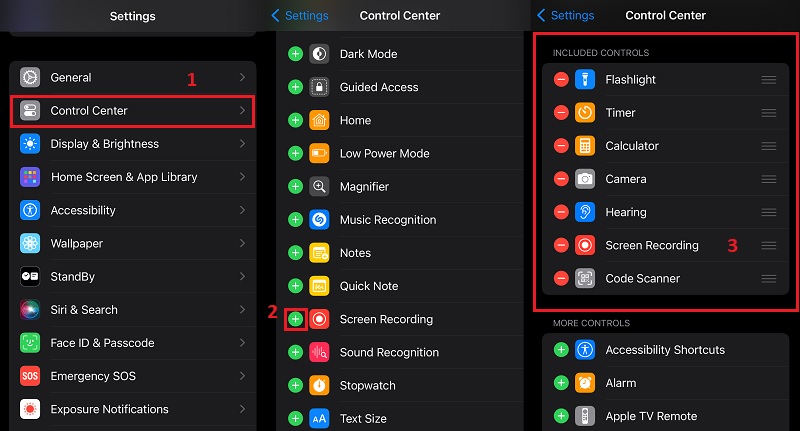
On your iPhone device, access your "Settings" app. Then, scroll down and navigate to the "Control Center" settings. Under "More Controls", locate and tap the green "+" button next to "Screen Recording". After that, the "Screen Recording" tool should be included in the "Included Controls."
Step 2. Turn on Microphone
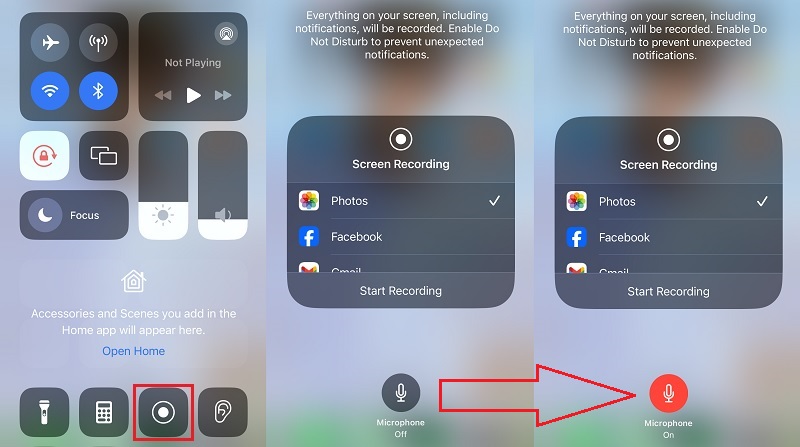
Swipe down from the upper-right part of the screen to open the Control Center. Before starting the FaceTime call, press and hold the Screen Recording button until you see an option to turn on "Microphone Audio." Tap Microphone Audio to enable it (it should turn red).
Step 3. Record FaceTime Call with Audio
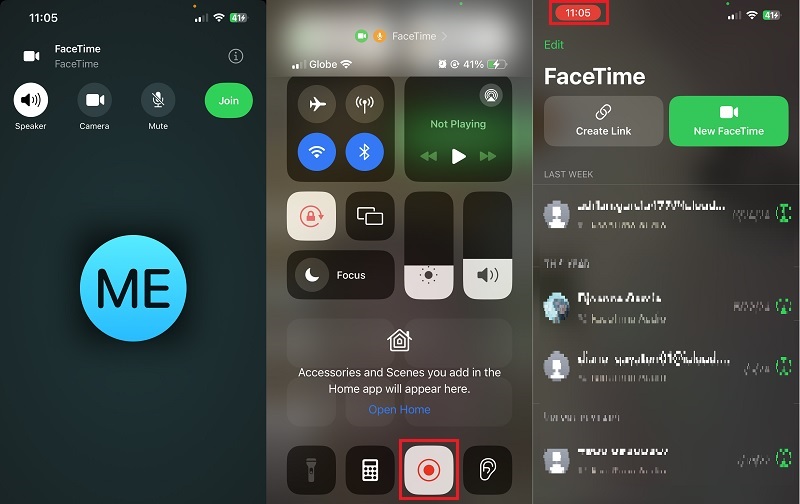
Open the "FaceTime" app and start your call as usual. While on the call, open the Control Center by swiping down and tapping the Screen Recording button. The recording will begin immediately, with the call, your voice, and the other participant's voice captured. To stop recording, hit the red status bar at the top left part of your screen (indicating that the recording is in progress).
Capture FaceTime Calls on Mac
If you are utilizing your Mac device to make a FaceTime call, you can leverage your device's built-in media player. QuickTime is a multimedia framework forged by Apple and comes pre-installed on all Mac computers. Beyond its media playback capabilities, QuickTime also offers a feature to record yourself on Mac, making it a viable option to record FaceTime calls on Mac. When initiating a screen recording, you can select to capture the entire screen or a particular portion. Besides, you have control over the quality of the recording, allowing you to balance between video resolution and file size. This includes options for High, Medium, and Low-quality settings. Underneath is the process of how to record a FaceTime call on Mac:
Step 1: Launch QuickTime on your Mac
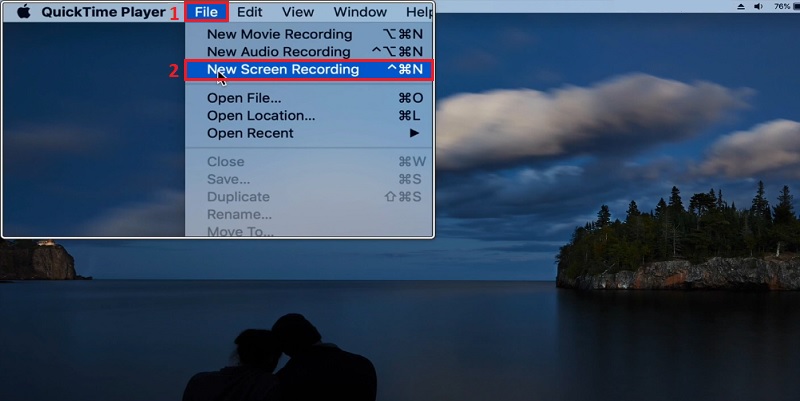
First, open the "Finder" app, navigate to Applications, and access the Utilities. After that, launch the QuickTime Player. Alternatively, you can employ the keyboard shortcut "Command + Space" to open Spotlight Search, type "QuickTime," and press "Enter" to launch it. Then, click "File" and click the "New Screen Recording."
Step 2: Enable Internal Microphone
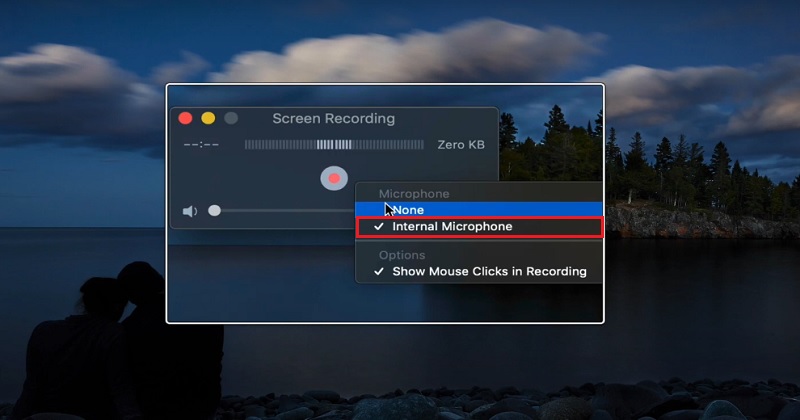
Before starting the recording, you can alter the recording settings by clicking the small arrow next to the record button in the screen recording window. Make sure that you have clicked on the "Internal Microphone" option to record the FaceTime call with audio. After that, you can proceed to the recording process.
Step 3: Start Recording FaceTime
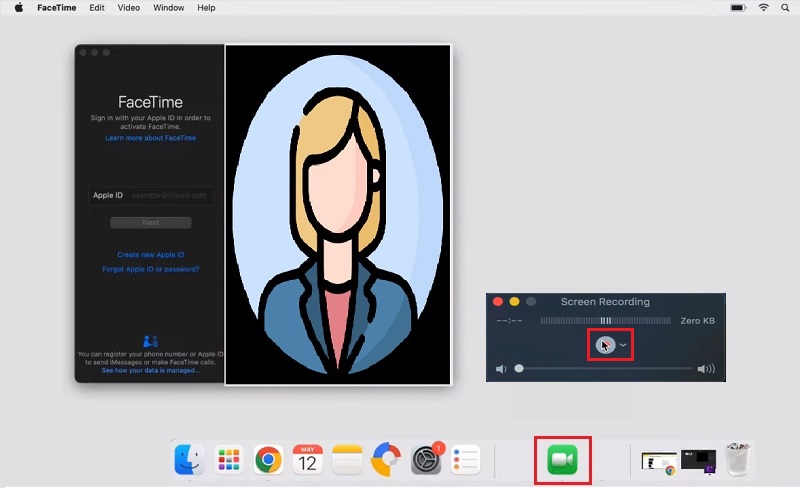
Launch the FaceTime application on your Mac and initiate a call as you would normally do. Then, click the "Record" button in the screen recording window to start capturing your screen. Afterward, to stop the recording, click the "Stop" button in the menu bar (it's a small red square). The recorded video will be kept in your Mac's "Document" folder. That's how to screen record FaceTime with sound on your macOS.
Reliable Screen Recorder for Recording FaceTime Calls
While the built-in screen recording tools on iOS and Mac devices provide a convenient way to capture FaceTime calls, third-party screen recording applications can offer more advanced features and functionality. One of the most reliable screen recorders you can use is the Aqua Demo. This tool can effectively capture video and audio from any application or window on your computer. Aside from recording FaceTime calls, it can also record Apple TV content and other activities on your screen. Moreover, you can save video recordings in high-quality, up to 4K resolution formats. It also supports annotating the footage with text, shapes, highlights, and more for a more informative result. Here are the methods on how to screen record with sound on FaceTime using Aqua Demo:
Step 1: Install Aqua Demo on your Device
First, you need to download and install the Aqua Demo, an app to record FaceTime calls on your Mac or PC. To do this, click the "Download" button above to acquire the installer package. Then, walk through the installation wizard to get it set up on your computer. After that, the screen recording app will launch on your device.
Step 2: Modify the Output Settings
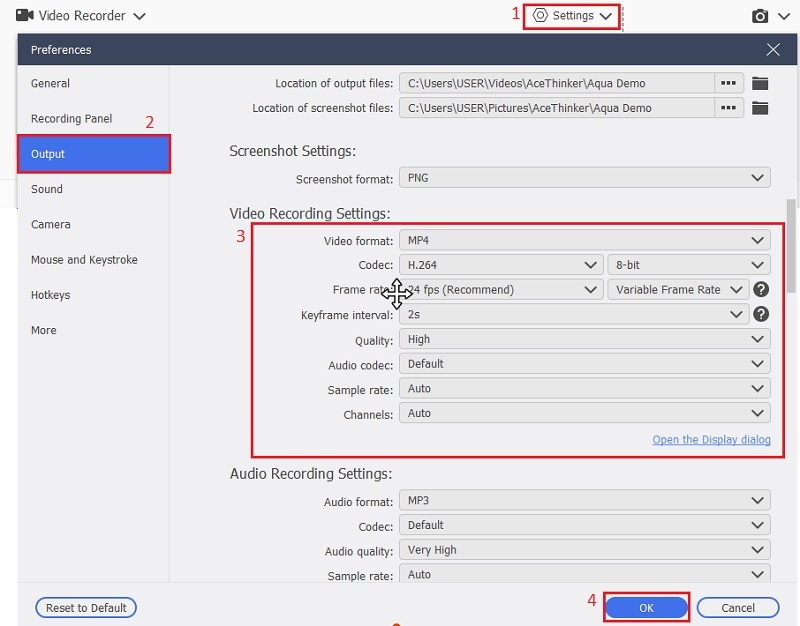
In the Aqua Demo's interface, navigate to the "Settings" at the top right corner. Then, click the "Output Settings" from the menu options. After that, the settings will open, and you can choose your preferred output format, frame rate, quality, and more. Save the changes by clicking the "OK" icon at the bottom of the settings.
Step 3: Initiate the FaceTime Call
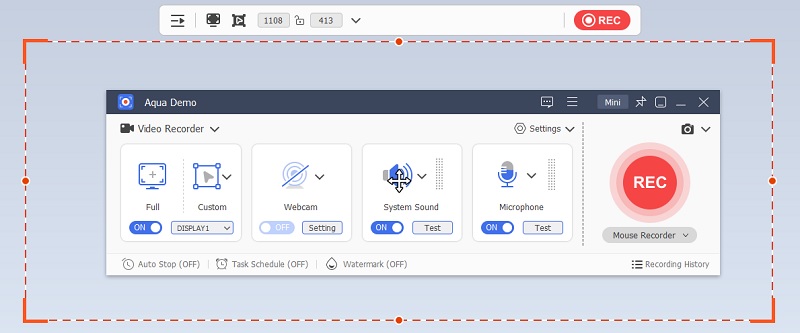
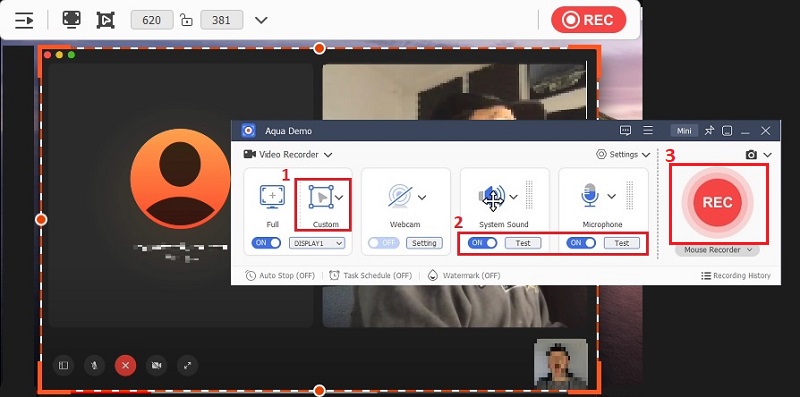
Access your FaceTime application, and start your call. Then, access the screen recorder and select the region for your FaceTime call. Turn on the system sound and microphone by toggling the slider button below each option. Next, hit the red "REC" button of the tool. This will commence the FaceTime recording.
Step 4: Stop and Review the FaceTime Recording
After the call has ended, click on the square "Stop" button on the screen recorder to end the video capture. Then, the "Recording History" will appear. Here, you can view the FaceTime recording by clicking the "Play" icon at the bottom of the history panel. That's how to record Facetime with audio on your Mac or PC using Aqua Demo.
Frequently Asked Questions
Is it legal to record FaceTime calls?
Laws regarding recording calls vary by jurisdiction. In many places, it's legal to record calls as long as one party (typically the person doing the recording) consents. Always check local laws and consider informing all parties involved before recording.

What are the benefits of recording FaceTime calls?
Recording FaceTime calls offers multiple benefits: it helps preserve important conversations, create tutorials or guides, and capture memories. Additionally, it provides a record of discussions for future reference, aiding in retaining valuable information exchanged during calls.

How can third-party tools enhance the recording experience?
Third-party screen recording tools often provide more advanced features such as customizable recording settings, editing capabilities, and easier sharing options. They can be particularly useful for users needing more control over their recordings.

Conclusion
This article covered various methods and tools for recording FaceTime calls on iOS and macOS devices. Explored built-in features like iOS screen recording and QuickTime Player on macOS. In addition, third-party applications, such as Aqua Demo for Mac, highlight their capabilities in capturing both screen activity and audio. However, before recording it's important to remember legal and ethical considerations: always acquire consent or permission from all parties before recording, and be aware of local laws governing call recording. By responsibly exploring these methods, you can effectively document conversations, create tutorials, or simply preserve memorable moments while respecting privacy and legal boundaries.


