In the world of gaming and content creation, OBS (Open Broadcaster Software) stands out as a versatile tool for recording gameplay. OBS is free, open-source software that allows gamers to capture and stream their gaming sessions easily. Its robust features make it popular among beginners and experienced gamers. One of the benefits of using OBS for game recording is its flexibility. It supports various platforms and allows customization of recording settings, ensuring high-quality video output tailored to your needs. Additionally, OBS offers advanced features like scene transitions, overlays, and audio mixing, which enhance the overall production value of your recordings. Whether you're streaming live on platforms like Twitch or recording gameplay for YouTube, OBS provides the tools necessary to showcase your gaming skills and engage with your audience effectively. In this article, we will teach you how to record game with OBS in detail.
| Solutions | Brief Information |
|---|---|
| Detailed Guide in Using OBS Studio | Step-by-step instructions on how to use OBS when recording gameplay Learn More |
| Troubleshooting Common Issues in Using OBS Recorder | Troubleshooting some common issues you might encounter when using OBS Learn More |
| Alternative Tool to Record Gameplay | Aqua Demo is the best recorder tool for any activity on your computer screen, including recording games Learn More |
| Frequently Asked Questions | FQAs that are commonly encountered about OBS Learn More |
| Wrapping Up | Final thoughts about recording games with OBS Learn More |
Detailed Guide in Using OBS Studio
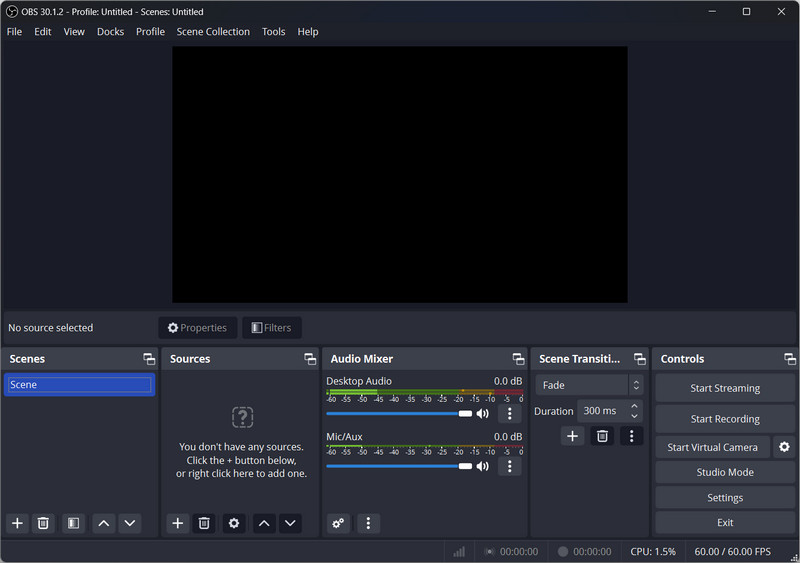
OBS Studio is a versatile open-source tool for capturing, encoding, and streaming video content. Its modular design allows you to customize recording and streaming workflows to meet your needs. Additionally, it offers a wide range of features and configuration options to optimize performance and quality. This includes support for hardware encoding, fine-tuning audio/video codec settings, and advanced scene composition. Apart from that, OBS supports numerous input sources, from webcams and game captures to browser-based content and media files. Moreover, when setting up OBS, it is crucial to get the right balance between video quality, system resource utilization, and file size. Considered one of the best streaming software available today, OBS gives both beginners and professionals the flexibility they need. In the following section, we will provide step-by-step instructions on how to record a game with OBS.
A. Downloading and Installing OBS
Before we proceed with how to use OBS to record gameplay, you must first download and install the software on your computer. First, go to the OBS Project website or click the link. Next, on the page, you will see three download options for Windows, Mac, and Linux. Choose one of them depending on your operating system to get its installer file.
Once the download is complete, open the installer file and follow the instructions to install OBS. This typically involves agreeing to the license terms and selecting the installation directory. After the installation is complete, OBS will automatically open.
B. Initial Configuration
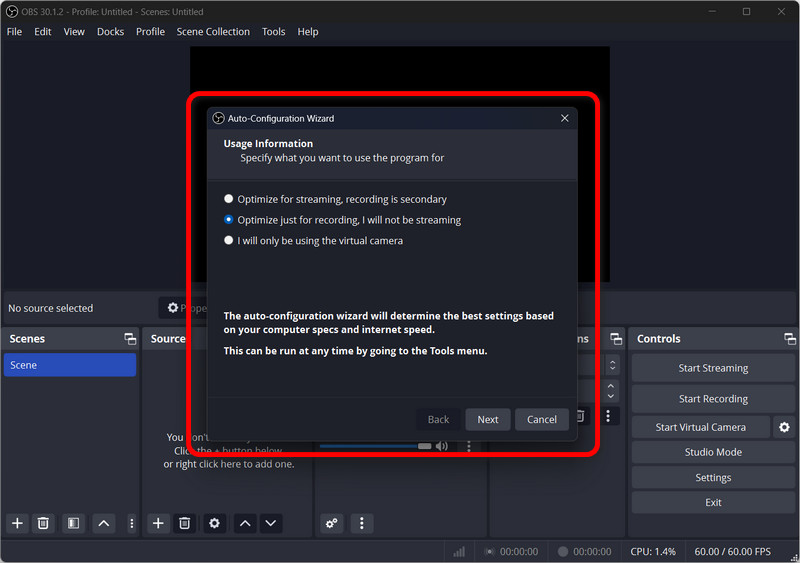
Auto-Configuration Wizard
After installing OBS, you will be prompted to run the Auto-Configuration Wizard when you first launch OBS. Choose to optimize for streaming, recording, or both. For game recording, select "Optimize just for recording; I will not be streaming." Next, OBS will automatically configure the initial settings, taking into account your system's capabilities.
Modify General Settings
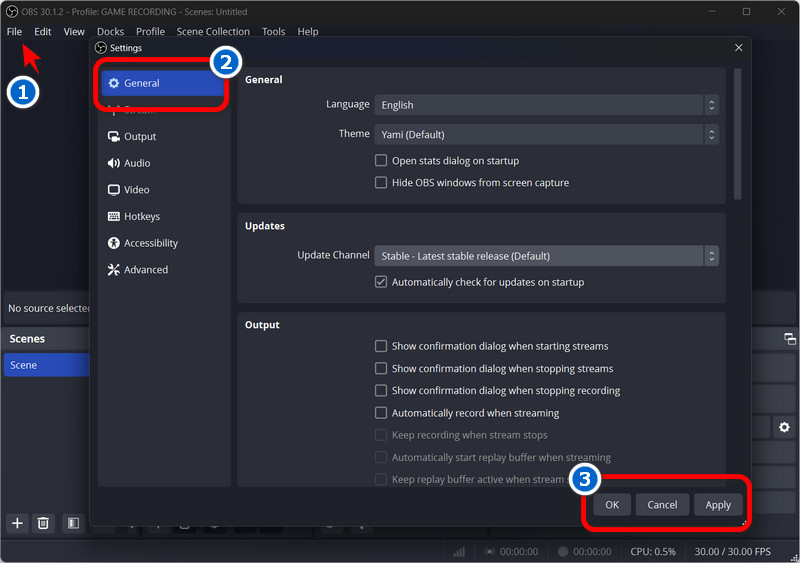
Afterward, if you want to change the theme or language of the OBS, you need to modify General Settings. Simply click the File tab and select Settings from the pop-up menu. Here, you can change the language, theme, preview, studio mode, and more. After that, click the "Apply" or "OK" button to save the changes.
C. Configuring OBS for Game Recording
After modifying the initial settings, we can set up OBS to capture a game. Here’s how to set up OBS for recording gameplay.
Adding a Game Capture Source
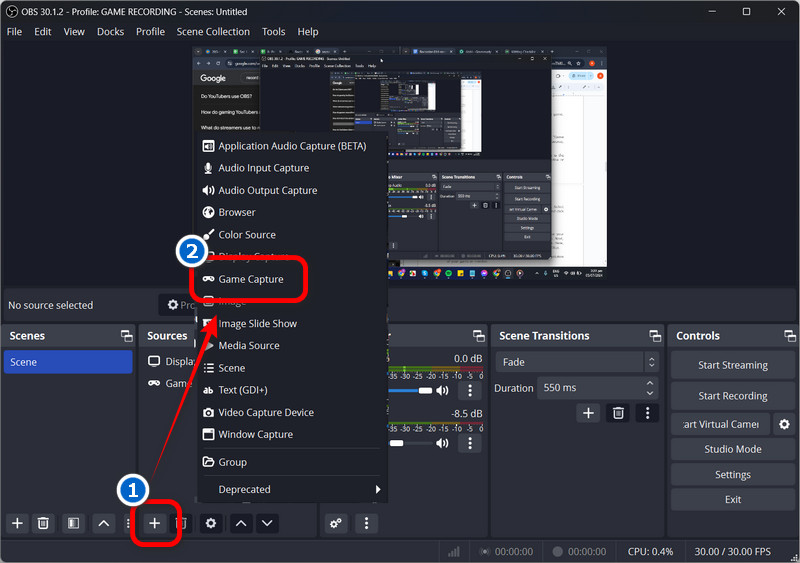
To add Game Capture to a Source, click the "+" icon and select "Game Capture" from the pop-up menu. Next, you can set a name for your source, like Game Capture or Game Recording, and click OK.
After that, another pop-up menu will appear on your screen; this is the Properties tab. From there, set the mode to Capture a specific window or Capture any full-screen application, depending on your preference. Select the game window you prefer to capture from the dropdown menu and click OK.
Configuring Video Settings
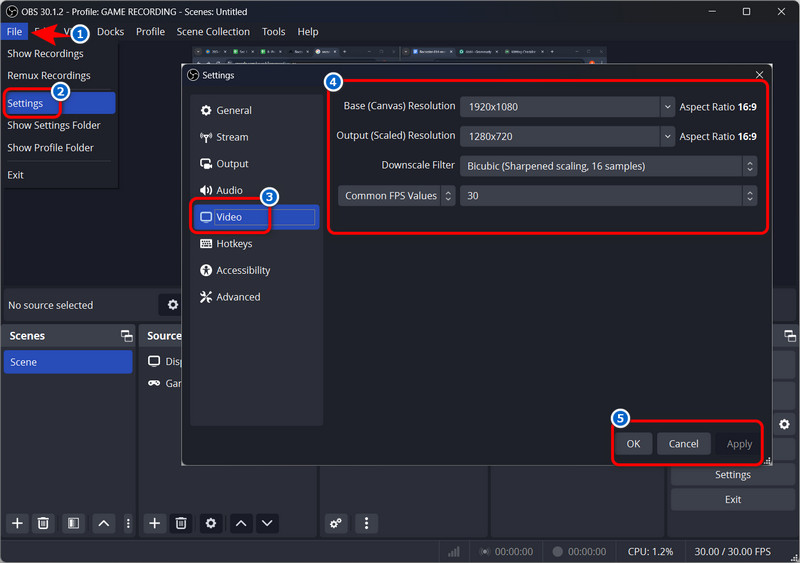
After adding a source, you'll need to configure the video settings for your recording. Navigate the File tab again and select the Settings option. Next, in the left-hand corner, click on the Video tab to see the video settings. Here, you can set the base and output resolutions, FPS, and the downscale filter.
- Base (Canvas) Resolution: This should match the native resolution of your game or monitor.
- Output (Scaled) Resolution: Depending on your hardware capabilities, choosing a lower resolution, like 1080p or 720p, is a responsible and considerate way to reduce the load on your system.
- Downscale Filter: This determines how the image is resampled when downscaling. Use the Lanczos filter if you want the best quality for your recordings.
- Common FPS Values: 30 fps or 60 fps are typical choices for game recording. Ensure the FPS matches your game's frame rate to avoid any logging.
Configuring Audio Settings
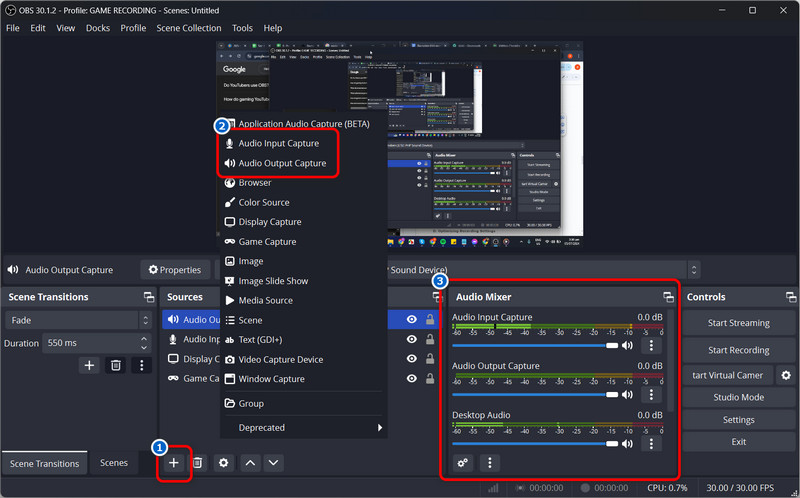
OBS has two Audio Source types - Desktop Audio and Mic/Auxiliary Audio. The Desktop Audio or Audio Output Capture can capture all sounds from your PC, including game audio, system sounds, and other media playing. At the same time, Mic/Auxiliary Audio or the Audio Input Capture can record the audio coming from your microphone or any other connected audio device. To add these audio sources, follow the steps below:
- Click the "+" button from the Sources panel and select Audio Input Capture from the list. This will prompt you to rename the new source. Once you've done that, click OK to proceed. Repeat the same process to add the Audio Output Capture.
- After adding the audio sources, go to the properties tab and select the "Device" option. Then, choose your audio input/output from the drop-down menu and click "OK" to confirm.
- Now, you can control the volume levels for each audio source from the Mixer panel. You can adjust their volumes or mute them if needed. Lastly, test your audio settings to ensure the game audio and microphone are properly captured.
D. Optimizing Recording Settings
Once you have all the sources set up, it's time to optimize the recording settings in OBS. Optimizing OBS recording settings is essential for achieving high-quality game recordings without overloading your computer. Also, you can ensure smooth performance and clear video output by fine-tuning a few key settings. This involves adjusting the output mode, selecting the right encoder, setting an appropriate bitrate, and choosing a CPU usage preset that balances quality and performance. Whether you're going to record League of Legend for your YouTube, or Twitch, or personal archives, these optimized settings will help you capture your gameplay in the best possible quality while keeping your system running efficiently. Follow these simple steps to get the most out of your OBS recordings.
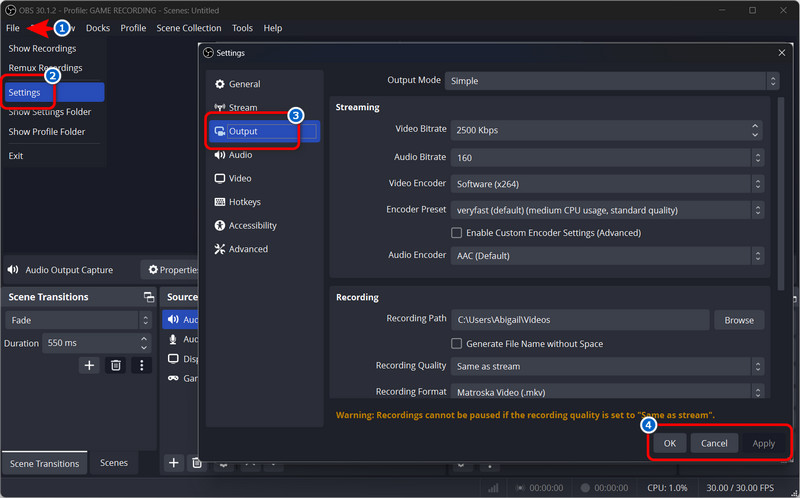
- First, go to the File tab and click the Settings option from the pop-up menu. Next, navigate to the Output tab and start optimizing the recording settings. Then, the first thing to consider is the Output Mode. Set it to Simple or Advanced, depending on your needs and system capabilities.
- Next, in the Streaming section, select x264 for CPU encoding or NVENC for GPU encoding. After that, set the video bitrate at around 10,000 Kbps and the audio bitrate at around 128 Kbps for a good balance of quality and file size. Then, select very fast for the CPU Usage Preset to balance quality and performance.
- After the streaming section, navigate to the Recording section, where you can set the recording path, format, and quality. Once satisfied, click the OK or Apply buttons to save the changes. Finally, you can proceed to record your gameplay.
E. How to Record Game Using OBS
When you are done setting up the sources and output settings, you can start recording the game footage using OBS. Here’s how to use OBS Studio to record gameplay.
Start Recording
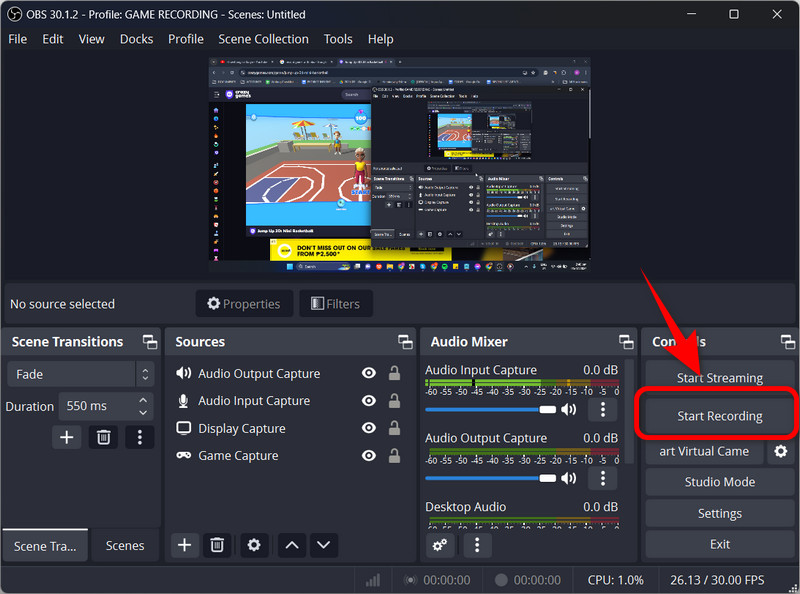
First, ensure the game you want to capture is open and ready. Next, click the Start Recording button in the Control tab to begin recording your game. Then, the recording will start immediately after you click the button. Now, navigate the game you want to record and start playing.
Stop Recording
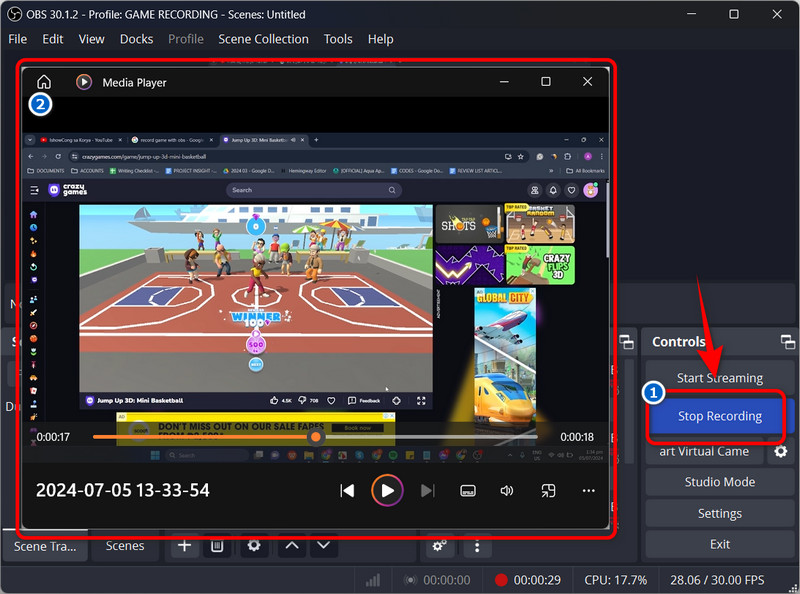
If you wish to stop the recording, simply click the Stop Recording button in the Control tab. This will stop capturing the gameplay and automatically save the recorded game on the designated folder you set earlier. Finally, you can preview the footage to ensure everything is recorded properly.
Troubleshooting Common Issues in Using OBS Recorder
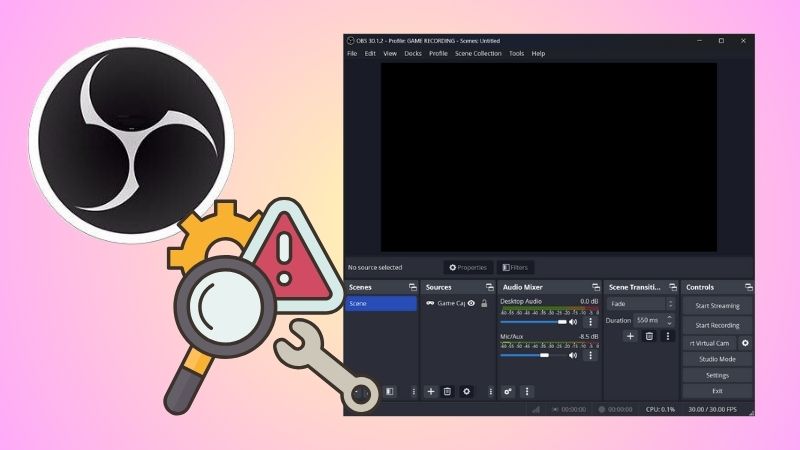
Using OBS (Open Broadcaster Software) for recording gameplay and live streaming offers great flexibility but can sometimes present technical challenges. In this section, we will help you fix common problems encountered while using this powerful open-source software.
1. Black Screen Issue
Recording with a black screen is one of the most encountered problems with OBS. This can be caused by various reasons, such as incorrect video capture settings, display driver issues, or incompatibilities between the game app/site and OBS. To troubleshoot this issue, first, ensure that the video capture source is correctly configured. You can check that the display, game, or other application you are trying to record is properly selected in the OBS Sources panel. Additionally, update your computer graphics card drivers to the latest version and the OBS software, as outdated drivers can sometimes lead to black screen problems. In some cases, disabling hardware acceleration in OBS or the game app itself may also help resolve the black screen issue. Alternatively, you can try to record with NVIDIA ShadowPlay, which is another reliable option for capturing gameplay without facing the same black screen errors.
2. Audio Sync Issues
Maintaining audio sync between your game/application and commentary is crucial for a seamless recording. OBS may sometimes struggle with keeping the audio perfectly in sync, leading to it drifting over time. This can be due to the system clock on your computer not being accurate enough. Also, this can be due to issues with the audio devices and drivers used for recording. To fix this problem, you can manually adjust the audio sync offset to align audio with video. Navigate to the audio mixer section, right-click on the audio source causing the issue, and select "Advanced Audio Properties." Here, adjust the "Sync Offset" value (+/- milliseconds) until the audio matches the video timeline. Additionally, ensure both are set to the same sample rate (e.g., 44.1kHz or 48kHz). You can adjust this in OBS under "Audio" settings.
3. Optimizing Performance for Smooth Recording
Ensuring high-quality and consistent recordings with OBS requires proper optimization. Especially if you are trying to capture high-resolution gameplay or stream at high bitrates. To achieve smooth recording, optimize OBS and your system settings. First, lower your game's graphics settings to reduce strain on your CPU and GPU. Also, Use OBS Studio's performance mode or adjust encoding settings (bitrate, encoder, etc.) for optimal performance. Close unnecessary background applications to free up system resources, ensuring OBS has ample processing power to capture high-quality video smoothly.
Alternative Tool to Record Gameplay
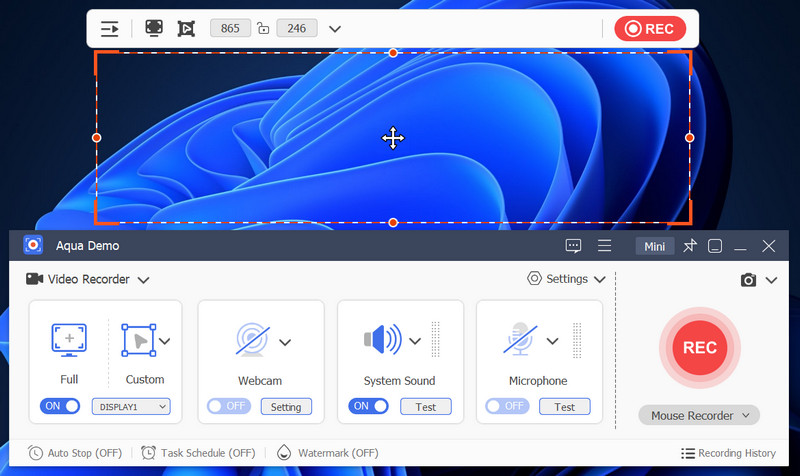
Since the OBS Studio has complicated navigation and needs time to learn how to use it effectively, some users prefer simpler screen recording applications. If you are one of those users, Aqua Demo is for you! Aqua Demo is a screen recording tool that can record any activity on your screen. It has a simple UI, perfect for beginners looking for an easy-to-use recorder. Additionally, it lets you customize the recording area depending on your preference. It can be recorded on full screen, in a specific window, or a selected area of your PC's screen. Aside from that, you can ensure that the quality of your recording is high, up to 4K resolution. Furthermore, it has a Task Scheduler feature, where you can set a specific time and duration to start and stop the recording, which the OBS doesn't have. To learn how to use this tool, follow the guide below.
Step 1. Download and Install the Aqua Demo
You need to download the installer file for the Aqua Demo before doing anything else. Click any download button presented above, depending on your operating system. After that, proceed to the installation process by opening the file you downloaded. Simply follow the prompts shown on your screen to install the tool successfully. The tool interface will launch automatically after installation.
Step 2. Configure the Settings
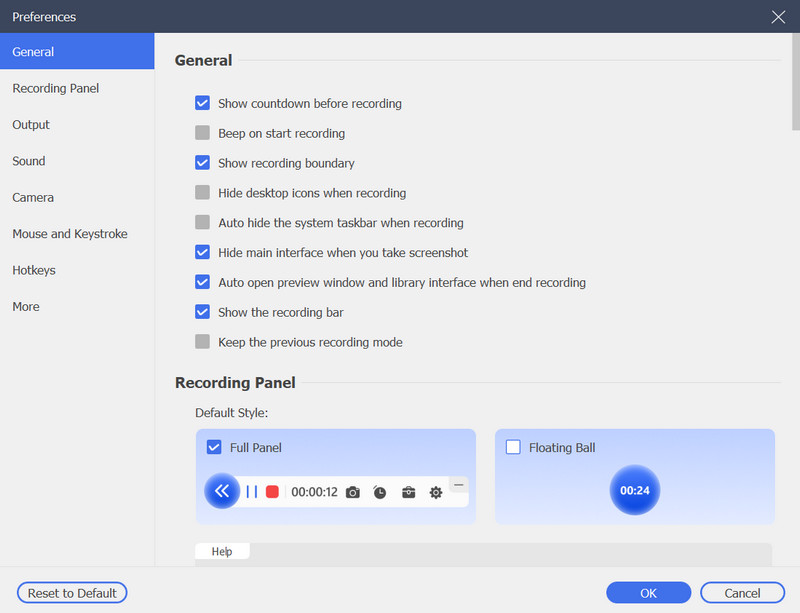
Next, switch on the Sound System and Microphone if you want to record your voice as well as the audio of the game. You can also turn on the webcam to record the game with your face. Aside from that, you can go to settings to customize the recording, output, mouse, and hotkey settings. Then, set the recording area to full screen.
Step 3. Start Recording Gameplay
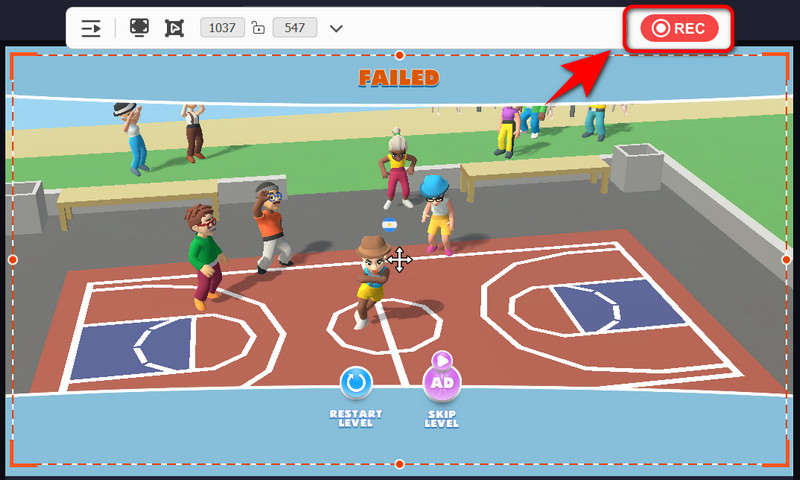
Once all setup, click the REC button and start playing with the game you want to play after the 3-second countdown. From there, you can use annotation tools such as drawing lines and shapes and adding text while recording. If the game is done and you wish to stop the recording process, simply click the Stop icon (small red box), and the preview panel will appear on your screen.
Step 4. Playback the Recorded Game
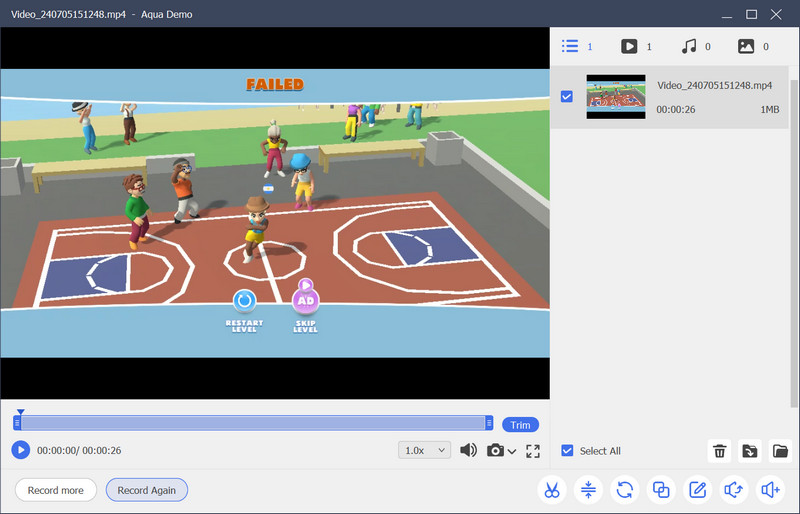
You can play the recorded game on the preview panel to see if there is no problem. Also, you don't need to save it manually since the recorded file is automatically saved in the output folder. Finally, you can locate it by clicking the small folder beside the recorded file to see the exact location of your files.
Frequently Asked Questions
Is OBS good for recording games?
OBS is generally considered good for recording games due to its flexibility, customization options, and ability to capture high-quality footage. Many gamers use OBS to record gameplay and create content for platforms like YouTube and Twitch.
Why can't I record the game on OBS?
There could be several reasons why you can't record games using OBS. It could be related to hardware compatibility, settings configuration, or conflicts with another software running on your system. Troubleshooting these issues and adjusting OBS settings may help resolve the problem.

Can I screen-record for 2 hours?
Yes, you can use OBS to screen record for two hours or even longer. As long as your system has sufficient storage space and resources, OBS is capable of capturing extended gameplay sessions and other screen activities without duration limitations. Ensure your system is optimized for extended recording sessions to avoid any potential technical issues.

Wrapping Up
In conclusion, recording games with OBS is a fantastic way to share your gameplay with others. Following the steps outlined in this post, such as configuring video and audio sources. By doing so, you can ensure that your recordings are of the highest quality. Feel free to experiment with different settings and fine-tune them to suit your preferences. Besides, every setup is different, so what works for others may not work for you. Keep exploring and refining your recording process to achieve the best results!


