Screen recording on Mac with audio is valuable for various purposes, such as creating tutorials, capturing gameplay, or recording webinars. The ability to record both the visual and audio elements of your screen activities provides a comprehensive means of communication and demonstration. When it comes to Mac, you have access to built-in options like QuickTime Player as well as third-party software solutions offering advanced features. In addition to capturing visual content, it's important to consider the capabilities for recording audio alongside the screen. This allows you to have a complete and immersive viewing experience. Furthermore, with the wide array of options available, you can select the most suitable screen recording tool for your specific recording needs. Whether for professional presentations or personal use, this article provides various tools to record screen on Mac with audio.
| Screen Recorders | Functions | Disadvantages |
|---|---|---|
| Use Screenshot Toolbar for macOS Mojave and Later | Quickly capture screenshots or record video of your Mac's screen and save the files to your computer. Read More | Limited to macOS Mojave and later versions only |
| QuickTime Player - Built-in Media Player | It is a default media player on Mac that can also be used to record the screen. Read More | You need to install a third-party app to capture the system audio |
| Best Reliable Screen Recorder - Aqua Demo | Provides a full-featured screen recording solution with both video and audio capturing capabilities as well as editing tools. Read More | It is a paid software, but it has a free version with limited features |
| Alternative Screen Recorder for Mac - ScreenFlow | A powerful screen recording and video editing tool with advanced features like annotations, green screen effects, etc. Read More | It has a steep learning curve and is more expensive than other options. |
| Frequently Asked Questions | FAQs that are usually asked about screen recorders for Mac Read More | |
| Wrapping Up | Last saying about recording screen with audio on Mac Read More |
Use Screenshot Toolbar for macOS Mojave and Later
Apple has introduced a new screenshot toolbar in macOS Mojave and later versions. This inbuilt tool provides a more convenient and intuitive way to capture screenshots and perform various editing tasks directly on the captured image. Additionally, this toolbar allows you to screen capture with audio Mac OS, which can be useful for some users who don’t want to install third-party screen recorder apps. Furthermore, it can also let you record and screenshot the entire screen or partial only. However, regarding its audio, this tool can only record audio from your microphone, not internal audio, limiting you to capturing system audio. Ultimately, you can see the user guide below this description that you can follow to learn how to use and access this screenshot toolbar.
User Guide:
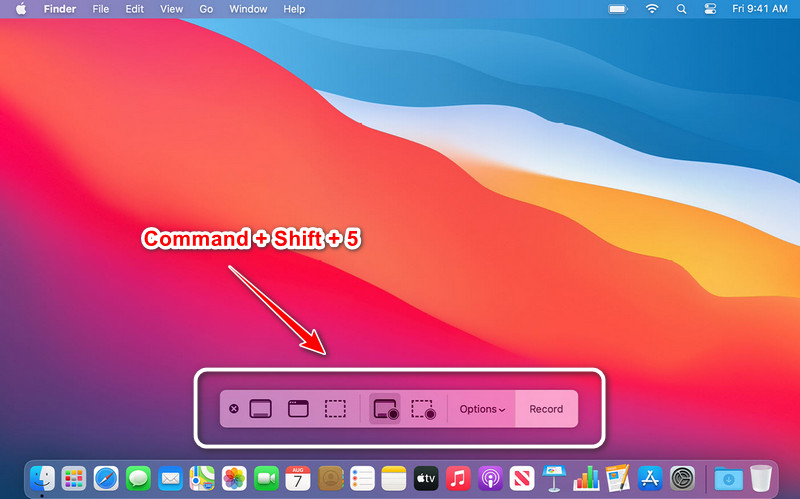
- To activate the screenshot toolbar on your Mac, press Command + Shift + 5 on your keyboard. This keyboard shortcut brings up the screenshot toolbar at the bottom of your screen. The toolbar includes options for capturing screenshots and recording your screen.
- Next, select a recording option you prefer. Click the Record Entire Screen button to record the whole computer screen; alternatively, select Record Selected Portion to capture a partial screen only.
- Afterward, if you are ready to capture your screen, simply click the Record button to start recording. While recording, the toolbar at the top of the screen will indicate that a recording is in progress. Then, tap the Stop button or press Command + Ctrl + Esc on your keyboard to stop the recording.
QuickTime Player - Built-in Media Player
QuickTime Player is a powerful and versatile media player developed by Apple Inc., a staple in the multimedia world for decades. But did you know that it can also screen record with audio on Mac activity? This feature is incredibly useful for recording any screen activity, such as the Screenshot toolbar. However, QuickTime Player can only record audio from your microphone. But, if you want to record system audio, you’ll need an additional application. For instance, you can install Soundflower, Black Hole, or Loopback to record internal audio on Mac. To learn how to use this tool for screen recording, let’s explore the process in detail.
User Guide:
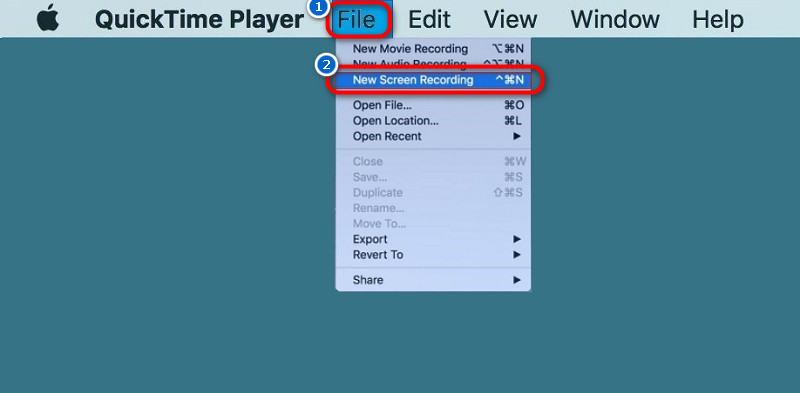
- First, open QuickTime Player on your Mac by searching for it on Spotlight or Launchpad. Next, on its main screen, navigate to the File tab and tap the New Screen Recording option. Then, a pop-up recording window will appear at the top or bottom of the screen.
- Next, click the Options menu on the control panel to customize your settings. Here, you can select the microphone to record the audio with your narration. Alternatively, choose the third-party app you installed to capture the internal audio. Afterward, pick your preferred recording mode, whether full screen or a selection.
- Once you're ready, click the Record button, and the recording will commence. To end the recording, click the Stop icon in the menu bar. Finally, QuickTime Player will automatically open the recording in a new window. You can review, edit, and record files from there before saving them.
Best Reliable Screen Recorder - Aqua Demo
Aqua Demo is one of the best software to record screen and audio Mac. Aside from its straightforward interface, you can ensure high-quality recordings using this tool. Also, the tool provides basic editing tools that you can use to enhance your work and annotate in real time. These include text, shapes, lines, mouse effects, and a highlighter. Furthermore, it supports multiple output formats such as MP4, WMV, AVI, etc., enabling you to share and play on various devices easily. Aside from that, the recorded video doesn't have a watermark or logo, giving you a professional and clean output. Moreover, you can also enjoy its additional features, such as Task Scheduler and screenshot capture. Below are the steps on how to stop a screen recording on Mac and save it for later viewing.
Step 1. Download the Aqua Demo Installer File
To begin with, you need to get the Aqua Demo’s installer file first. You can click the download button above for the Mac OS. Then, it will download automatically on your computer. Next, go to your files and navigate to the Downloads folder. From there, open the screen recorder's installer file and start the installation process.
Step 2. Configure Recorder Settings
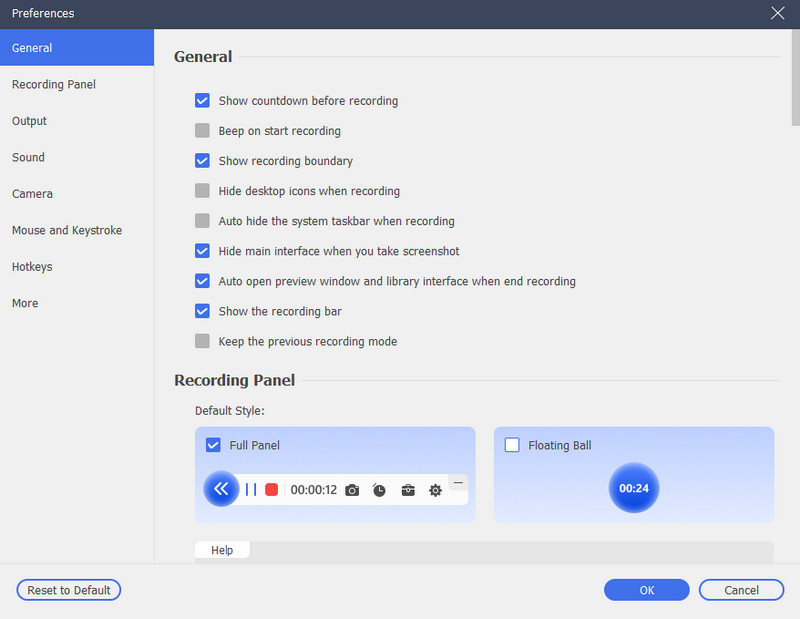
Once the installation is finished, the recorder will open automatically, and you will see its main UI. Next, you are allowed to customize the recording settings to your liking. Simply go to Settings and select Record Settings from the drop-down menu. On the pop-up screen, you can see various recorder settings and start modifying them to your choice.
Step 3. Start Screen Recording With Sound on Mac
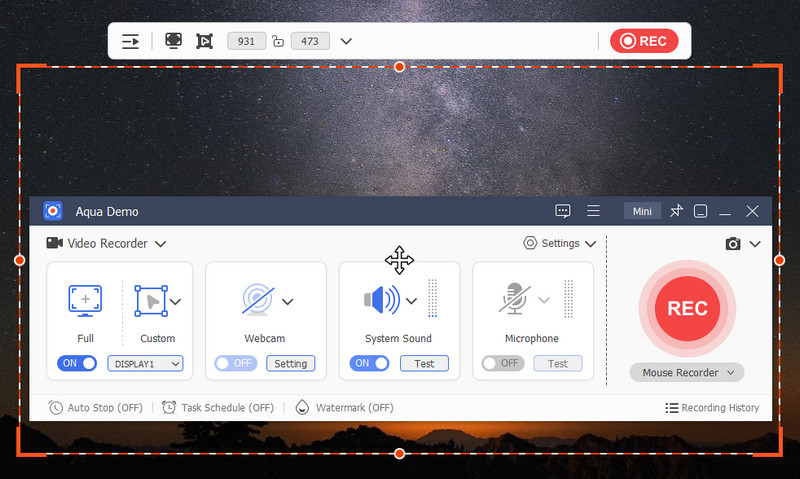
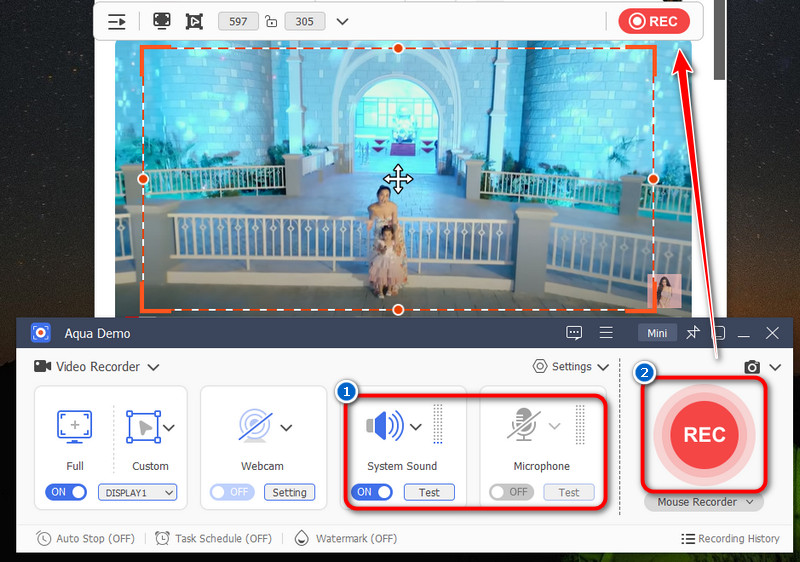
Go to the video, gameplay, or any activity you want to capture on your PC. Then, customize the recording area to fit on the activity screen. After that, turn on the System Sound and Microphone if you want to capture both. When you are ready, click the REC option, and there will be a 3-second countdown before starting recording.
Step 4. Playback and Trim the Video
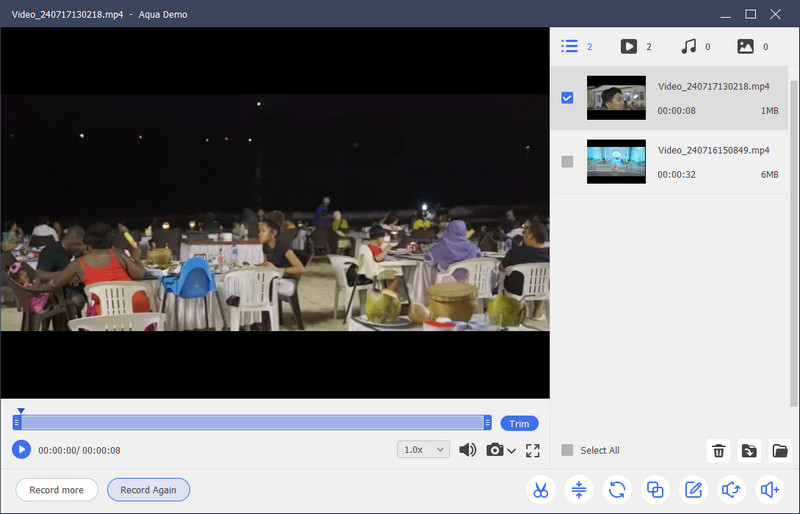
Once you want to stop recording, you can simply tap the Stop icon to stop the recording. A pop-up window with the recorded video will appear on your screen. From there, you can playback the recorded file and trim the unwanted parts you want. After that, you can locate the file in the output folder since the recorded file is automatically saved.
Alternative Screen Recorder for Mac - ScreenFlow
ScreenFlow is another screen recorder tool available on Mac that can record screen and audio Mac. It offers various features, making it popular among content creators, educators, and professionals. One of the key features of this tool is that you can record audio from your computer’s microphone, system audio (such as game audio or app sound), and even multiple audio sources simultaneously. Additionally, you can record MP4 video on Mac in high-quality screen and webcam footage up to 1080p. The software also provides robust editing capabilities, allowing you to trim, crop, add annotations, and apply some effects to the recorded video. Furthermore, the tool can also provide additional features such as recording directly on your iPhone devices, a built-in media library, and customizable output settings.
User Guide:
- The first step is downloading and installing the ScreenFlow tool. You can visit its main page or click the link above for easy access. From there, choose the download button for Mac and proceed with the installation process after downloading the installer file.
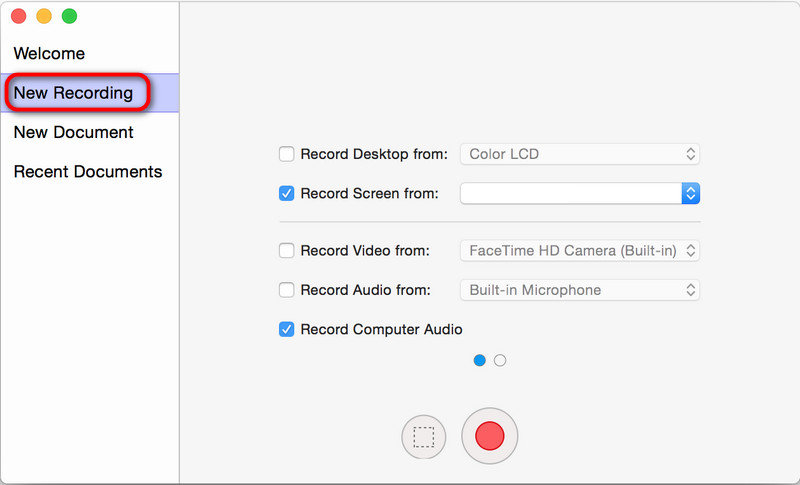
- Once installed, navigate to the New Recording option to see its recording settings. Then, start modifying them depending on your preferred choice. Next, set a recording mode and click the REC button to initiate the recording process.
- If you’re ready to stop the recording, simply tap the Stop button. The recording will then be imported to the editing window, where you can enhance it. Lastly, you can export the video in your desired format and output folder.
Frequently Asked Questions
Why can't I screen record with audio on Mac?
You may not be able to screen record with audio because the microphone or audio input settings on your Mac are not correctly configured. Ensure the microphone is selected in your screen recording options and check the System Preferences > Sound settings.

How do you record the screen using keyboard shortcuts?
On a Mac, you can activate the built-in screen recorder using keyboard shortcuts like Command + Shift + 5 to bring up the screen recording toolbar. Then, you can choose to record the whole or partial screen by clicking on the available options. Another way is to use QuickTime Player with Command + Control + N to start a new recording, choose your recording area, and click Record to start capturing.

Why is there no sound on my QuickTime screen recording?
If your QuickTime screen recording does not have sound, check if the correct microphone or audio source is selected before starting the recording. Additionally, ensure that your Mac's sound settings are configured correctly and that the microphone or audio input device connected to your computer is working properly.

Wrapping Up
Recording screen and sound on Mac can be achieved using various tools like QuickTime Player, built-in macOS feature, and third-party applications such as Aqua Demo and ScreenFlow. Each tool offers different capabilities, from capturing system audio to providing advanced editing features. Also, Selecting the right tool based on your specific recording needs is crucial, whether for professional presentations, tutorials, or personal use. Furthermore, it is also important to experiment with different tools to find the most suitable solution for creating high-quality recordings. By exploring these options, you can efficiently record screen and sound Mac, enhancing your ability to communicate and demonstrate effectively.


