The Snipping Tool is a useful screenshot tool built into Windows 11. It lets you capture specific parts of the screen, edit them, and save them quickly. Many people use it for work, school, or personal use. However, some users have noticed that the Snipping Tool is missing or not working on their Windows 11 devices. This can occur for various reasons, including system updates, software bugs, or accidental removal. It's a common issue, but luckily, there are easy ways to fix it. This guide will explain why the Windows 11 Snipping Tool missing and show you simple steps to bring it back. Whether you're a beginner or an experienced user, these solutions will help you quickly restore the Snipping Tool.
| Solutions | Brief Information |
|---|---|
| Why the Snipping Tool Might be Missing? | The disappearance of Snipping Tool in Windows 11 may be attributed to various factors. Learn More |
| Troubleshooting to Fix Snipping Tool Issue | A set of solutions to fix the Snipping Tool missing on Windows PC. Learn More |
| Alternative Solution to Snipping Tool | A computer program for Windows to capture still images. Learn More |
| Conclusion | The final thought about Windows Snipping tool issue. Learn More |
Why the Snipping Tool Might be Missing?
- System Updates: Windows 11 frequently undergoes updates to enhance functionality and security. Updates may inadvertently alter certain tools, such as the Snipping Tool. The disappearance of the Snipping Tool could be a consequence of recent updates.
- Bug in the OS: Users have reported instances of a bug within the operating system itself, specifically affecting the functionality to take screenshots on Windows of Snipping Tool. This issue may necessitate an update from Microsoft to fix the bug and restore the tool's proper operation.
- Corrupt System Files: The Snipping Tool's unavailability might stem from corrupted system files. If these critical files are compromised, it can impact the tool's execution. Running system file integrity checks and repairs may be essential to address this issue.
- Disorganized Settings: Certain settings related to the Snipping Tool, when misconfigured or disabled, can disrupt its normal functioning. Ensuring that relevant settings are appropriately configured is crucial for the tool's operation.

Troubleshooting to Fix Snipping Tool Issue
If your Snipping Tool is missing in your Windows 11 PC, don't worry—there are several ways to fix it. Below, we'll go through different troubleshooting steps to help you get the Snipping Tool back up and running.
1. Altering the Date of Windows 11
Suppose you are trying to screenshot Google Maps using the Snipping Tool and wonder why it is missing and how to get it back. In that case, the first solution to consider when resolving the missing Snipping Tool in Windows 11 is to adjust the date and time. Microsoft recommends this method because it is linked to the digital certificate owned by the Snipping Tool application. This certificate is valid until October 31, 2021, and serves as a form of authentication to ensure the app's integrity and security. Therefore, users are advised to change the system date. Doing so can bypass any limitations caused by the certificate's expiration, allowing the Snipping Tool to regain functionality. To adjust the date on your Windows 11, follow the instructions below.
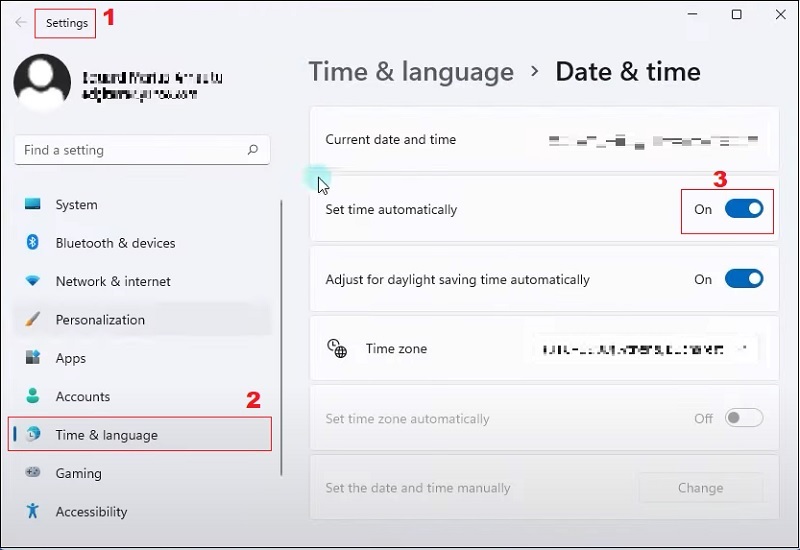
Step 1. Open Time & Language Settings
To initiate the process, start by accessing the Settings menu using the Windows key + I key combination. Next, navigate to the "Time & language" section in the left-hand navigation panel and opt for "Date and Time." Subsequently, turn off the 'Set time automatically' switch by toggling it to the off position.
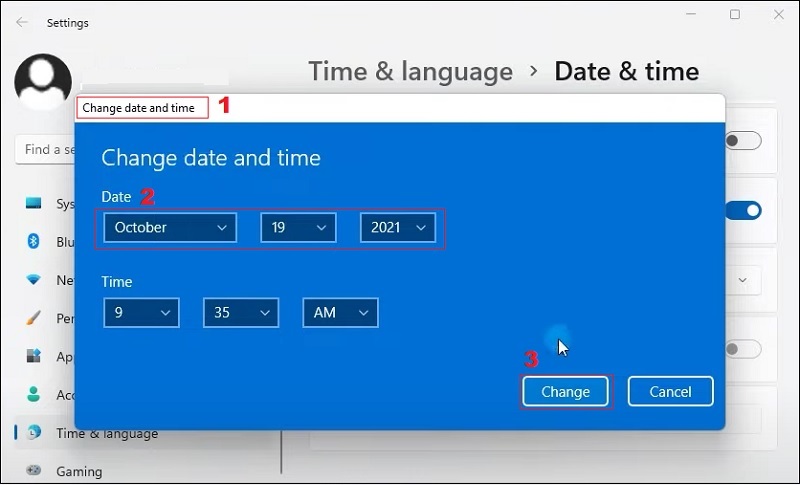
Step 2. Adjust the Date
Then, locate and select the "Change" button positioned next to the option 'Set the date and time manually. Now, set the time to a date before October 30, 2021. This date manipulation serves as a workaround to address issues related to the Snipping Tool on Windows 11.
2. Alter the Group Policy Settings
Addressing the Snipping Tool Windows 11 missing issue by modifying the policy settings is crucial for ensuring the seamless functionality of this tool. The availability and functionality of this tool are often influenced by specific policies set within the Windows operating system. That said, misconfiguration in these policies can inadvertently restrict or disable the Snipping Tool, causing it to appear as if it is missing from the user interface. To rectify this and restore the Snipping Tool's functionality, follow the provided steps.
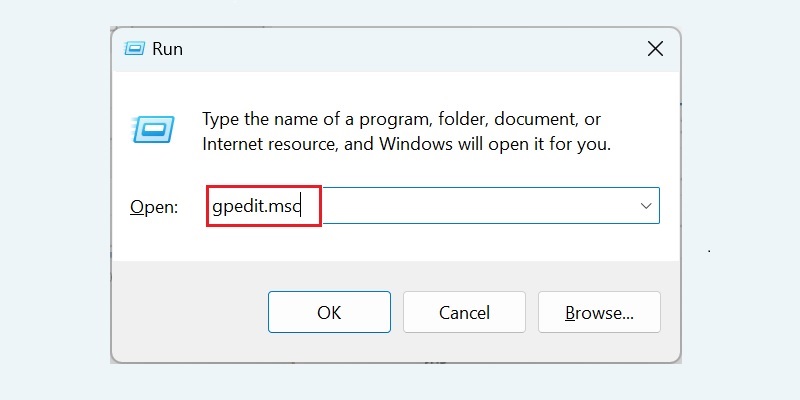
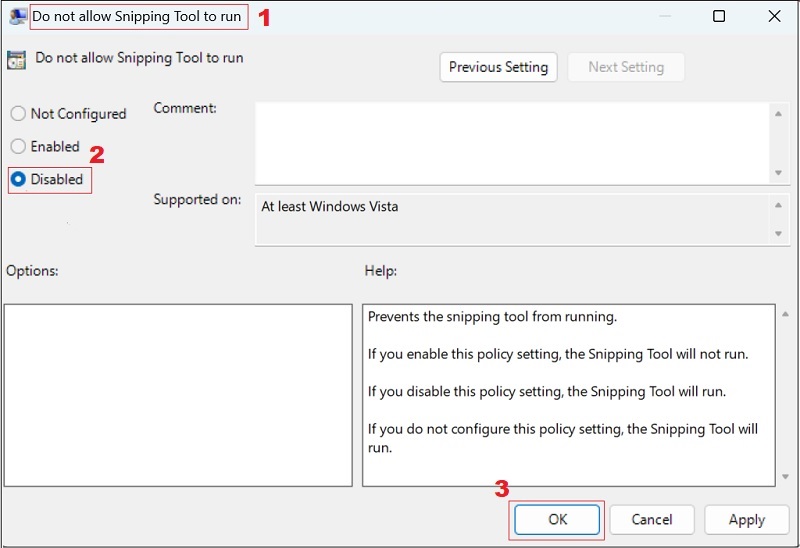
Step 1. Accessing the Group Policy Editor
Using your keyboard, press the "Windows+R" keys to initiate the Run dialog. Afterward, type the code "gpedit.msc" into the provided space and press the "Enter" key. This action will open the "Group Policy Editor."
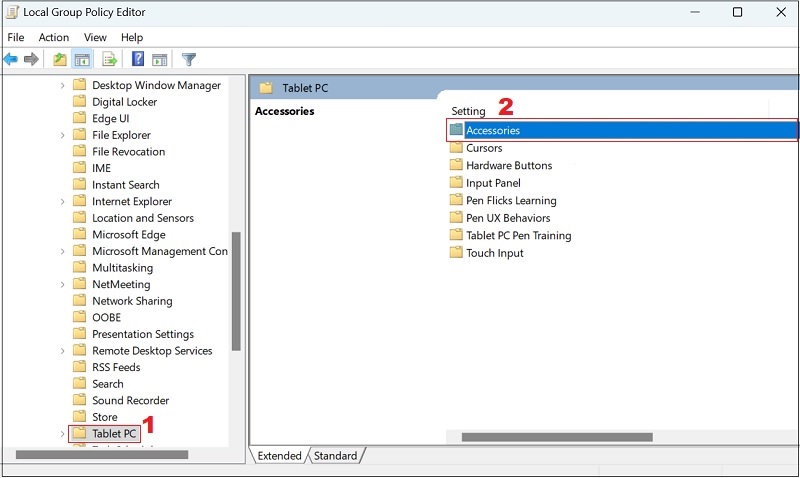
Step 2. Open Accessories
Within the Group Policy Editor, expand "Administrative Templates" located under the "User Configuration" option. Then, navigate further to Windows Components and select "Tablet PC" from the options presented. Within the "Tablet PC" section, locate and choose "Accessories."
Step 3. Configure the Policy
Once you have accessed the "Accessories," double-tap on the "Do not allow Snipping Tool to run" policy. This action opens the policy for configuration. Proceed by selecting "Disabled" from the available options at the top, and then click "OK" to confirm and save the changes to the policy.
3. Open Snipping Tool on Windows.old Folder
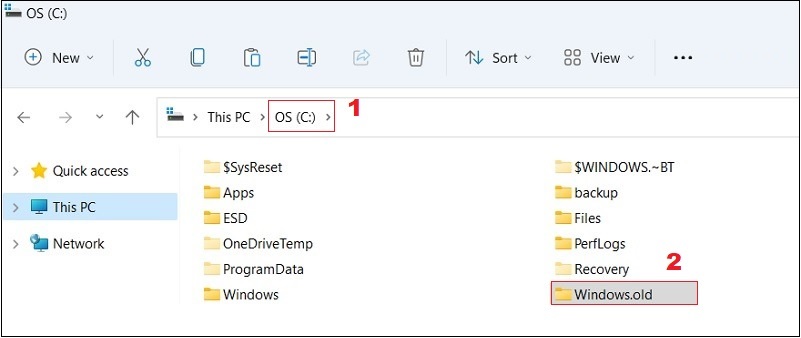
Suppose you've recently upgraded to Windows 11 and faced the issue of the missing Snipping Tool. In that case, there's a potential solution by accessing Windows.old folder. This folder is created during the system updates, preserving the previous operating system version. It acts as a backup repository, safeguarding files and applications, including older versions of essential tools like the Snipping Tool. Users can access this folder to retrieve and use the previous version of the Snipping Tool, thereby mitigating the issue of its absence in the upgraded system. Follow these steps to address the problem Windows 11 Snipping Tool missing.
Step 1. Open the Windows.old Folder
To begin this walkthrough, press the "Windows+E" command to open the "File Explorer." Then, navigate to the "C" drive or the local drive and locate the directory of "Windows.old."
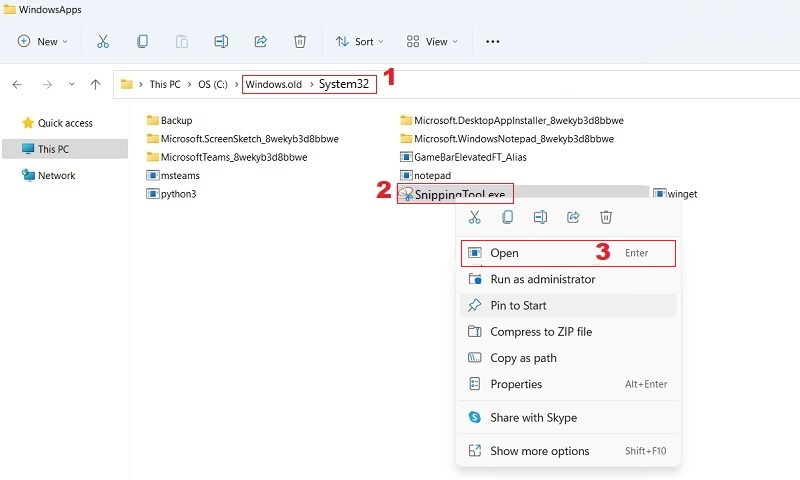
Step 2. Launch Snipping Tool
After that, search for "SnippingTool.exe" within the System32 folder. Then, launch the Snipping Tool program directly from this location.
4. Download the App on the Microsoft Store
Downloading the Snipping Tool directly from Microsoft for Windows 11 is a practical and advantageous solution if the tool is missing. This guarantees you can obtain the application from an official and reliable source. It also reduces the risk of downloading compromised or altered versions from third-party websites. In addition, it ensures that you are accessing the latest version of the tool, and it is tailored to be compatible with the specific requirements of Windows 11.
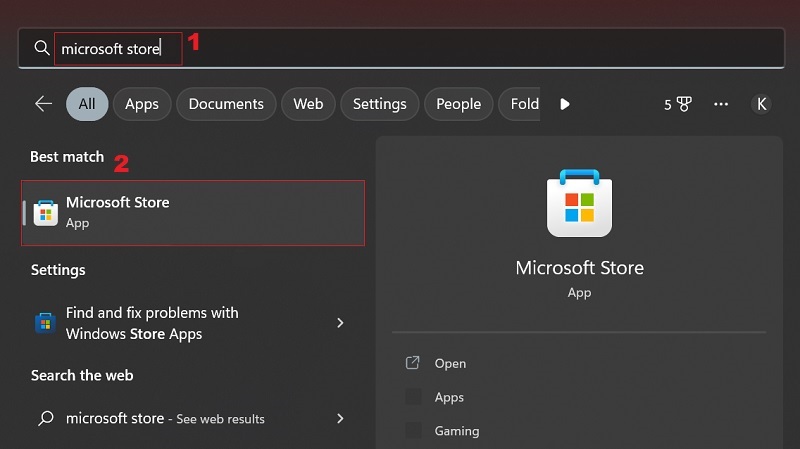
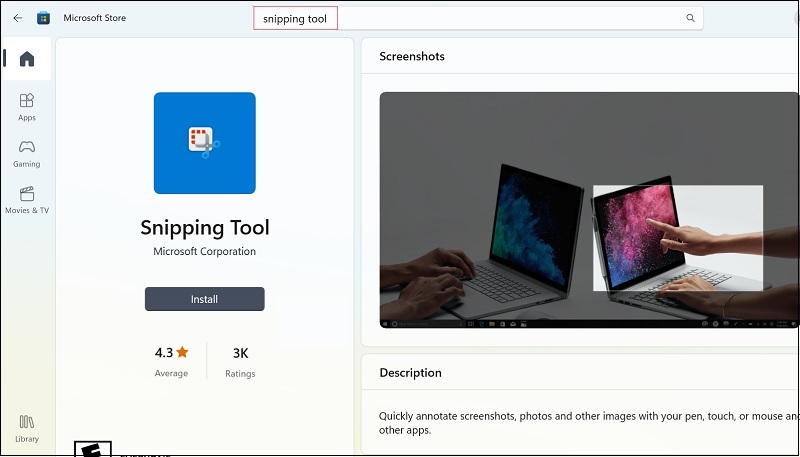
Step 1. Open Microsoft Store
Press the "Windows+S" keys to open the Search option. In the search bar, type "Microsoft Store" and select the relevant search result for Microsoft Store.
Step 2. Locate and Install the Snipping Tool
Within the Microsoft Store, utilize the search bar and type "Snipping Tool" and look for the search result. Then, tap on the "Install" option associated with the Snipping Tool. Once the installation is completed, launch the Snipping Tool.
5. Allow the Snipping Tool Run on the Background
Enabling the Snipping Tool to operate persistently in the background on Windows 11 goes beyond its inherent design, which primarily involves interactive usage initiated by the user. This method aims to minimize disruptions to your workflow by providing expedited entry points to the Snipping Tool. Suppose the tool is absent or missing due to the underlying system issues. In that case, you can consider the other troubleshooting solution steps outlined in this article.
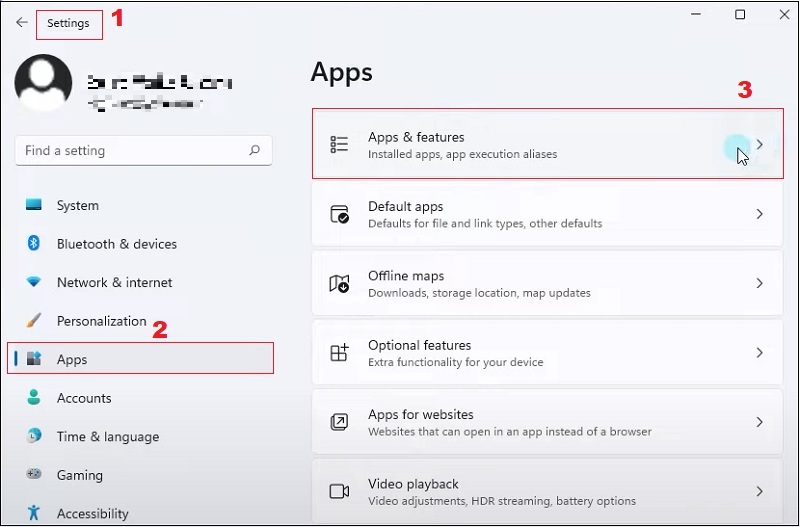
Step 1. Access App & Features on Windows 11
On your Windows 11, click the Windows icon or simply smash the Windows key on your keyboard. Then, go to "Settings" and access the "Apps" on the right panel of the menu. After that, hit "Apps & features."
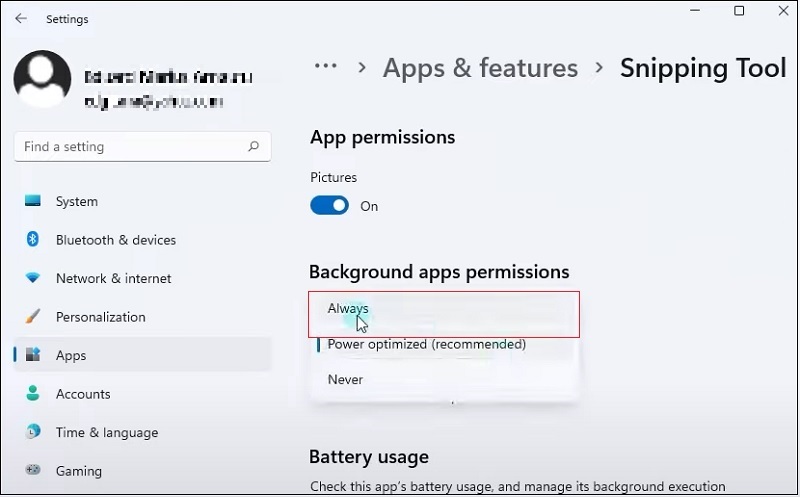
Step 2. Set the App Permission
Under the "Apps & features," scroll down and find the "Snipping Tool." Once you have accessed it, go to the "Background apps Permission" and click the drop-down menu. Then, hit the "Always" option to enable the Snipping Tool.
Alternative Solution to Snipping Tool
Suppose none of the above solutions works and the Snipping Tool is still missing from Windows 11. In that case, you can use a professional tool to capture or record your screen. Aqua Demo is one of the most flexible 1080P screen recorders you can use to record any activity on your Windows 11 system. This tool also supports macOS. With Aqua Demo, you can record a specific region, window, or the entire screen, allowing you to focus on your recording without distractions. Additionally, you can add annotations such as arrows, lines, shapes, and text to highlight important details. Users can overlay the webcam and include audio from the system or microphone, making videos more engaging. It also features a Task Scheduler, which allows recordings to start automatically at a specified time, setting it apart from other screen recorders.
Key Features:
- Aqua Demo produces high-definition recordings, making sure that your screen captures maintain clarity and details.
- It can record the system sound, microphone input, or both, allowing comprehensive audio customization to enhance the screen recordings.
- Besides, that, it supports multiple output formats for recorded videos, giving users flexibility in choosing the format that best suits their preferences. These formats include MP4, MOV, AVI, WMV, and more.
- Also, it has basic editing features, letting users trim, merge, and fast split any recorded video.
- The tool's "Game Recorder" uses advanced algorithms to ensure your gameplay will be recorded smoothly.

Conclusion
If the Snipping Tool is missing in Windows 11, several ways exist to restore it. You can change the date and time settings, modify Group Policy settings, and access the tool from Windows.old folder or download it from the Microsoft Store. Additionally, enabling background app permissions may also be helpful. If these methods do not work, the issue could be more complex, requiring further troubleshooting or professional assistance. Alternatively, you can use third-party screen capture tools, such as Aqua Demo, which offers advanced features for taking and editing screenshots. Therefore, by following these steps, you can restore the Snipping Tool or find a suitable replacement to continue capturing and sharing important information.