QuickTime is a great Mac tool that lets you capture video on your screen. It's perfect for recording tutorials, meetings, or any activity on your screen. Starting a recording is simple, but stopping it can sometimes be confusing, especially if you're new to Mac's shortcuts. Furthermore, knowing how to end a recording properly is important for saving your video and ensuring it doesn't keep running in the background, which could slow down your computer or fill up storage space. In this guide, we'll walk you through the quick steps to stop screen recording on Mac. These methods will help you end recordings easily and avoid common issues.
| Sections | Brief Information |
|---|---|
| 4 Quick Ways to End QuickTime Screen Recording | Four easy methods to stop the recording on Mac Learn More |
| Alternative Tool to Record Screen on Mac | Best screen recording tool alternative to QuickTime Player Learn More |
| Frequently Asked Questions | Questions and answers that are frequently asked about the methods Learn More |
| Conclusion | Recap of the solutions Learn More |
4 Quick Ways to End QuickTime Screen Recording
1. Stop the Recording Using the Stop Button
Suppose QuickTime Player is smoothly running while recording screen on Mac with audio. In that case, the simplest way to stop it is to use the Stop button. However, some QuickTime users don't know where the stop button is located. Here's how you can do it.
- First, launch the QuickTime Player on your Mac. Then, click the File tab and select New Screen Recording. The recording tab will appear on your screen. When you're ready to record, click the REC button or the red circle icon to start the recording process.
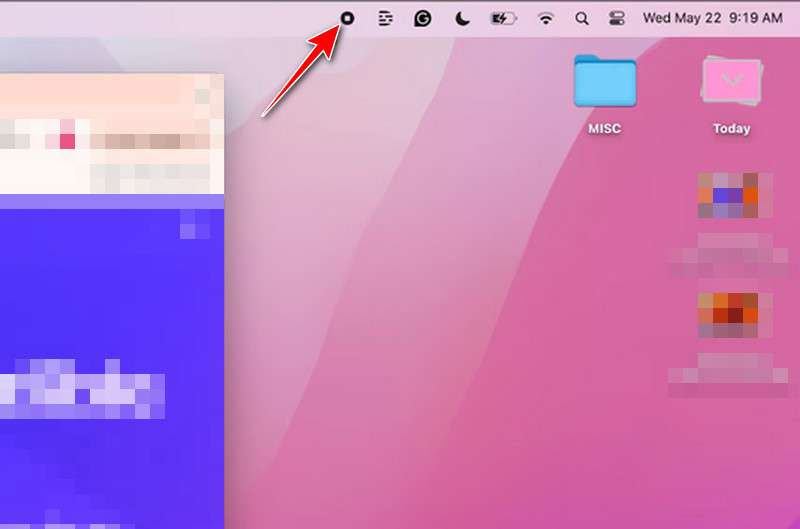
- Once you want to stop video recording Mac, look at the top right corner of your screen in the menu bar. Here, you will see a small circular square inside, which represents the stop button.
- Next, hit the stop icon, and the recording will stop. After clicking the stop button, QuickTime will prompt you to save the recording. Finally, choose a location and name for your file, then click Save.
2. End the Recording Using Keyboard Shortcuts
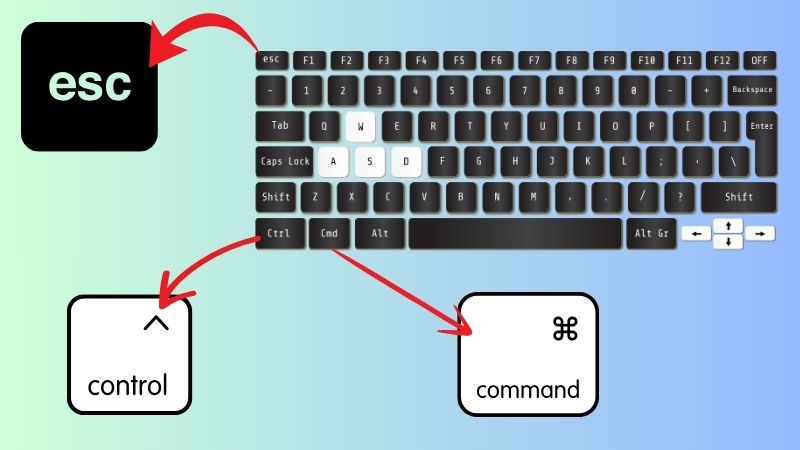
Another method to cancel screen recording Mac is to use a keyboard shortcut. QuickTime has built-in keyboard shortcuts that allow you to control the recording process. All you need to do is Press the Command + Control + Esc keys simultaneously on your keyboard. This will instantly stop the recording. Furthermore, this hot key works even if the QuickTime window is minimized or hidden behind other applications. Also, this is very useful if you can’t see the Stop icon in the menu bar.
3. Force Quit to End Screen Record Mac
Sometimes, there are QuickTime users who complain that QuickTime is occasionally unresponsive. This means that the stop button and the keyboard shortcut may not work as intended. In such cases, you can use the macOS Force Quit option to stop the recording. However, since this method involves force quitting QuickTime, your recording will not be saved. There are two ways to force quitting the app. Here’s how to do it:
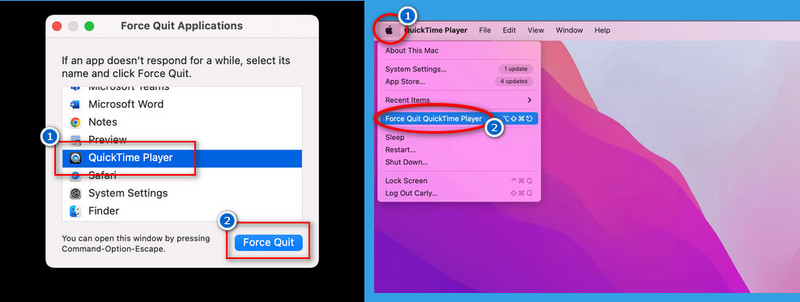
- First, press the Command + Option + Esc keys together to open the Force Quit window. Here, locate the QuickTime Player on the list of applications. Now, click to highlight it and hit the Force Quit button to stop the recording.
- On the other hand, you can also click the Apple logo at the upper-left corner of the screen and then choose the Force Quit option. Again, select QuickTime Player and hit the Force Quit button.
4. Stop Recording Mac Screen via Activity Monitor
If Windows computers have a Task Manager, Macs have the Activity Monitor to help you manage and close apps. The Activity Monitor gives a detailed view of all the running processes on your Mac, including QuickTime Player. This method is very useful if the app freezes unexpectedly and you can't stop the recording. However, like force-quitting the app, this won't save your recording. Follow the guide below to access the Activity Monitor.
Step 1. Open Activity Monitor
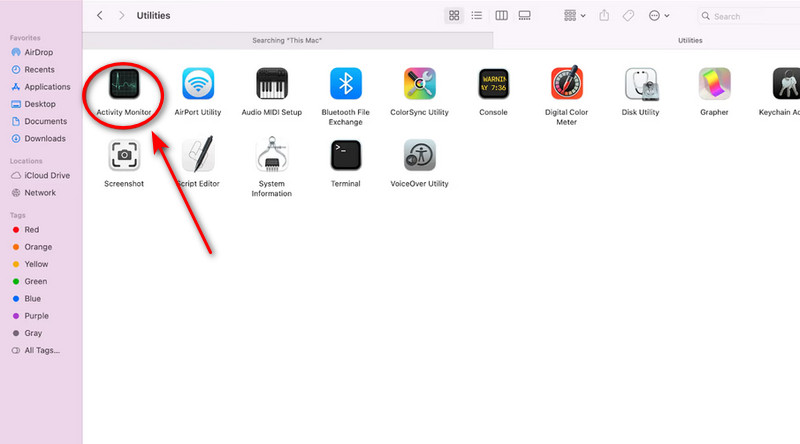
First, press Command + Space to open Spotlight search, then search for "Activity Monitor" and open it. Alternatively, go to Finder, then Applications > Utilities > Activity Monitor.
Step 2. Find QuickTime Player
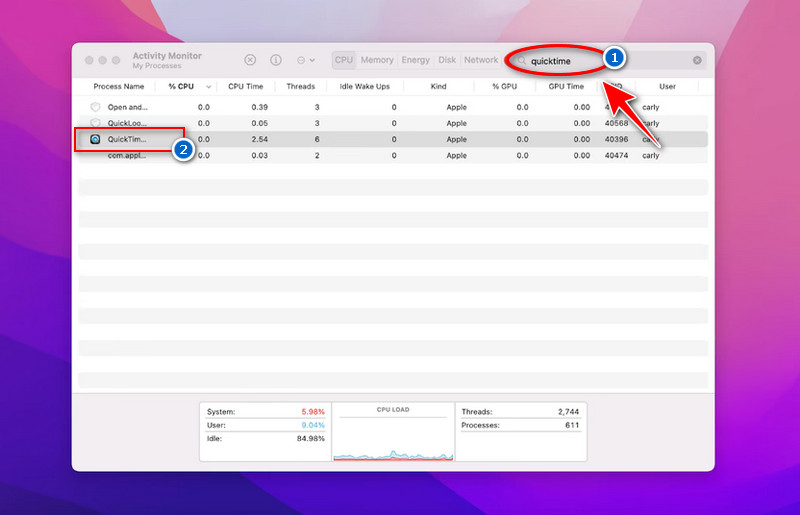
In Activity Monitor, locate "QuickTime Player" in the list of active processes. You can also type "QuickTime" in the search bar at the top right to find it quickly.
Step 3. Close QuickTime Player
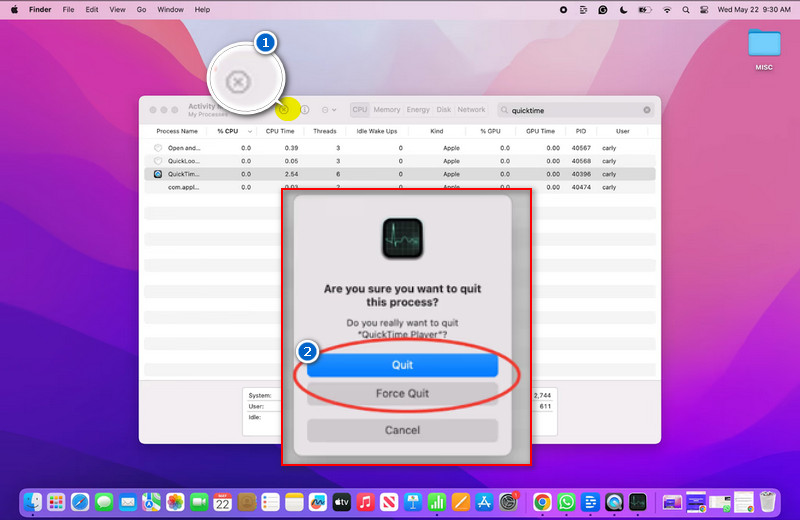
Once you locate the app, click on it and then click the "Quit Process" icon at the top of the window (it looks like an "X"). Lastly, choose "Force Quit" in the pop-up confirmation to stop the app immediately.
Quit an app or process in Activity Monitor on Mac.
You can use Activity Monitor to quit a process, even if it's in a loop or not responding.
Alternative Tool to Record Screen on Mac
If you think QuickTime Player is not the best screen recorder for your needs, there are other great alternatives available for Mac. One popular 1080P screen recorder option is the Aqua Demo, which offers more robust recording features than QuickTime, allowing you to record Mac gameplay. Aqua Demo provides high-quality recordings with up to 4K resolution in 60fps. This means that you can provide a clear and crisp recorded video. It also allows you to customize the recording area depending on your preference. Whether full screen, specific window, or partial screen, our tool has got you covered. Furthermore, one of the best features of Aqua Demo that our users love is that it is easy to navigate and beginner-friendly. This means you can start, pause, stop, and annotate your recordings more easily than QuickTime. Moreover, see the additional features that our tool offers below.
Additional Features:
- It provides basic editing tools such as cutting, trimming, and annotating.
- Aqua Demo also comes with a task scheduler that allows you to set a time and duration, so you don’t need to manually start and stop the recording.
- You can export the recordings on the preferred quality, such as MP4, WMV, AVI, and more.
- It also lets you simultaneously record the internal sound, microphone sound, screen, and webcam.
Step 1. Install Aqua Demo on Your Mac
First, you need to download the Aqua Demo on your Mac before starting recording. You can click the MacOS Download button above, and it will automatically download the installer file. Once downloaded, locate the file, open it, and follow the on-screen wizard prompts. After the installation, the tool will launch automatically.
Step 2. Modify the Recording Settings
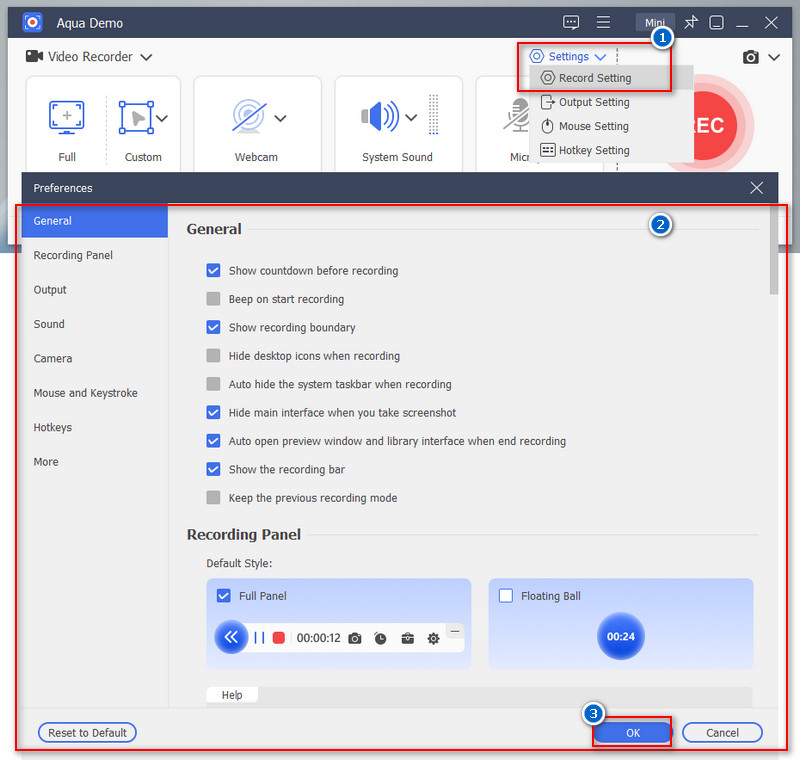
Now, start modifying the record settings depending on your preference. Simply click the Settings drop-down menu and select the Record Settings option. Here, you can customize the quality, resolution, frame rate, audio settings, directory settings, and more. After that, don't forget to click the OK button to save the changes.
Step 3. Start Recording
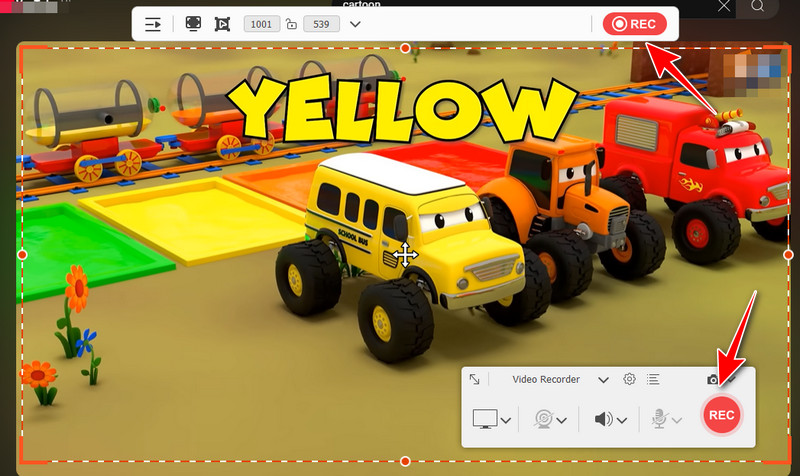
The next step is to set up the recording area. You can select full screen or custom, depending on your preference. Once you're all set, start recording the activity on your Mac screen by clicking the REC button. While recording, you can annotate the screen, add shapes and lines, highlight key points, and more.
Step 4. Stop the Recording
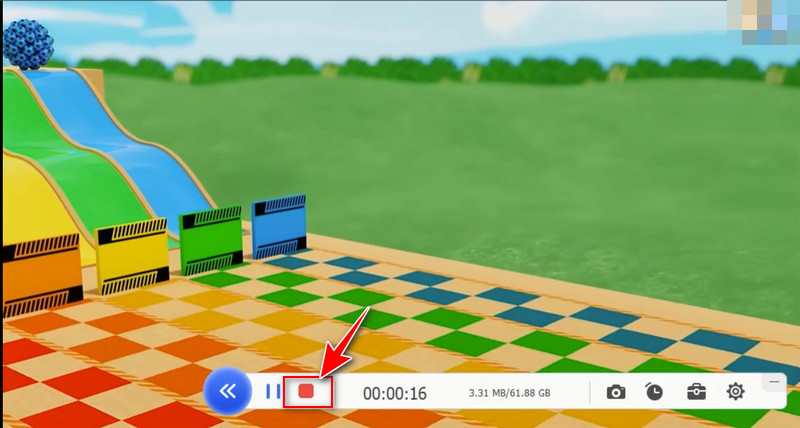
Once you want to stop the recording, you can simply tap the red box (represented as a stop button) on the recording panel. Then, another window will appear on your screen with the recorded video. Here, you can preview and edit the recorded activity on your Mac screen before saving.
Frequently Asked Questions
Why can't I find the stop button in the menu bar?
If the stop button isn't visible, check if QuickTime is actively recording. Also, ensure you're in screen-recording mode, as other modes may have different controls.

Will it force quitting QuickTime to save my screen recording?
No, force-quitting the QuickTime Player will not save your screen recording. This is because the recording is not correctly stopped and saved before the app is force-quit. To end the recording safely, use the stop button or keyboard shortcuts.

What if QuickTime freezes and won't stop recording?
If QuickTime becomes unresponsive, open Force Quit (Command + Option + Esc) to force quit QuickTime. You can also use Activity Monitor to quit QuickTime Player.

Conclusion
Stopping a screen recording on a Mac is simple once you know the different methods. You can quickly end a recording using the Stop Button in the menu bar or a Keyboard Shortcut like Command + Control + Esc. If QuickTime freezes, close it with Force Quit or Activity Monitor, but it doesn't save the recording. Furthermore, the Aqua Demo is also a great option for exploring smoother recording management. Moreover, mastering these methods to stop QuickTime Player screen recording helps you save your work easily and prevents performance issues by avoiding background recordings. Knowing how to manage screen recording tools properly gives you more control. It makes capturing your screen a hassle-free experience.
Recap of the solutions
| Stop Button | 100% Effective | Quick, straightforward, and always works. |
| Keyboard Shortcuts | 85% Effective | Convenient and reliable but may not work if QuickTime freezes or becomes unresponsive. |
| Force Quit | 55% Effective | Useful if QuickTime freezes; however, recordings are often lost, making it less effective for saving work. |
| Activity Monitor | 60% Effective | Effective for closing unresponsive QuickTime sessions but similar to Force Quit, it doesn’t save the recording. |
| Aqua Demo | 100% Effective | Easy to use, stable and feature-rich |


