Have you ever come across a Facebook Story that was so funny you couldn't stop thinking about it? Facebook Stories, short, temporary updates that disappear after 24 hours, are a big part of social media. But keeping memories is the best thing to do. Facebook Stories are a new way to share experiences, more personal and spontaneous than regular posts. You can share anything from funny stories to behind-the-scenes moments. They also include features like polls and questions; you can add filters, stickers, and text to make them more fun. The fact that they disappear after 24 hours makes them more exclusive and engaging. However, since they're temporary, how can you ensure you keep the ones you want to remember? The answer is screen recording. This article will show you how to screen record Facebook story. Different ways how to preserve these important Facebook stories for everyone.
| Sections | Brief Information |
|---|---|
| Record Facebook Story using Built-in iOS/Android Recorder | Detailed guide in screen recording Facebook story from your mobile devices.Read More |
| Capture Facebook Story with Aqua Demo on Mac/Windows | Step-by-step process on how you can save important stories in your Windows or Mac.Read More |
| Screen Capture Facebook Story with OBS Studio for Free | Another tool for free that you can utilize in Facebook Story recording. Read More |
| Tips for Quality Screen Recording | Additional note you can follow to achieve the best quality of recordings. Read More |
| Conclusion | The summary and some tips about recording Facebook story contents. Read More |
Record Facebook Story using Built-in iOS/Android Recorder
While numerous third-party apps are available for screen recording, why not make the most of the tools you already own? This section reveals the untapped potential of your smartphone, showing you how to utilize the built-in screen recording features on iOS and Android devices without downloading any additional apps. We'll explore the user-friendly screen recording tools pre-installed on iPhones and iPads. You can capture any Facebook Story that catches your eye with just a few simple steps. Then, we'll guide you through the screen recording functionalities available on various Android devices. Although the specific methods may vary slightly depending on your device model, you'll be pleasantly surprised by how easy and accessible the process is. By following the steps in this section, you'll be an expert at capturing those elusive Facebook Stories, all without the hassle of downloading any extra apps.
Step-by-Step Guide Using iPhone
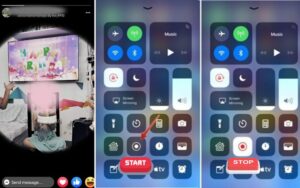
- Before you use the Facebook app, ensure screen recording is enabled on your iPhone. Go to Settings and then Control Center. Find Screen Recording and tap the "+" icon to add it to your Control Center. After that, go to the Facebook story you want to record.
- Swipe up from the bottom (iPhone 8 and earlier) to access your Control Center. Locate the screen recording icon (it looks like a circle with a dot inside) in your Control Center. Tap and hold this icon for a few seconds.
- After that, a countdown will appear on your screen. Once the countdown finishes, your iPhone will begin recording everything on your screen. If you want to end the recording, just click the red circle.
Step-by-Step Guide Using Android
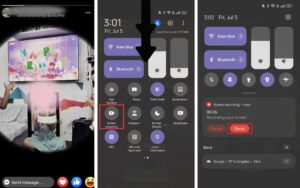
- Open your Facebook application from your Home Screen. Find the story you want to preserve and play it while setting the recorder. Swipe down twice from the top of your screen to open the Quick Settings panel.
- Locate the Screen Recorder icon and tap it. If you don't see it readily available, swipe on the Quick Settings panel to reveal more options. Once you see the icon with the video camera with a circle in the middle, tap on it, and it will start a countdown.
- Now, go back to the Facebook app and replay the story to record the full content. Once you're done, swipe down to the notification cabinet again. You will see the recording and click Done to stop finally.
Capture Facebook Story with Aqua Demo on Mac/Windows
While the built-in screen recording feature is impressive, there are times when you crave greater power and versatility. Aqua Demo is an advanced screen recording tool for both Mac and Windows that enhances your experience when capturing Facebook Stories. This software offers more than just a standard screen capture, making it a good option if you also want to record Instagram Live with higher flexibility. It features a variety of capabilities that enable precise and creative recordings. Area recording allows you to capture only the specific part of your screen that appears in your Facebook Story, cutting out any unnecessary background elements. It’s also ideal for capturing stories from busy friends or only available at certain times. It lets you set it to record a Facebook Story automatically at your chosen moment. It is also easy to merge your webcam footage, adding a personal touch to your stories. It allows you to trim recordings, add annotations, and even blur sensitive information, making your editing possibilities endless.
Step 1. Setting Up the Capture Area
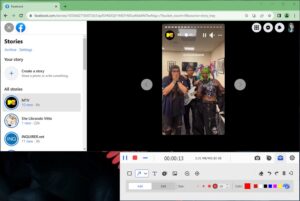
Launch the Aqua Demo and familiarize yourself with the interface. Locate the "Record Area" selection tool. This might be a square or rectangular icon; you can choose a full or custom screen. Open the Facebook app and navigate to the story you want to capture.
Step 2. Start the Recording
On your desktop screen, use the "Record Area" tool to drag and select only the portion that displays the Facebook Story. After that, click the Record button to start the recording and wait for it to finish. You can also edit it while recording, adding text, shapes, etc.
Step 3. Stop and Save the Recording
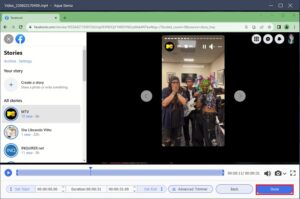
Once you're happy capturing the most stories, hit the Done button in Aqua Demo. The program will show a playback prompt for you to save the recording. Choose a descriptive filename and location on your computer to access it later.
Screen Capture Facebook Story with OBS Studio for Free
OBS Studio stands as the premier, free, and versatile leader in video capture and streaming software! This tool offers an exceptional alternative, particularly for individuals seeking greater control and customization options. You have the ability to embed graphics, overlays, and transitions, elevating your storytelling. It can seamlessly merge screen recordings with webcam footage, enhancing the interactive experience. Allow yourself complete control over when to start and stop recordings, ensuring precise timing for your narrative. Additionally, choose your preferred video editing software to refine your captured footage before uploading. However, it's crucial to recognize that OBS Studio presents a steeper learning curve compared to Facebook's native recording tools. Consider your technical proficiency and the complexity of the story you aim to tell before embarking on this journey.
- Download and Install OBS Studio from the official website of OBS Studio . Decide on the content and the flow you want to record. After that, find the story in you Facebook you want to preserve.
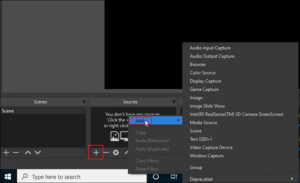
- To set up your scene, utilize the Auto-Configuration Wizard. Head to Tools, then select the Auto-Configuration Wizard option. Following that, choose the second option for recording a Facebook story. Next, adjust the video settings, and finally, save the settings.
- Navigate to the Settings and Recording section, and specify the directory where you want to save your recording. Open your Facebook page and choose the story you wish to record. Return to the OBS studio and press the start recording button. Once your recording is finished, hit the stop recording button. You can then return to the previously selected directory to review your recording. At this point, you have the ability to trim and edit your recording as needed.
Tips for Quality Screen Recording
- Steady Connection is Key: A stable internet connection is crucial. Buffering or lag during recording creates a poor viewing experience. Consider waiting for a stronger connection before recording if your internet is shaky.
- Calibrate Brightness and Volume: When you record video on your PC find the right balance for screen brightness and audio volume. A too-bright screen can be harsh, while a dim one makes details hard to see. Similarly, ensure the audio volume is clear and audible without being overpowering.
- Silence Those Notifications: Notifications popping up during recording disrupt the flow and can be visually distracting. To maintain a clean presentation, silence notifications on your phone or computer before recording.
Conclusion
While Facebook provides a built-in recording feature, OBS Studio allows you to craft unique and polished narratives. It's important to note that planning your content and preparing your visuals in advance can streamline the process. To achieve flawless recordings, ensure you have a strong internet connection, adjust your screen brightness and audio levels, and turn off notifications. Always obtain permission before using content that has been downloaded, and respect copyright laws. Avoid recording private information or content that belongs to others. Adhering to these guidelines and recording responsibly can create engaging Facebook stories that captivate your audience.


