Instagram is a popular social media platform where people share their posts, photos, videos, and stories. One of its exciting features is Instagram Live, which lets users broadcast live videos to their followers in real-time. This feature is often used for sharing events, tutorials, Q&A sessions, or casual chats. However, Instagram Live videos disappear after 24 hours unless saved or shared by the host. Many users wish to record live videos to rewatch them, keep valuable content, or share it later. Unfortunately, Instagram doesn't offer a built-in option to record other people's live videos. This article will guide you on how to record Instagram Live videos on various devices, whether you're using a smartphone or a computer. Following these simple steps lets you stay updated on important moments from your favorite creators or live events.
| Sections | Best For | Setup Difficulty |
|---|---|---|
| How to Record a Live Stream on Instagram - Windows/Mac | Users who need advanced features or frequent recordings Learn More | Easy |
| Record Instagram Live Video Using Online Screen Recorder | Anyone who want a quick and hassle-free solution without installing software Learn More | Easy |
| Can You Screen Record Instagram Live on Mobile? | Mobile users who prefer built-in solutions for casual recording Learn More | Easy |
| Frequently Asked Questions | Questions and answers about Instagram Live Learn More | |
| Conclusion | Summary of the methods in recording Instagram Live Learn More |
How to Record a Live Stream on Instagram - Windows/Mac
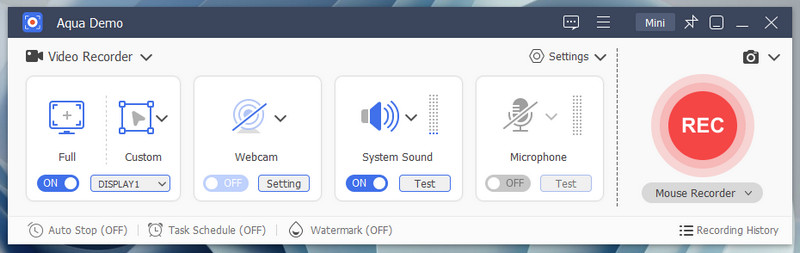
Recording an Instagram live is easy if you have the right tools. In this case, we recommend a 1080p screen recorder for you, the Aqua Demo. Aqua Demo is a reliable screen recording tool that captures all the activity on your computer screen. One of the features that many of our users love is the high-quality recordings this tool provides. This screen recording tool can record Instagram Live with up to 4K resolution and save the recordings in various media formats, including MP4, WMV, AVI, and more. Furthermore, Aqua Demo features various recording areas, allowing you to customize the record area, whether it's full screen, a specific window, or a specific region. Moreover, this tool is the best screen recorder on the internet due to its task-scheduling feature. With this feature, you don't need to start and stop recording on Instagram Live manually. Here's how to use it.
Step 1. Download the Aqua Demo
First, click the download button provided above, whether for Windows or Mac, to get the Aqua Demo installer file. Then, locate the file and proceed to the installation process. For a successful installation, you need to pass through all the wizard prompts on your screen. Once the installation is completed, Aqua Demo will launch on your screen automatically with its user-friendly interface.
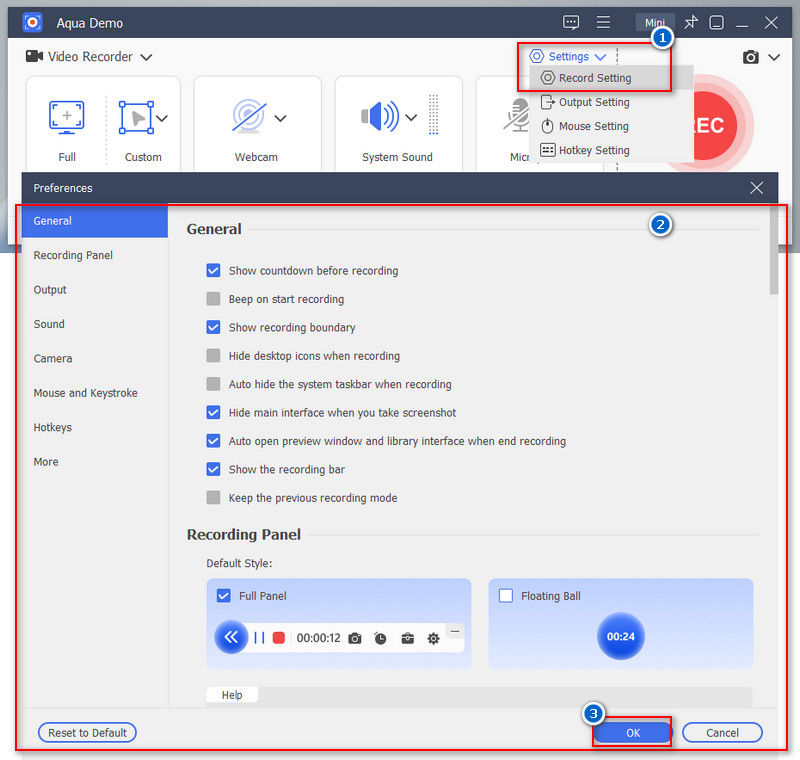
Step 2. Modify the Recorder Settings
Next, go to the Recorder Settings and modify them according to your preferences. Click the Settings dropdown icon and select the Recorder Setting option from the menu. Here, you can choose your preferred quality, resolution, frame, rate, output format, etc. Then, click the OK button to save the modifications you've made.
Step 3. Set the Recording Area and Audio
After you modify the settings, go back to its main interface and start setting the recording area and the audio. If you want to record Instagram live on the full screen, simply tap the Full option. On the other hand, for a custom recording area, click the Custom option and set your preferred location. Next, turn on the System sound to capture the internal audio. Also, if you want to record yourself with microphone sound, you must enable the webcam and microphone options.

Step 4. Start Recording an Instagram Live Video
Once everything is set, go to the Instagram live video and click the REC button. While recording, you can annotate it using the annotation tools of Aqua Demo. Simply click the tool icon, and you will see the annotation tools like brush, shapes, text, box, and more. Once the live video on Instagram is over, tap the Stop button, which is the red box icon on the toolbar, to stop the recording.

Step 5. Preview the Recorded Instagram Video
Once you hit the stop button, a preview window will appear on your screen. Here, you can watch the live video again or trim the excess starting and ending points. Also, you don't need to manually save the recorded video, as our tool automatically saves it in the designated folder you set earlier.

Record Instagram Live Video Using Online Screen Recorder
Another way to record Instagram live videos on your computer is by using an online screen recorder. An online screen recording tool is ideal for those who prefer not to install third-party applications on their PCs for any reason. In that case, go for AceThinker Free Online Screen Recorder. This reliable online tool allows you to record screen, microphone audio, internal sound, and webcam simultaneously without hassle. Besides, it is easy to use; even beginners can use this tool. In addition, you can access this online tool on any popular browser, including Firefox, Edge, Chrome, and more. Furthermore, it allows you to record the whole screen, a custom area, or a specific window. Moreover, you don't need to worry about the output file, as this online screen recorder records screens up to 720p. Follow the guide below on how to record IG live using this tool.
Step 1. Access the Online Screen Recording Tool
On your device, open a browser and search for AceThinker Free Online Screen Recorder. Then, find the main page in the search results and make sure it's the same as the image below. Alternatively, you can click its name with the hyperlink to go directly to the page.

Step 2. Set the Recorder
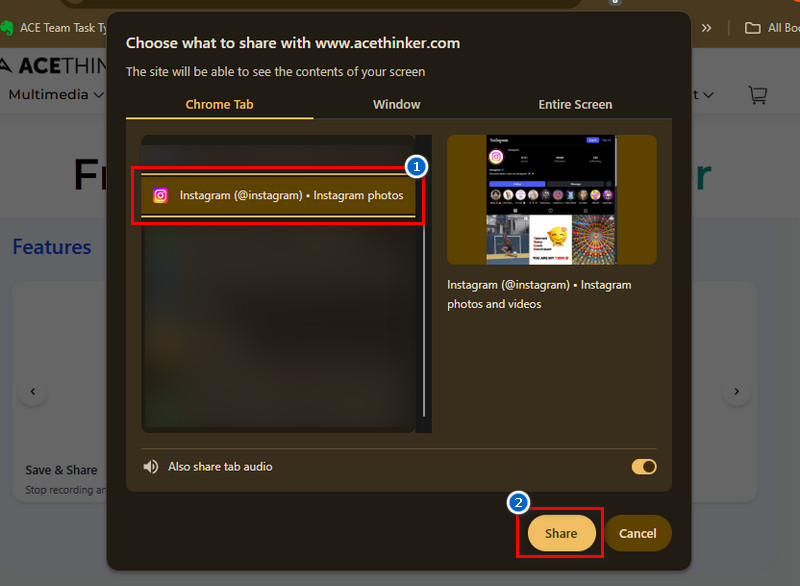
Next, when you are on the homepage, you already see its recording features. Tick the "Desktop Audio" option, so the Instagram Live audio will be recorded. Then, click the "Start Recording" button below and select the Instagram website from the pop-up menu. After that, hit the "Share" button.
Step 3. Start Recording Instagram Live
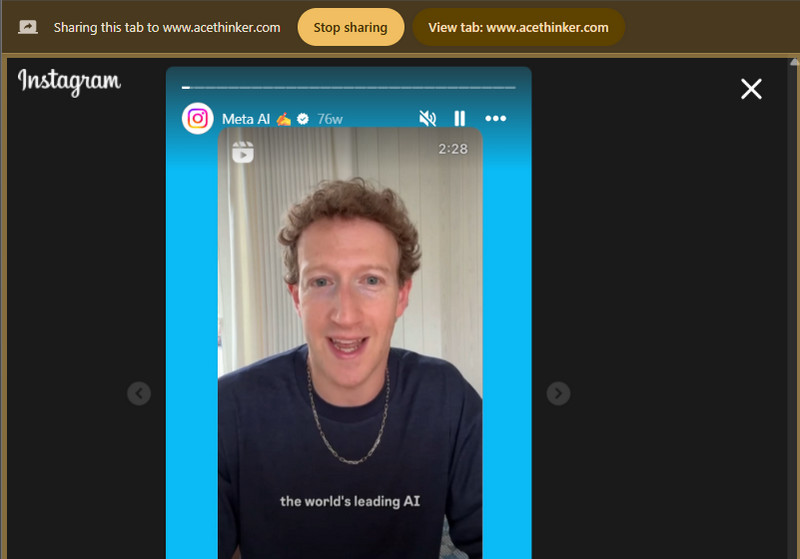
Once you click the "Share" button, the online recorder will initiate the recording process. You will see on the top of the Instagram Live page that the page is being recorded with the online tool. If the live stream ends, click "Stop Sharing" above and return to the recorder. Then, click "Stop Recording" to complete the process.
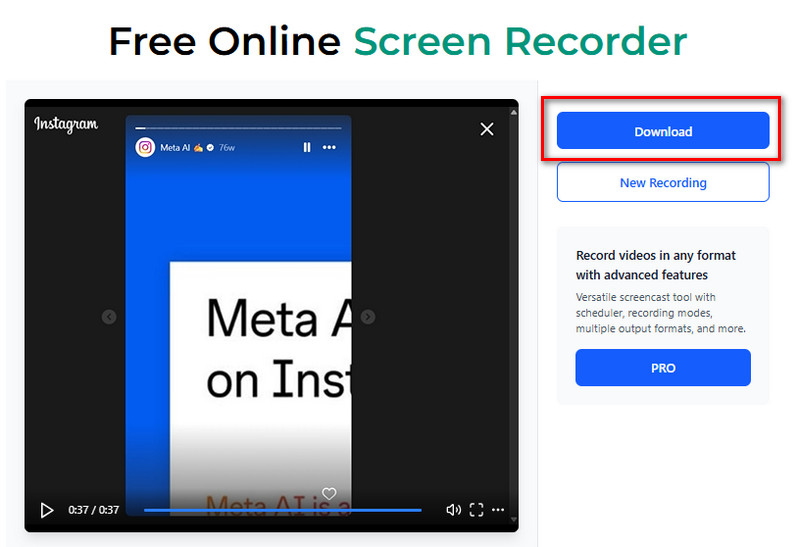
Step 4. Preview and Save the Recorded File
When you stop the recording, you will be directed to the preview page. Here you can review the recorded Instagram live. If you are satisfied, download the recorded video using the "Download" button in the right corner, and it will be saved in WMV format.
Can You Screen Record Instagram Live on Mobile?
You can also record Instagram Live videos on your iPhone and Android devices. Both mobile phones have built-in screen recorders that you can use to record your screen. This means that you don’t need to install third-party apps on your device to record a Facebook Story, live videos, and more. Additionally, both built-in tools can simultaneously capture the internal sound and your voice. Furthermore, you can ensure that the recorded file is high-quality in MP4 format. Below is the guide on how to record Instagram Live on mobile.
How to Record a Live Instagram Video on iPhone
- First, ensure the screen recorder is added to your iPhone’s Control Center. Go to Settings and find the Control Center. Here, locate Customize Controls, then add Screen Recording by tapping the + icon if it’s not already there.
- Next, open the Instagram app and find the live video you want to record. Then, swipe down from the top-right corner for the Control Center (or swipe up on older iPhones) and tap the Screen Record icon. The recording will begin after a three-second countdown.
- Once the live video ends or you’ve recorded what you need, tap the red status bar at the top of the screen and select Stop. On the other hand, you can return to the Control Center and tap the Screen Record button again to finish the recording. Then, the video will be saved automatically in your Photos app.

How to Record Live Video on Instagram on Android
- To access the built-in screen recorder, swipe down on the top of your Android screen to open the quick settings panel. Here, you will see various icons, including the Screen Recorder option. Tap on it, and the toolbar for screen recording will appear.
- Now, go to the Instagram app and search for the live video you want to record. After you find the live session, start watching it and tap the Record button on your screen recorder toolbar. While recording is in progress, you can pause, resume, or stop it using the icons on the toolbar.
- Once the live ends, tap the Stop icon to finish the recording. You will then see a pop-up notification that the recorded video is already saved on your Gallery app. From there, you can play, edit, or share the recorded Instagram live video.

Frequently Asked Questions
How to go live on Instagram?
To go live, open the Instagram app and swipe right to access the camera. Then, select the "Live" option at the bottom, then tap the start button to begin your broadcast.

What's the longest you can go live on Instagram?
You can go live on Instagram for up to 4 hours in a single session. After that, the live stream will automatically end.
Can you rewatch Instagram lives?
Yes, you can rewatch Instagram Lives if the host saves them to their profile or story. Saved lives appear under the "Live Replay" section or on their main feed.
Start a live broadcast from the Instagram app
Swipe right anywhere in Feed, then scroll to Live at the bottom. To add a title, tap Title on the left and enter a title, then tap Add title. Tap at the bottom. The number of viewers appears at the top of the screen and comments appear at the bottom.
Conclusion
In conclusion, recording Instagram Live videos can be done easily using various methods depending on your device. Suppose you want to record Instagram Live. In that case, you can utilize screen recording tools like Aqua Demo or an online recorder like AceThinker Free Online Screen Recorder. On mobile, both iPhones and Android phones offer built-in screen recording features to capture live videos. Simply set up your screen recorder, start the live video, and save the recording once it's over. While Instagram doesn't offer an official way to record live videos, these simple techniques ensure you don't miss out on any important content. Just remember, always respect privacy and copyright when recording live sessions. If you're wondering will Instagram notify them? the answer is no, Instagram does not send notifications when someone records a live video using screen recording tools.