On This Page
In recent years, video calls have become an essential part of our daily lives. As remote work, online learning, and digital communication have become more prevalent, many of us now rely on video conversations. That said, recording a video call serves many purposes. For example, it helps you with documentation of important meetings or provides training material. It also supports content creation, ensures legal compliance, and preserves memories with family and friends. At the same time, a broad range of platforms and recording options is available, giving users the flexibility to choose the approach that best fits their needs. With this in mind, we have explored different ways to record video calls in this article. The goal is to help you understand why recording matters and how to make the most of the tools already at your disposal.
Most Frequently Used Video Call Software
Video call platforms have become an important part of how we work, study, and connect with others. We explored three of the most popular options that people use today. Each platform offers unique features for communication, along with built-in or supported tools to record online meetings. This makes it easier to save discussions, share training materials, or use a video call recorder with audio for future reference.
Zoom
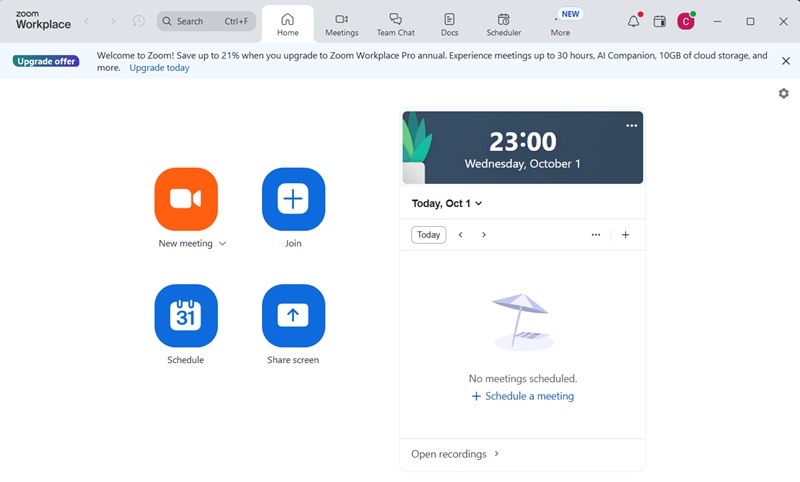
The first most widely used app for video meetings on the list is Zoom. It is known for its easy setup, strong video and audio quality, and helpful features like screen sharing and breakout rooms. Zoom also allows users to record online meetings, either to their computer or to the cloud. We have seen how this function is useful for training, team reviews, or simply keeping a copy of important discussions. It supports HD video recording and captures both the speaker's video and shared screen, ensuring that all vital information is preserved. Users can also enable automatic transcription, making it easier to review or share meeting highlights later.
Google Meet
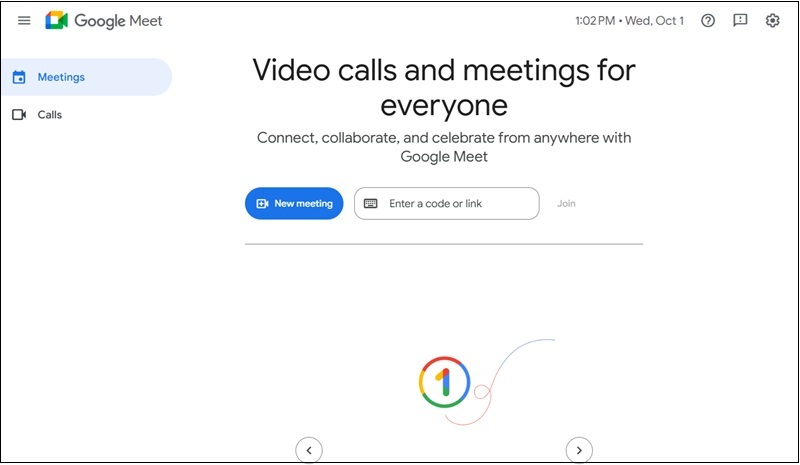
Google Meet is another top choice for people who use Google Workspace. It runs directly in the browser, making it fast to join without installing software. Features include live captions, screen sharing, and secure access. Google Meet also offers a meeting recording option for paid accounts, priced between $6 and $18+ per user per month, allowing users to capture both video and audio. We explored how this tool is handy for teachers, remote teams, and anyone who needs a reliable way to save their sessions. Additionally, recorded sessions are automatically stored in Google Drive. This allows participants to review or share them anytime without worrying about losing important content.
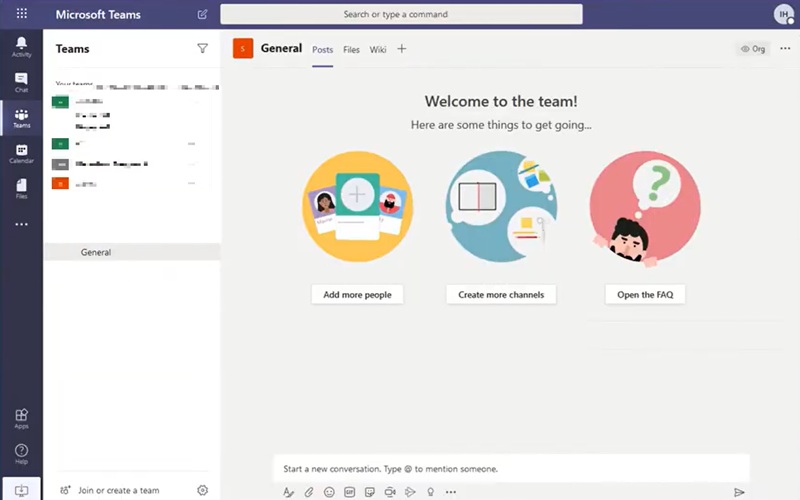
Microsoft Teams
Lastly, Microsoft Teams is more than just a meeting app—it combines chat, file sharing, and video calls in one platform. It works best for companies and organizations that use Microsoft 365. Teams supports recording meetings with audio, video, and screen sharing, which are stored securely in the cloud. The feature also includes speaker tracking, so viewers can see who is talking, and it can generate live captions and transcripts for better understanding. Users can pause, stop, or resume recording at any time and access it immediately after the meeting ends. We found this especially helpful for project updates, training, and long-term collaboration, where keeping records is important.
| Platform | Zoom | Google Meet | Microsoft Teams |
|---|---|---|---|
| Best For | Large meetings, webinars, and online classes | High-quality video and audio, breakout rooms, easy meeting links, reliable recording features | Free plan has time limits of 40 minutes, can use more system resources |
| Google Meet | Quick calls, education, and Google Workspace users | No installation needed, works in browser, smooth integration with Gmail & Calendar | Only paid users can record sessions |
| Microsoft Teams | Business collaboration and project management | Combines chat, file sharing, and video calls, integrates with Microsoft 365 apps, strong security | Can feel complex for new users, requires Microsoft account |
How to Record Video Conference with Built-in Recording Features
As we mentioned above, popular video conferencing platforms such as Zoom, Google Meet, and Microsoft Teams have integrated recording functionalities. That said, these built-in features are often the easiest way to capture your meetings, since they do not require extra software. Below, we explored how to record online meeting directly on Zoom, Google Meet, and Microsoft Teams.
How to Record a Zoom Meeting Session as a Participant
There are two recording modes available on Zoom: local and cloud. Local recording makes it simple to view and manage the session offline because it is saved immediately on your computer. However, by default, most recordings are saved in 720p to ensure smooth performance. In the meantime, only premium clients, such as Zoom Workplace ($12/month), can utilize Cloud Recording. By keeping your files online, you may share links to them immediately and view them whenever you want. In that regard, since many users prefer cost-free solutions, this guide will focus on utilizing Zoom's local recording feature. That said, we have created a simple guide below on how to record a video call with Zoom.
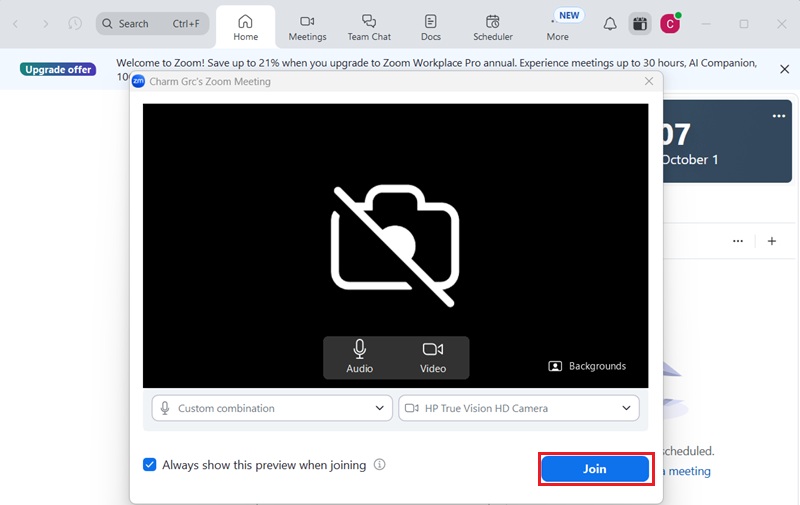
Step 1: Join a Zoom Meeting
Start by opening the Zoom software on your PC. Next, input the host's provided meeting ID and password. Before selecting the "Join" option, ensure your audio and video settings are set up correctly.
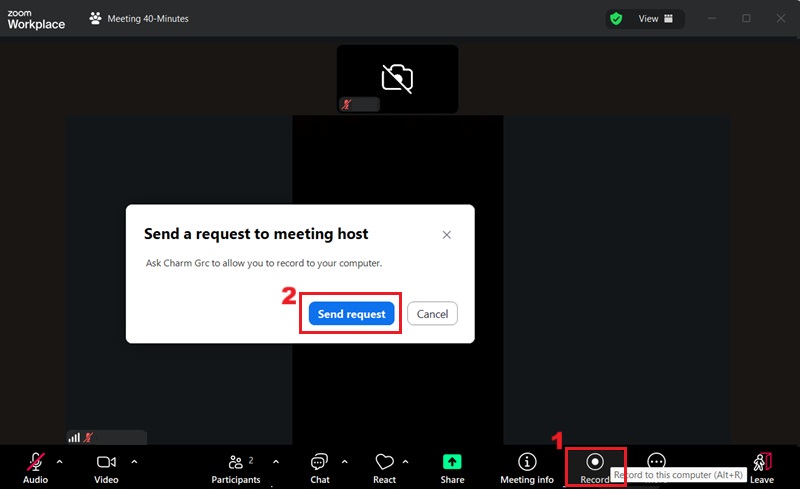
Step 2: Ask Permission from the Host
Once you have clicked "Join," you will enter the waiting room or proceed directly to the meeting, depending on the host's settings. Then, click the "Record" option located in the meeting control bar. After that, you will see a pop-up on your screen asking for the host's permission to record the Zoom session.
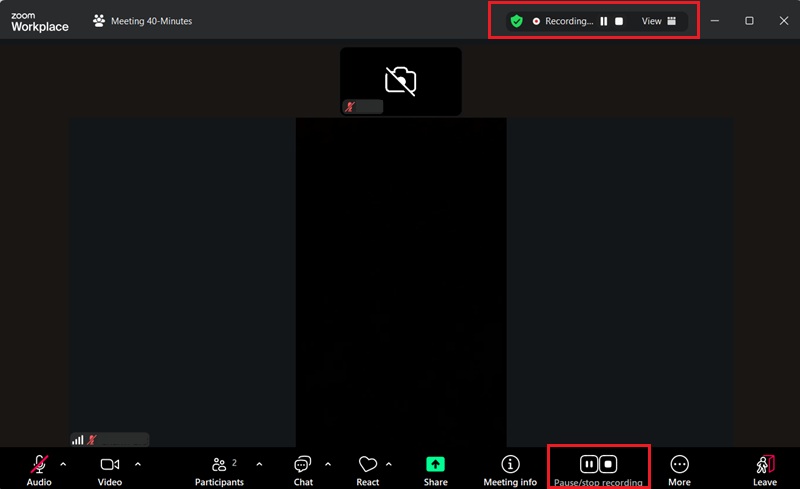
Step 3: Record Zoom Meeting
Once the host grants permission, click the "Record" button again to begin capturing the session. This action will also let the host and other participants know that the recording has commenced. After the meeting, the Zoom recorded file will be automatically converted and saved to your local computer.
"Record a Zoom meeting to the cloud or locally."
Zoom allows you to record locally, and its cloud recording feature is available for paid accounts
How to Record a Google Meet Session
When it comes to recording Google Meet, it is available for paid Google Workspace accounts, such as Business Standard, Business Plus, Enterprise, and Education plans. With this feature, you can record online meetings, including video, audio, and presentations. Moreover, you can record meetings if you are the meeting organizer, are in the same organization as the organizer, or are a teacher. So, if you are using Google Meet and have a paid Workspace account, then you can follow these steps to record video call with sound.
Step 1: Initiate a Meeting
The initial step is to access your Google Meet account on your web browser or launch the application. Then, on the "Meeting" panel, select "New Meeting" to create a new Google Meet session. Alternatively, if you are a co-host, you can add the meeting ID and join the meeting.
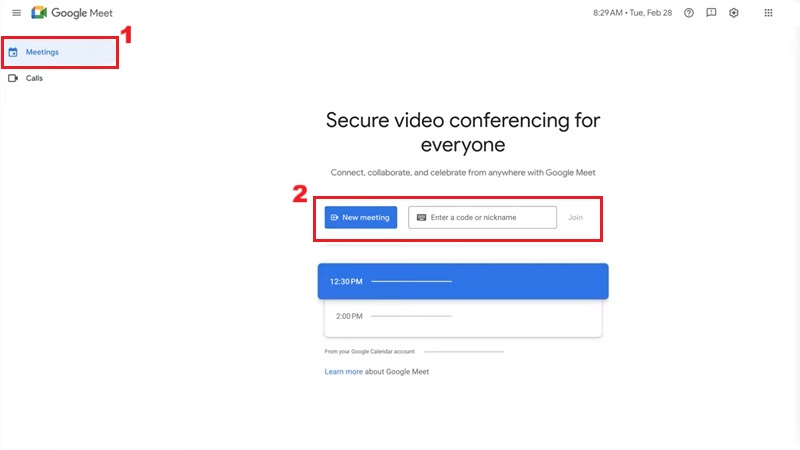
Step 2: Record Google Meet Session
Once inside the meeting interface, locate the "Activities" button, typically represented by a triangle, square, and circle icon at the bottom right part of the screen. Then, the "Recording" option should appear within the activities menu. Click this option to reveal the "Start Recording" option and begin recording your Google Meet session. Once done, hit the "Stop Recording" option from the "Activities" option.

How to Capture Microsoft Teams Conference
Microsoft Teams also has built-in recording capabilities that allow users to capture audio, video, and shared content from their meetings. OneDrive or SharePoint automatically stores the Microsoft recordings, depending on the kind of meeting. Recordings can be easily accessed, shared, and reviewed later with this cloud storage configuration. Teams also allows organizations to manage permissions, so only authorized members can view or download the files. Furthermore, to record a Microsoft Teams meeting, you must have an appropriate license that includes this functionality. Observe these steps to learn how to record a video call in Teams:
Step 1: Begin a Microsoft Teams Meeting
To initiate the Teams recording, open the Microsoft Teams application first. Then, join an existing meeting or start a new one. Once you have created a new meeting, you can invite participants by sharing a URL or adding their email addresses.
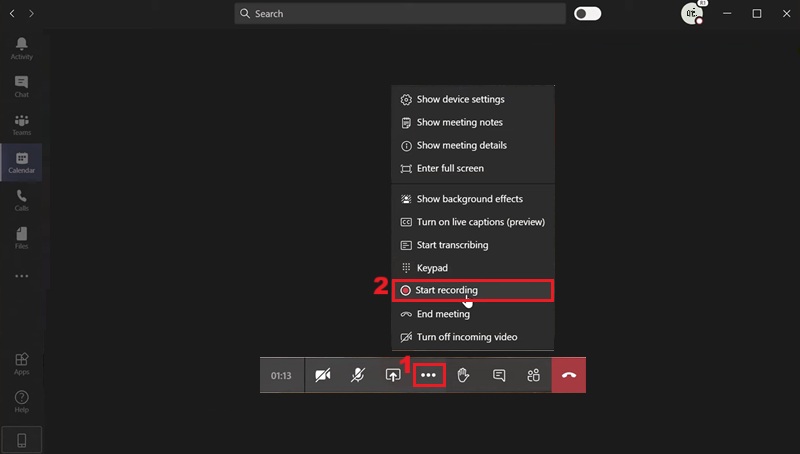
Step 2: Record the Teams Meeting
After the meeting is established, navigate to the meeting controls, typically represented by three dots or an ellipsis icon. Then, select "Start recording" from the dropdown menu to begin capturing the session. Once the recording has commenced, all participants will be notified, and a red circle will appear in the meeting interface to indicate that the recording is active. When you are finished with the meeting, select the "More actions" icon again and choose "Stop recording."
How to Record Video Calls in a Flexible Way
Beyond the native recording features of specific platforms, users can also utilize third-party software, such as Aqua Demo, to record video calls. This approach offers greater flexibility, often supporting a wider range of platforms. It enables you to record high-quality video and audio from various conferencing applications. Besides, with this video call recording software, you can also capture your screen and webcam simultaneously, providing comprehensive coverage of online interactions. In fact, this recorder also allows you to record an annotated presentation with real-time drawing tools, highlighting key points for emphasis.
Additionally, with the "Task-Scheduler" of the screen recorder, you can preset specific times for your recording. This is particularly useful for automating the capture of recurring meetings or webinars, ensuring no important content is missed. Moreover, you can record your screen with the system sound or microphone, which is essential for capturing comprehensive audio during video calls or presentations. To record video calls with Aqua Demo, you can follow the detailed guide below.
Step 1: Install Video Call Recorder
To start, acquire the file installer of the video call recorder with audio by clicking the download buttons above. Then, proceed with the installation process and follow the on-screen prompts to complete the setup. The Aqua Demo video call recorder will then launch automatically.
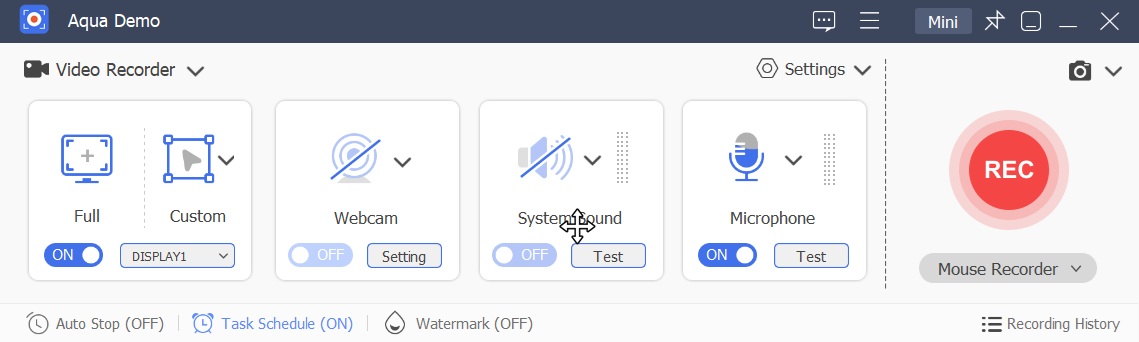
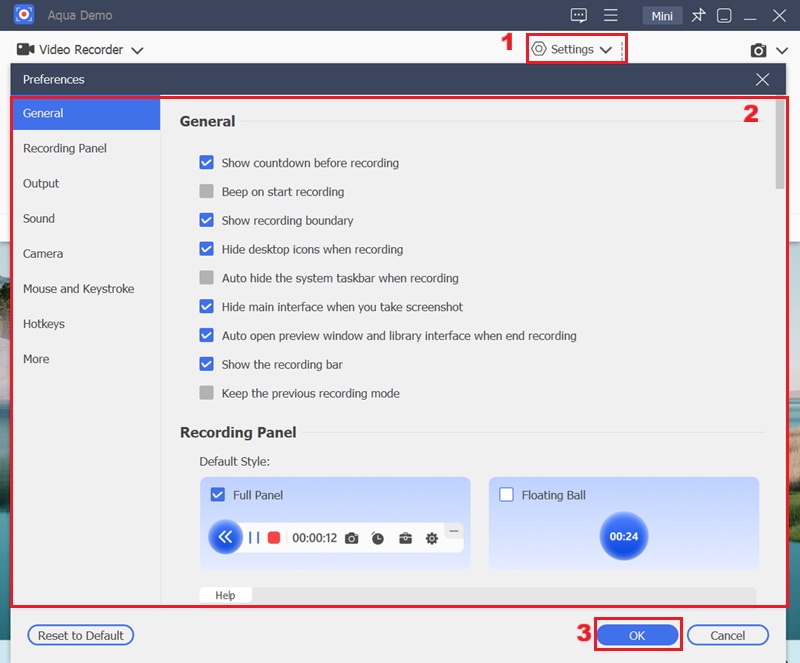
Step 2: Modify the Video Call Recorder Settings
After installing the tool, the next step is to adjust the settings. First, click the "Settings" drop-down menu and select "Record Settings." From there, you can set your preferences, such as video and audio quality, save location, output formats, and even hotkeys. Once you're done, make sure to click OK at the bottom to save your changes.
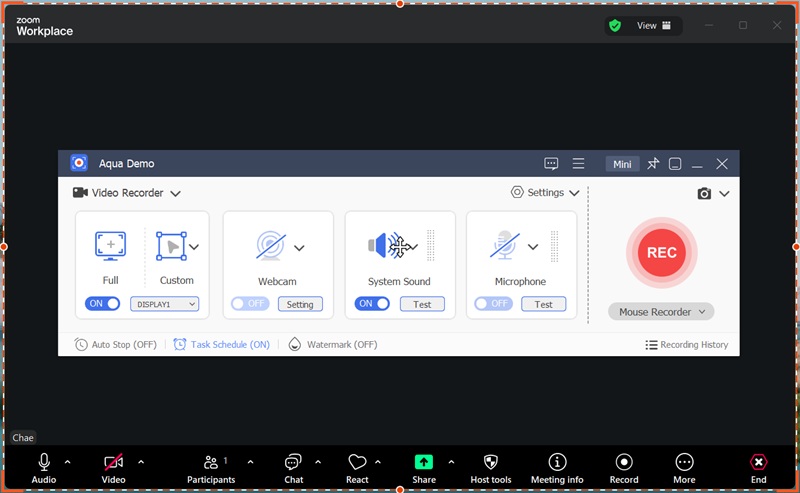
Step 3: Record the Video Call
Once you have configured your settings, initiate your video call on your preferred platform. For instance, we will use Zoom. When you have joined the Zoom meeting, return to the Aqua Demo, then select the region of your screen that corresponds to the video call window. Then, toggle the system sound and microphone if needed. Finally, click the "REC" option to begin recording your video call.
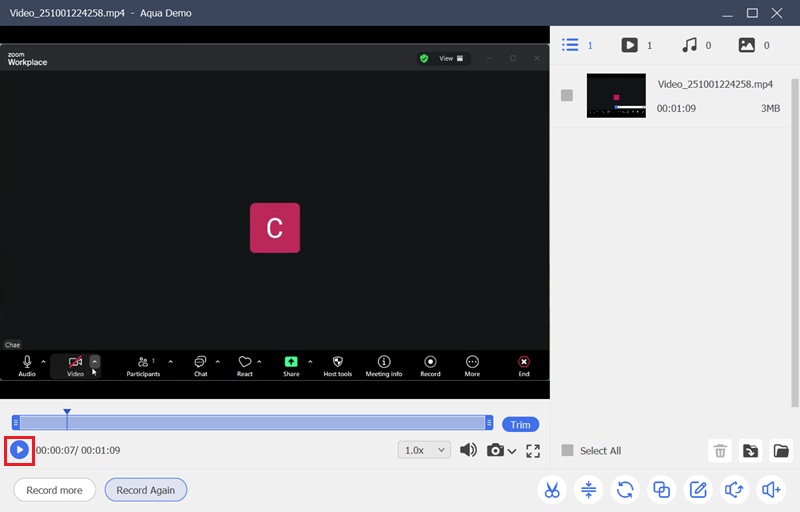
Step 4: Preview the Recorder Video Call
Upon completion of the recording, a preview window will automatically appear. On the lower left side of the window, you will see the "Play" icon; clicking it will authorize you to preview the recorded video call immediately. You can also access the recorded file directly from the designated save location you previously configured in the settings.
How to Record Video Meetings Online
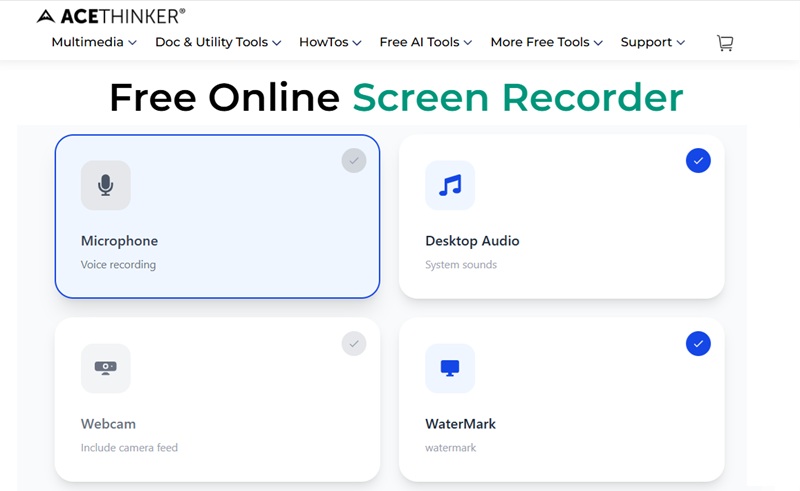
Another option you can try is to use an online screen recording tool. One of the best options we have tried is AceThinker Free Online Screen Recorder. This web-based application enables you to capture your screen activity, including video calls, without the need for software installation. This can be particularly beneficial for users who need quick recordings. It permits you to capture your entire screen, a specific application window, or even a tab on your browser. Additionally, you can capture audio from your desktop and microphone, providing complete control over the audio input for your video recordings. On top of that, you can also include your webcam footage in the video recording, which is ideal for presentations or tutorials where a personal touch is desired. However, since it is a free application, the recorded video will contain watermarks. Below, we will show you how to use the online recorder to record video calls.
Step 1: Access the Online Video Call Recorder
To begin, access any browser you prefer. It is available on Chrome, Edge, Firefox, Safari, and more. Then, navigate to the AceThinker Free Online Screen Recordert website. Once on the screen recorder's homepage, you will see its clean interface.
Step 2: Start Recording the Video Call
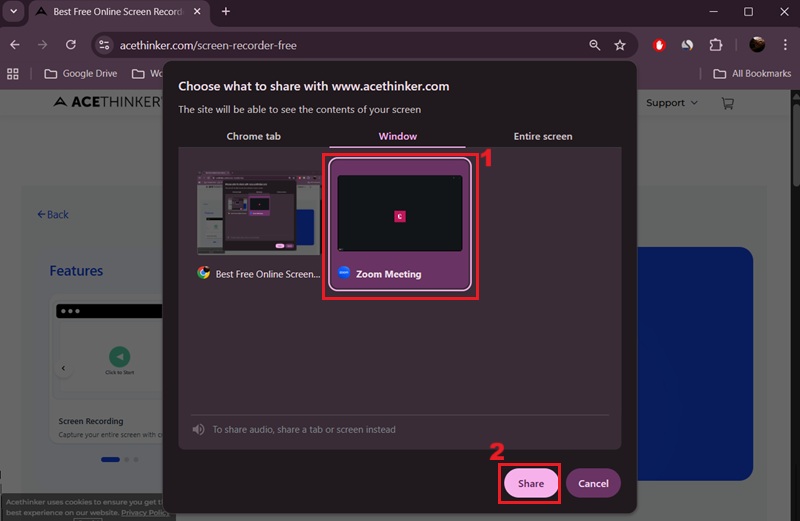
After that, access the video conferencing tool you want to record. Once you have established a call, return to the online recorder and click the "Start Recording" option located at the bottom part of the recorder's interface. Then, a pop-up window will emerge, enabling you to choose the specific screen, application window, or browser tab you wish to capture. Choose the video call window and click the "Share" option to record the video call.
Step 3: Stop and Download the Recorded Video Call
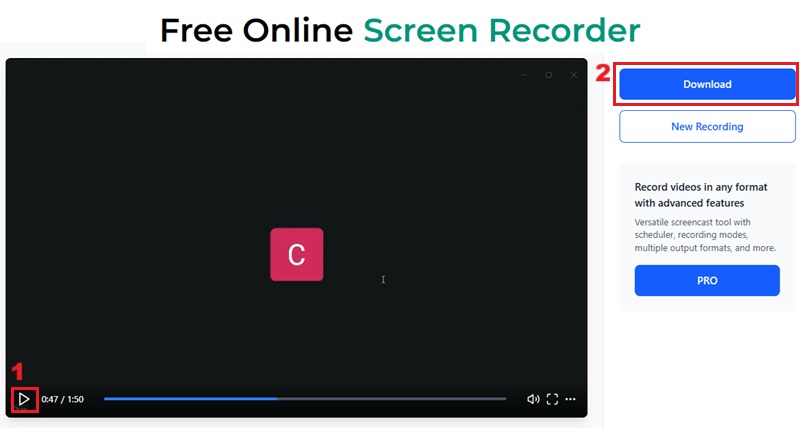
Once the video call concludes, click the "Stop Recording" button. Then, you will be redirected to a new window, where you will see the video call you just recorded. Hit the "Play" icon to review the recorded video call. Afterwards, click the "Download" option to save the recorded video call on your local device.
How to Record Video Call on Mobile Devices
Recording on iOS
On iOS devices, recording video calls is simple because the system already has a built-in screen recording feature. This iOS tool enables you to capture your entire screen, including both video and audio. In addition, it produces high-quality recordings without requiring extra apps. With just an occasional tap, you can start and stop recording, making it a convenient option for iPhone and iPad users. Here are the steps on how to record video calls on your iOS device.
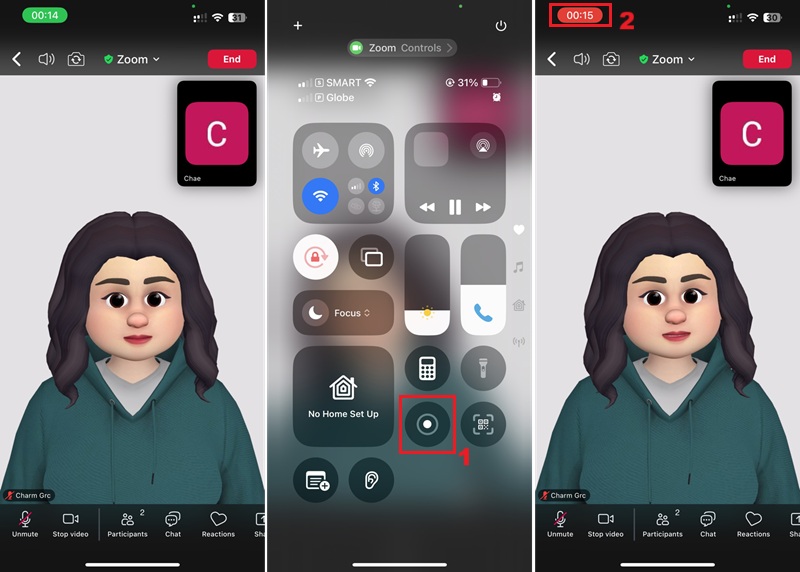
Step 1: Begin Recording
First, access the video call application on your iOS device, and initiate the video call. Then, on the "Control Center" of your iOS device, click the screen recording icon, and you will see the three-second countdown before recording commences. Once the recording has started, a red bar or icon will appear at the top of your iOS screen, indicating that the recording is active.
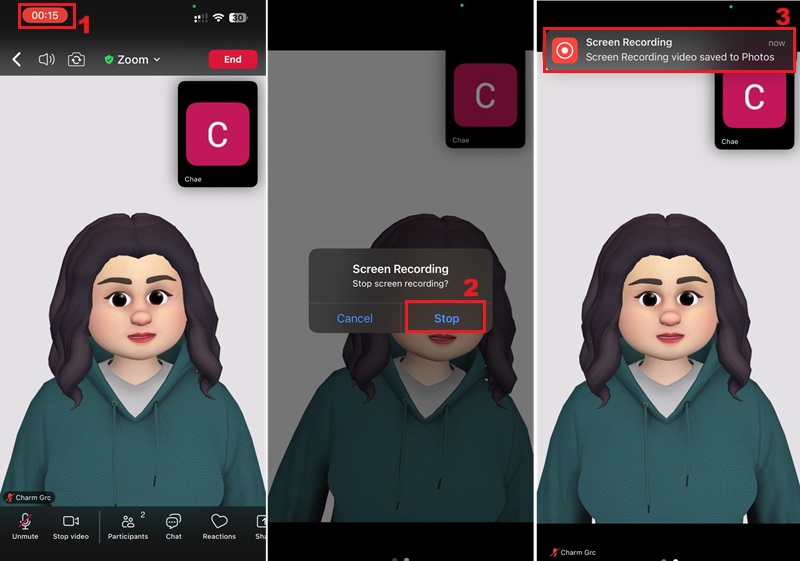
Step 2: Stop the iOS Recording
When the video call concludes, tap the red bar or icon at the top of the screen. Then, a dialog box will emerge on your iOS device screen, prompting you to confirm that you want to stop the video call recording. After that, a notification will show, confirming that the video call recording has been saved to your Photos app.
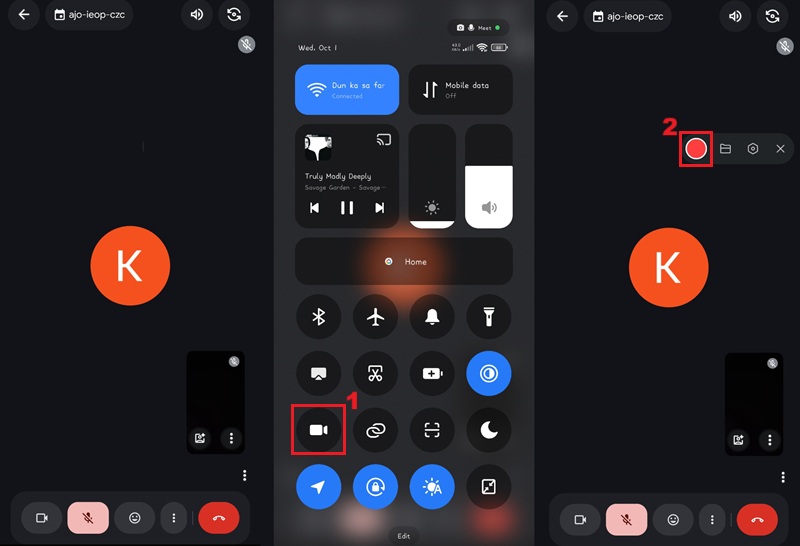
Recording on Android
Like iOS, the Android operating system also features a built-in screen recording capability. With this feature, you can efficiently capture video calls, apps, games, and other activities on their device screens. Besides, it records both video and audio, providing a complete copy of your session. You can also use it to share tutorials or demonstrations directly with others. Here are the steps to capture video calls on your Android device.
Step 1: Commence the Video Call Recording
On your Android device, start the video call. Then, access the Quick Settings panel by swiping down from the top of your screen. Locate the screen recorder icon and tap it to access it on your screen. Once the recorder icon appears, click it to commence the video call recording.
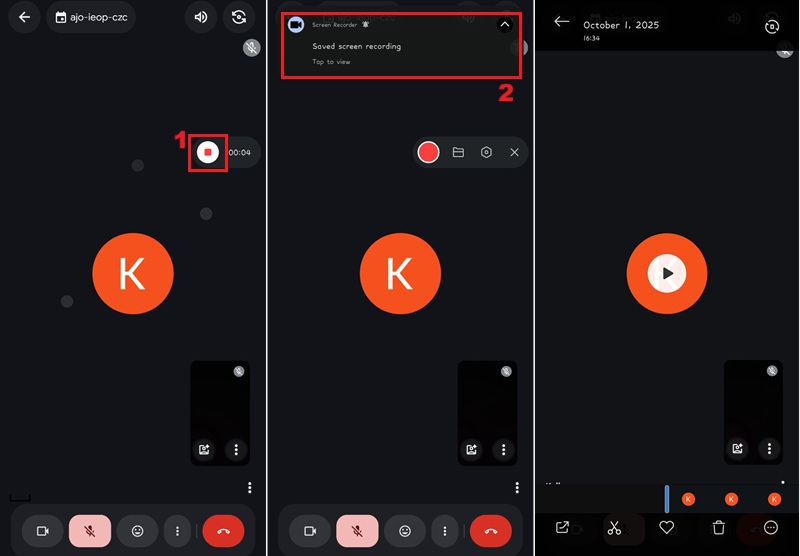
Step 2: Stop and View Recordings
To terminate the screen recording on your Android device, press the "Stop" button that appears as an overlay on your screen. Like iOS, a notification will confirm that the video has been saved. You can tap on this notification to review the recorded online video call.
Frequently Asked Questions
Can I record a video phone call?
Yes, most modern smartphones and video conferencing applications offer integrated features or compatible third-party tools. This tool enables you to capture, save, and review video calls for various purposes. Make sure that your device is running a compatible operating system version to utilize these recording functionalities.

Can I record a video call without the other person's permission?
On a legal and ethical level, it is illegal to record any conversations without the consent of all participants. If you need to record a video call, please ask your participants to do so for safety reasons.
Is it possible to record calls without permission?
Yes, you can record a video call without permission with the help of third-party tools, such as Aqua Demo and Free Online Screen Recorder. These video call recorders with audio allow you to record any of your screen activities, including video calls and other audio content. Nevertheless, you must obtain permission from all participants before initiating any recording to comply with ethical guidelines and legal requirements.
Wrapping Up
To wrap up this article, there are many ways to record video calls, whether you use built-in features from Zoom, Google Meet, or Microsoft Teams. You can also rely on flexible tools like Aqua Demo and free online recorders. Furthermore, mobile users can also take advantage of native screen recording on iOS and Android for quick captures. With these options, you can effortlessly save meetings, lessons, or personal conversations. Nonetheless, you have to always remember to pick the method that best fits your needs while respecting the privacy of others. Lastly, ensure you have consent from all the participants in any video call meetings before recording to enjoy smooth, legal, and stress-free experiences.