Recording Zoom meetings is very useful in various cases, whether attending a work meeting, an online class, or a virtual event. It helps you keep a clear record of what was discussed so you can go back and review the important points later. You can also share the recording with people who couldn’t join the meeting in real-time. Zoom offers built-in recording features that let you record directly to your computer or the cloud, depending on your account type. There are also other tools available if you need more options. However, keep in mind that not everyone can record by default. Some permissions may be required from the host. In this article, you’ll learn how to record Zoom meeting on your computer, explore options, and follow best practices to make sure your recordings are clear, legal, and useful.
| Sections | Brief Information |
|---|---|
| How to Record on Zoom as a Host | A walkthrough of how to record a Zoom meeting when you’re a host Learn More |
| How to Record Zoom Meeting As a Participant (With Permission) | A simple guide for recording a session with participant’s account Learn More |
| How to Record Zoom Without Permission (Responsibly) | A dedicated third-party tool that can capture the meeting without the host's permission Learn More |
| Frequently Asked Questions | Find quick answers to common questions about recording Zoom meetings Learn More |
| Conclusion | Final thoughts and recommendations for your recording needs Learn More |
How to Record on Zoom as a Host
| Best Use Case: | Official recordings with full access and quality |
| Ease of Use: | Easy |
Zoom is a popular video conferencing program for remote meetings, webinars, and online classes. It has a built-in recorder, which lets you record video and audio of your meetings and any shared screens. However, you can do it if you’re the host or co-host of the meeting. Moreover, it has two recording options: local and cloud. Local Recording means all the recorded sessions are automatically saved on your computer. On the other hand, Cloud Recording is available only to paid Zoom accounts. This option stores your recordings in the cloud so you can access them online and share links. On top of that, Zoom also lets you adjust recording settings, like choosing what to record (gallery view, active speaker, etc.), including transcripts, and separating audio tracks. Here’s how you can record remote meetings with the Zoom screen recording feature.
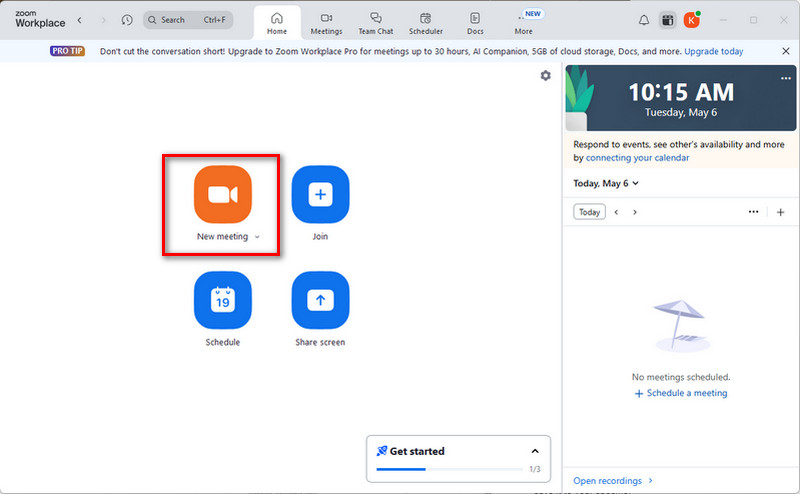
Step 1: Start Your Zoom Meeting
First, open the Zoom application and start your meeting as the host. Once the meeting begins, click the "Record" button at the bottom of the Zoom window. Then, choose between "Record on this Computer" for local recording or "Record to the Cloud" if you have a paid account and want to save the recording online.
Step 2: Confirm Recording Has Started
Then, a recording indicator will appear in the upper-left corner of the Zoom window. This will let you and other participants know that the meeting is being recorded. Use the "Pause" or "Stop" buttons at the bottom of the Zoom window anytime to pause or stop the recording.

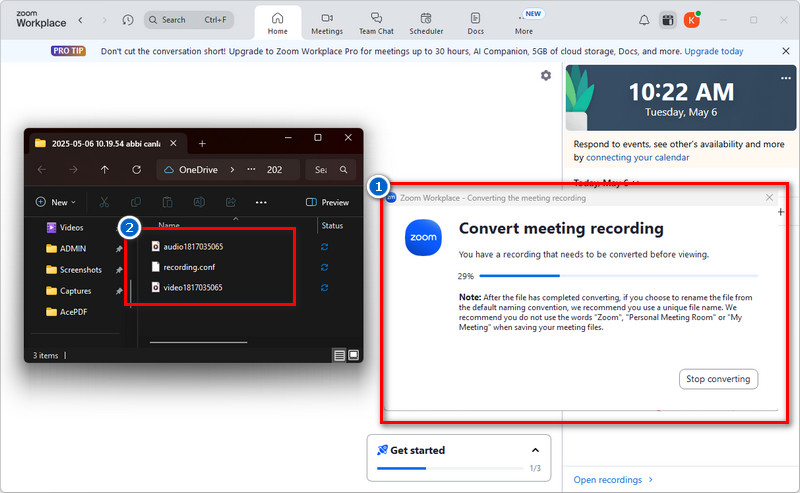
Step 3: Access the Recording
After the meeting ends, Zoom will convert the recording and save it to your specified folder. By default, recordings are saved in the "Documents" > "Zoom" folder. Finally, you can share the recorded video file with your participants.
How to Record Zoom Meeting As a Participant (With Permission)
| Best Use Case: | When host allows recording for note-taking or sharing |
| Ease of Use: | Easy |
If you're participating in a Zoom meeting and want to record it but aren't the host, you'll need permission from the host. Not everyone can record a Zoom meeting by default; only the host has that control. However, suppose you're a participant, and the host permits you. In that case, you can record the meeting directly using a built-in screen recorder for Zoom. In this section, we'll show you the steps to record a Zoom meeting as a participant when you've been granted permission so you can save important discussions, presentations, or lessons for later review.
Can I record a Zoom meeting that I am invited to?
If the host enables it, Zoom allows participants to record the meeting. You'll need the host to grant you recording privileges either before or during the call.
Step 1. Ask the Host for Recording Permission
First, join the Zoom meeting using the link that the hosts shared. Then, to ask permission to record, click the Record button below. A pop-up screen will appear, asking permission from the host. From the prompt, click the Send Request button to ask for consent from the host to record. This will notify the host that you would like to record the session.

Step 2. Start to Record the Meeting
After you grant permission, click the Record button below again and choose "Record on this Computer" to save the recording locally or "Record to the Cloud" if the host allows cloud recording for participants. Then, all meeting participants will receive a notification that the session is being recorded.

Step 3. End the Recording
Once the meeting ends, use the Stop button at the bottom of the Zoom window anytime to stop the recording. The recording will then automatically convert and save to your specified folder. If you are a paid Zoom user, the recording will store your recordings in the cloud so you can access them online and share links.

How to Record Zoom Without Permission (Responsibly)
| Best Use Case: | Private reference, scheduled meetings, no host access |
| Ease of Use: | Beginner-friendly |
Sometimes, you may need to record a meeting without permission from the host. While it's important to respect privacy and follow the rules, there are responsible ways to record a Webex or Zoom meeting for your reference, especially if you're not planning to share it publicly. So, a third-party screen recorder can be useful for recording a Zoom meeting without the host's permission.
One great option is Aqua Demo, a screen recording software that works well for Zoom meetings. It lets you capture your screen with a webcam as well as with internal audio and microphone sound. Besides, this Zoom meeting recorder stands out because it has a Scheduling feature, which is perfect for a scheduled Zoom meeting. All you have to do is set the time of your Zoom meeting, and it will automatically start to record the meeting without the need for the host's permission. You can also use it to record Google Meet sessions in the same way, making it versatile for different platforms. More than that, you can use the annotation tools of Aqua Demo to highlight important parts of the meeting. Furthermore, Aqua Demo lets you capture a selected region only, which is helpful if you just want to capture the part of the meeting that matters, like the presentation or shared screen, without showing the video feeds of other participants. However, this tool is a paid version with a free trial that costs $19.95. Nevertheless, it is worth purchasing because Aqua Demo gives you high-quality output up to 4K resolution and saves your recording in MP4, WMV, AVI, etc.
Step 1. Get the Zoom Video Recorder
To get started, download and install the Aqua Demo on your computer. Make sure to download the correct version for your operating system. Then, proceed to the installation process by following the steps on your screen. Once installed, it will open automatically; if not, just click the Aqua Demo icon from your desktop or Applications folder.

Step 2. Tweak the Recording Settings
Next, you need to configure the settings for the type of recording you want to create. Simply navigate to the Settings menu and select Recorder Settings from the options. Then, start configuring its settings to your liking, such as the audio source, video quality, output format, and more. Once done, save the changes by clicking the OK button below.

Step 3. Start to Record the Zoom Meeting
Now, join the Zoom meeting you want to record. While the meeting hasn’t started, set the region to record and enable your microphone. Once the meeting begins, click the REC button to record the session. You can also use the annotation tools to highlight key points or add notes to your recording in real-time.

Step 4. Stop and Access the Recording
Once the Zoom meeting has finished, click the Stop button on Aqua Demo’s taskbar to end the recording. Then, your recording will be processed and saved to your designated folder. A new window will also pop up that allows you to preview and trim the recording. Finally, locate the file in the output folder and share it with other meeting participants.

Frequently Asked Questions
Do all Zoom meetings allow recording?
No, not all Zoom meetings allow recording. Only the host or someone the host permits to record the meeting. If you’re a participant, you’ll need the host’s approval to start recording.

How long does Zoom store cloud recordings?
Zoom keeps cloud recordings as long as your account has enough storage. If your storage gets full, Zoom may delete older recordings or stop saving new ones. You can also delete or download recordings anytime to manage space.
Can you record it on mobile?
Yes, you can record Zoom meetings on mobile, but only if you are the host or have recording permission. Also, mobile recording saves to the cloud, not your phone. Free Zoom accounts can’t use cloud recording so that it won’t work without a paid plan.
Conclusion
Recording Zoom meetings can be very useful, and we’ve shared different ways you can do it. As the host, you can use Zoom’s built-in tools to record locally or to the cloud. You can record if you’re a participant, too, as long as the host gives you permission. And if permission isn’t possible, tools like Aqua Demo can help you responsibly record meetings for personal use. We still recommend using Zoom’s built-in recording features when available, as they offer the best quality and are easier to manage. Just remember to always respect privacy and ask for permission whenever needed. Recording helps us stay organized, remember important details, and share information with others who couldn’t attend.