VLC Media Player is a widely used and free application for playing videos and music. It is compatible with nearly all video and audio file formats, which makes it very useful. But did you know that VLC can also record your computer screen? This hidden feature is simple to use and requires no extra software. With VLC’s screen recording tool, you can easily capture anything happening on your screen. Whether you want to make a tutorial, record a video call, or save a live stream, VLC can help. It’s a great, quick, and free way to record your screen. In this guide, we’ll show you how to record screen with VLC in detail. It’s easy to follow, even if you’ve never done it before. Let’s get started!
| Sections | Brief Information |
|---|---|
| How to Use VLC Media Player Screen Recording? | A detailed guide on how to record your computer screen using VLC Media Player Learn More |
| Record Screen With VLC Media Player Issues | Some common issues with VLC screen recording and how to solve them Learn More |
| Capture Video with VLC Alternatives | Other ways to capture screen with the help of alternative recording tools Learn More |
| Frequently Asked Questions | Quick answers to frequently asked questions about VLC Learn More |
| Final Thoughts | Recap the topic being discussed in the article Learn More |
How to Use VLC Media Player Screen Recording?
Most of us use VLC Media Player to play video files on our computers. But VLC can do more than just play videos. It also has a screen recording feature. This means you can record your screen using VLC, like a video tutorial, a live stream, or a video call. In addition, it allows you to choose your desired Capture Device, such as a Desktop for screen recording, DirectShow to record mic and webcam, and TV-digital to record live TV. Besides, VLC lets you set your preferred frame rate up to 120 fps, which is beneficial, especially if you want to capture high-motion videos like gameplay. However, VLC only records the whole screen, and you can't select a portion of your screen to record. If you need more flexibility, you can also explore open source recorders that allow advanced features like region selection. You can follow the clear instructions given below to record desktop using VLC.
Step 1. Launch the VLC Media Player
Launch the app on your computer if you have the VLC Media Player. If not, visit the official VLC website at videolan.org to download and install the latest version. Once installed, VLC will automatically launch and show its main interface.
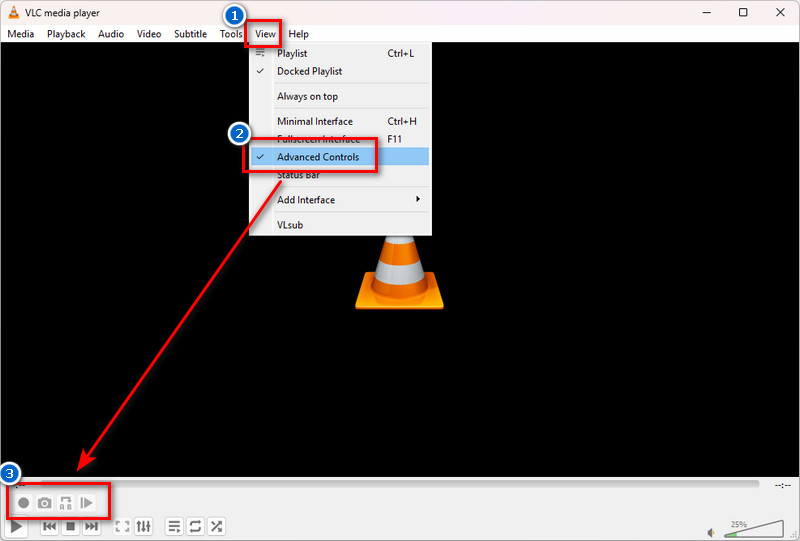
Step 2. Access the Record Feature
When you open VLC, you won’t immediately see a record button. Go to the top menu and click the “View” tab to enable it. Next, select “Advanced Controls” from the drop-down list, and you’ll notice extra buttons, including the red record button, appear above the normal playback controls.
Step 3. Customize the Recording Settings
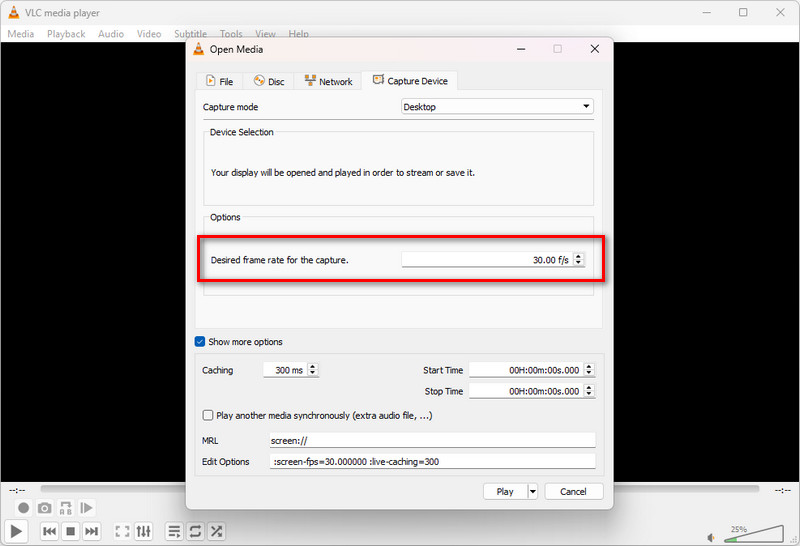
Before starting your screen recording, you need to set up your preferences. Click the “Media” tab and choose “Open Capture Device” from the list. In the open window, find the “Capture mode” drop-down and select “Desktop” to let VLC know you want to record your screen.
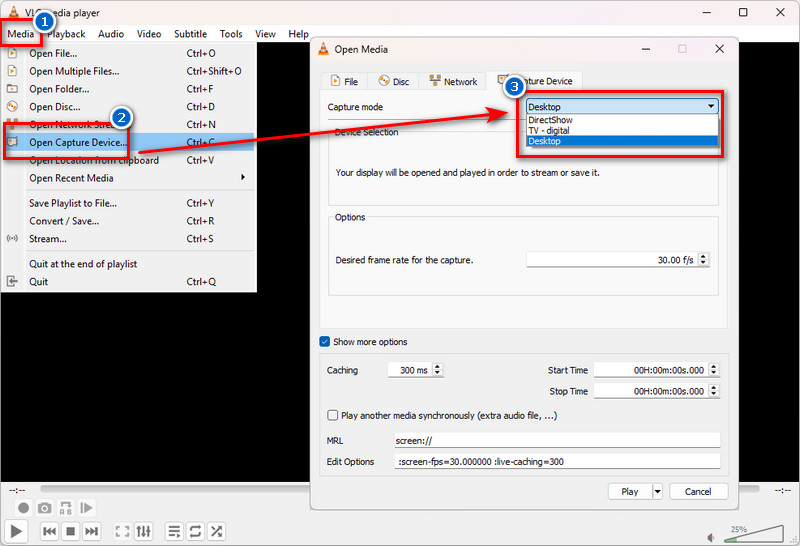
Step 4. Set the Desired Frame Rate
Below the capture mode, you’ll see a section labeled “Desired frame rate for the capture.” Enter 15 fps for simple tasks or 30 fps for smoother video. Remember, a higher frame rate means better video quality and a larger file size.
Step 5. Choose a Format and Set the Save Location
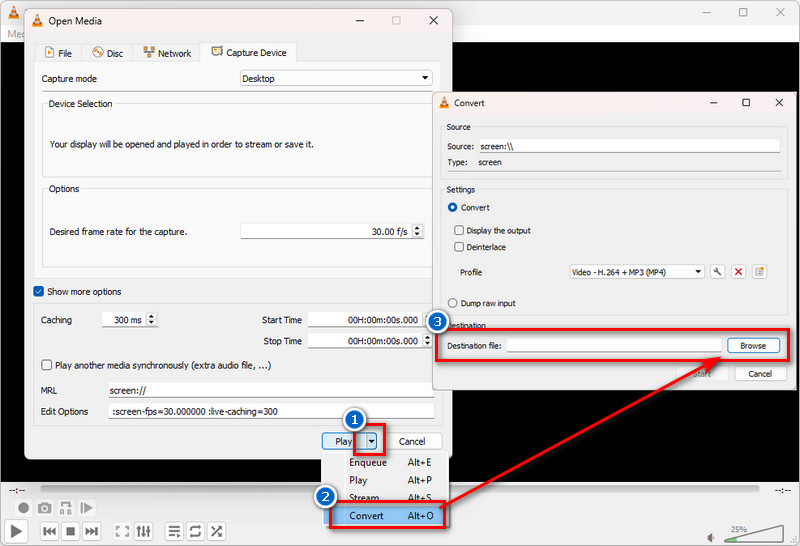
Instead of clicking “Play,” click the arrow next to it and choose “Convert.” On the Convert window, specify a format for the video in the Profile section. Video-H.264 + MP3 (MP4) is a good choice for most needs. Then, click the “Browse” option to choose where to save your video and give it a file name ending in .mp4.
Step 6. Start to Record Screen Using VLC
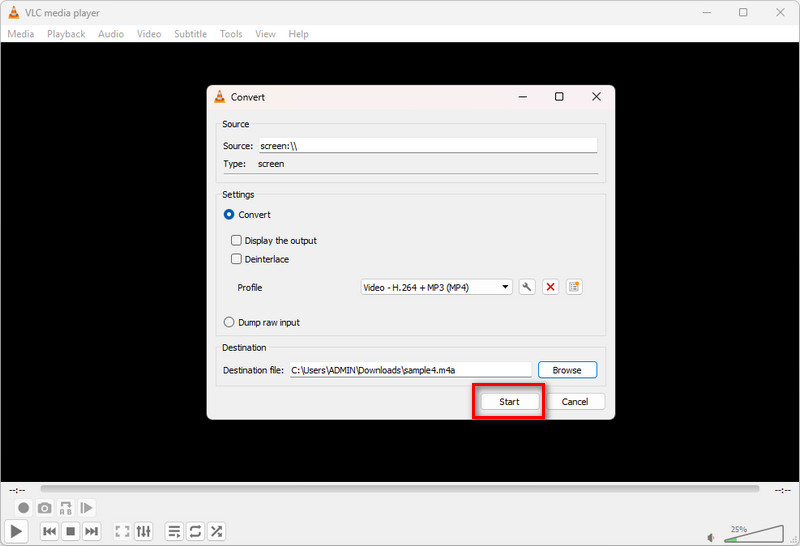
Once you are all set, click the Start button at the bottom to capture your screen. VLC will now begin recording your screen in the background. You won’t see a notification, so minimize VLC or move it aside to keep it from the recording.
Step 7. Stop the Recording
When finished, return to VLC and click the “Stop” button (the circle-shaped button on the bottom left). This will end the recording and save the video to your chosen location. You can now find and watch your screen recording as a regular video file.

While it is widely known for its media playing capabilities, this free open-source multimedia platform gives you the VLC screen record function that can help you record your desktop screen and webcam.
Record Screen With VLC Media Player Issues
While VLC Media Player is a handy and free tool for screen recording, you might run into some small problems while using it, especially if you also want to record audio with VLC. These issues are usually easy to fix once you understand what's causing them. Below are some common issues users face during screen recording with VLC.
1. Recording Quality is Low or Choppy
If your video looks blurry, laggy, or choppy, it could be because of a low frame rate or slow computer performance. To make the video smoother, set the frame rate to 30 fps when choosing your capture settings. Also, other apps can be closed while recording to free up memory and improve performance.
2. No Audio in the Recording
By default, VLC does not record audio from your microphone or system sounds when recording the screen. To fix this, you'll need to use DirectShow mode and manually select your microphone or audio input device, but this setup can be tricky. If sound recording is important, it's often easier to use other screen recording tools or record audio separately and combine it later.
3. Video File Not Saving or Missing
If your screen recording doesn't save, select the Convert option instead of Play, and set a valid save location with a proper file name (like myvideo.mp4). Also, avoid using special characters in the file name (like / \ : * ?). If the file still won't save, try restarting VLC or running it as an administrator.
4. Can't Find the Recording File
After stopping the recording, you might wonder where VLC saves recordings. VLC doesn't give a pop-up when it's done, so it's easy to miss. Just go to the folder you chose during the Convert step and look for the file name you typed — if you're unsure, try searching for .mp4 files on your computer.
5. VLC Stops Recording Automatically
If VLC suddenly stops recording before you're done, it might be due to low disk space or a conflict with another program. Check your computer's free space and close any other apps that might interfere. Also, avoid pressing buttons in VLC while recording, as this can sometimes cause it to stop.
Capture Video with VLC Alternatives
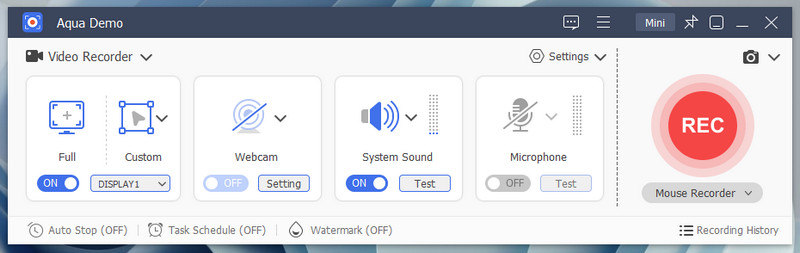
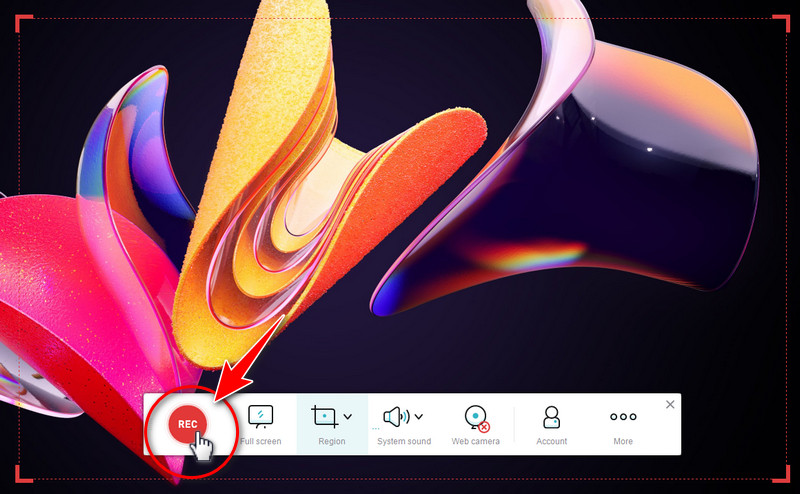
1. Aqua Demo
While VLC Media Player can record your screen, its recording feature is basic. It can be tricky to set up, especially if you want to include audio or record a specific area of your screen. If you're looking for something easier to use with more features, it might be time to try a VLC alternative. One great option is the Aqua Demo. Aqua Demo has various recording options that allow you to record a part of your screen, a specific window, or the entire desktop, compared to VLC, which only offers full-screen recording. Besides, this recording software can easily record audio from computer along with the video (mic & system sound). In contrast, the VLC record screen with audio is a bit complicated. Also, you can record the screen with the webcam overlay, so you can easily add commentary or reaction to the screen recording. More than that, one of the key advantages of Aqua Demo over VLC is its high-quality recordings. Yes, Aqua Demo lets you record video or screen with up to 4K resolution in 60 fps with no problems. However, this tool is a paid software that costs $19.95 - $42.95, compared to VLC Media Player, a free, open-source media player and screen recorder. See the guide below to learn how to record screens with this tool.
Step 1. Install the VLC Alternative Tool
Go to Aqua Demo's official website and download the software. Alternatively, you can choose among the download buttons above to get its installer. Next, proceed to the installation process by following the onscreen setup guide to install the tool on your desktop. Once the installation is finished, the tool will open automatically.
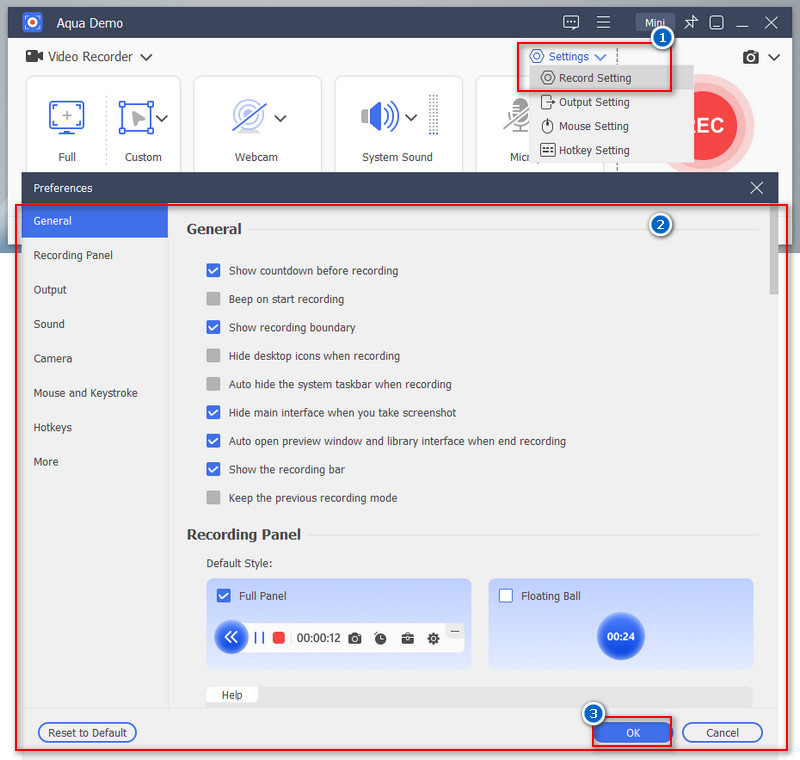
Step 2. Configure the Recording Settings
From the main interface, you can see the different modes and options. Navigate to the Settings options to tweak the recorded files' video quality, format, and location. Then, go back to its main interface to choose your preferred recording mode, such as full screen or custom area.
Step 3. Start Capturing the Screen
After modifying the settings, set your screen and click the record button to start recording. While recording, you can use its annotation tools to highlight some areas on your screen. Once you're done recording, simply click the stop button on the floating bar to finish capturing your screen.

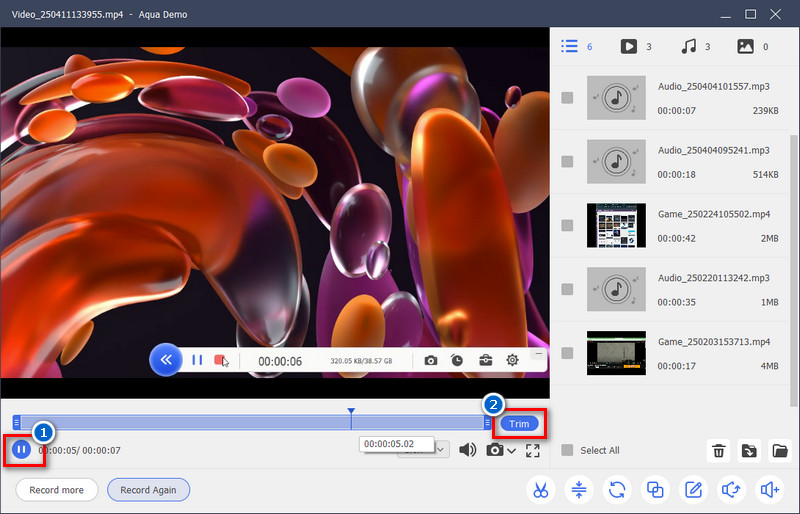
Step 4. Preview the Recording
Another window will show on your screen, where you can preview the output you recorded. You can also trim the recorded video's unwanted starting and ending points. Lastly, since the tool automatically saves your recording on your computer, you can locate the file on your local drive.
2. Online Screen Recorder
Suppose you prefer a hassle-free method that doesn’t involve installing software. In that case, AceThinker Free Online Screen Recorder is an excellent alternative to VLC. Like VLC, this screen recorder is free to access and allows you to record any activity on your screen, including videos, presentations, and gameplay. Still, this tool is more convenient as it is directly accessible on a web browser. There is no need for a complicated setup, but you will need to install a lightweight launcher if you are a first-time user. Moreover, AceThinker provides various recording modes, which lets you record the entire screen, a browser screen, or a customized area that VLC doesn’t support. What sets AceThinker apart from VLC is its ability to record the screen, webcam, and sound simultaneously. However, since this screen recording tool is web-based, you always need an internet connection to access it, unlike VLC, which can be used offline. Also, expect that the quality is not as high as Aqua Demo since AceThinker only records videos up to 720p. Follow the guide below to learn how to record screens using this online recorder.
Step 1. Get the Launcher
The first thing you need to do is to visit the official website of AceThinker Free Online Screen Recorder. Next, click the Start Recording button on the main page and download the tool's launcher. Then, set up the launcher by following the installation guide and launch it afterward.

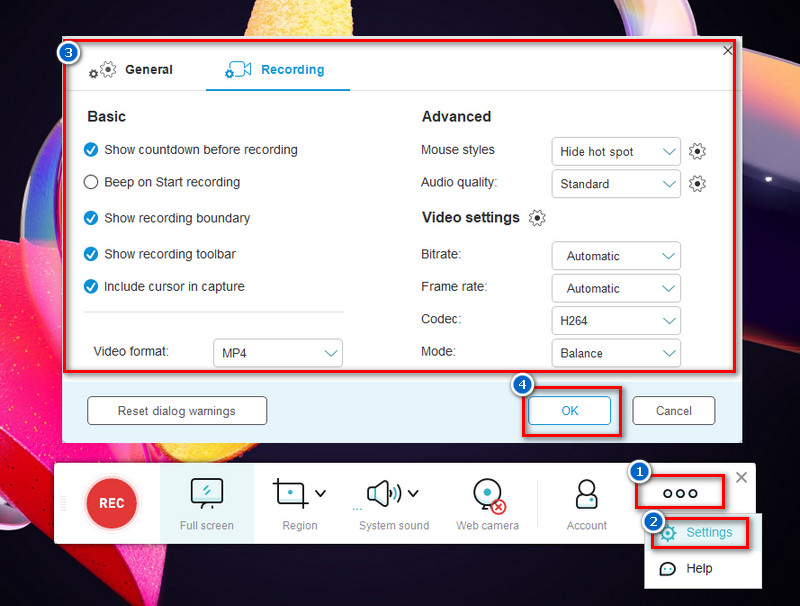
Step 2. Customize the Settings
Once the launcher runs, a recording toolbar will appear on your screen. From there, click the three-dot icon (More option) and select Settings from the options. Under the settings menu, set your preferred bitrate, frame rate, codec, mode, and video format settings. Then, click OK to apply the changes.
Step 3. Start to Screen Record using VLC Alternative
Next, set the recording area on how you want to record your screen. You can choose from the full-screen or region option. After that, hit the Record button to begin the recording. When you're done recording, click the Stop icon on the recording toolbar.
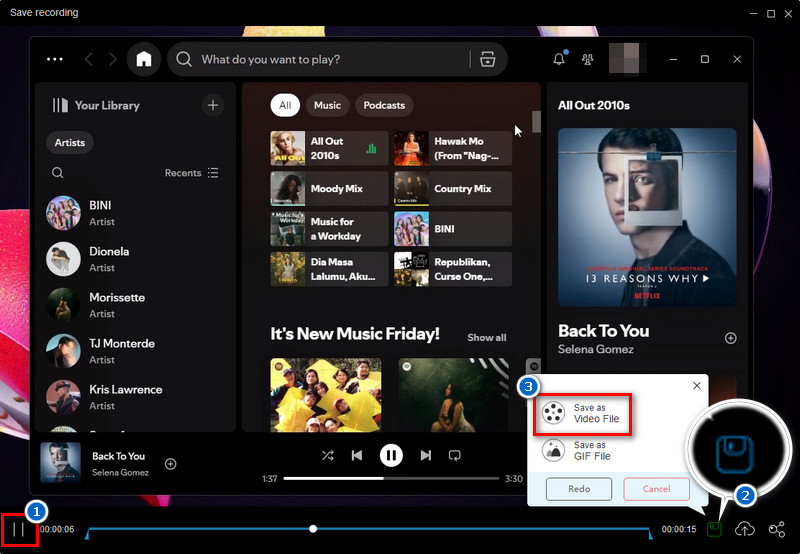
Step 4. Save the Recording
The recorded video will automatically appear, and you can preview it. Once you are satisfied, navigate to the Save icon at the bottom right corner and save the video file as a video file. Finally, select the folder where you want to save the recorded file.
Frequently Asked Questions
Can VLC record video from a webcam?
Yes, VLC can record video from your webcam using the DirectShow capture mode. In the settings, you just need to choose your webcam as the video device. Once set up, VLC will record whatever your webcam sees.

Why is there no sound on the VLC screen record?
VLC does not record audio by default when you’re doing a screen recording. To include sound, manually change settings and choose your microphone or audio input, which can be tricky. That’s why many people use other tools if they need both screen and sound.
How long can VLC record for?
VLC doesn’t have a built-in time limit for recording. You can record as long as you want, as long as your computer has enough storage space. Just ensure your system doesn’t go to sleep or run out of memory while recording.
Final Thoughts
We’ve just walked you through recording your screen using VLC Media Player. It’s a handy tool many of us already have, and it works well for basic screen recording tasks. From launching VLC to adjusting frame rates and saving your recording, the steps are simple once you know where to look. We encourage you to try out different settings, such as frame rate or capture modes, to see what works best for your needs. If VLC feels a bit limited, don’t worry—tools like Aqua Demo or AceThinker are great VLC alternatives for more advanced recording. Don’t be afraid to explore—learning by doing is the best way to improve!
| Tools | Effectiveness | Difficulty Level |
|---|---|---|
| VLC Media Player | Moderate: Good for basic full screen recording | Moderate: Requires setup and manual configuration for recording |
| Aqua Demo | High: Specifically designed for screen recording, includes more control over output | Easy: User-friendly with clear instructions |
| AceThinker Online Screen Recorder | High: Simple interface, reliable, with good quality capture | Very Easy: Simple, browser-based interface with minimal setup |