Recording gameplay on Steam is an excellent way to capture and share your gaming adventures with friends or a wider audience. Whether a casual player or an aspiring content creator, having a record of your best moments can help you improve your skills, entertain others, and even build a community. One of the most popular gaming platforms in the world is Steam. It offers built-in features that make it easy to record your gameplay without needing extra software. This feature lets you save important highlights and exciting scenes directly from your games. Moreover, recording gameplay preserves your achievements and is a valuable resource for tutorials and live streams. This guide will explore simple ways to record gameplay on Steam, making the process accessible to everyone. Let’s get started on your recording journey today.
On This Page
Best Game Recorder to Record Steam Gameplay
| Ease of Use | Very Easy |
| System Performance | Very low impact |
| Best For | Casual & high-quality recording |
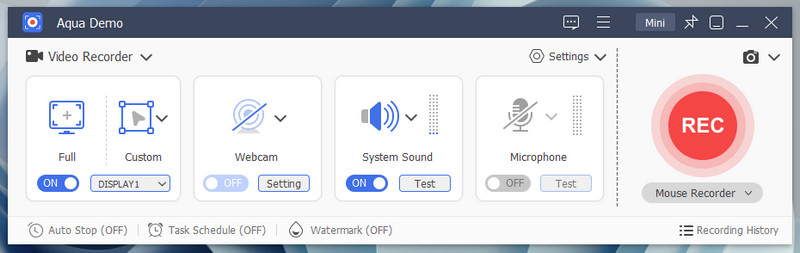
Aqua Demo is the best choice for users who want to capture their gameplay on Steam. This tool lets you record gameplay on Mac and Windows highlights in up to 4K resolution with 120 FPS, making it stand out. In fact, you can utilize this screen recording software on any activity on your computer screen. These include tutorials, videos, video calls, and more. In addition, Aqua Demo comes with various customization options, including recording area, output format, and audio source. You can adjust the recording area on full screen, a specific browser window, or a selected area/region. Besides, it allows you to record microphone audio and internal sound simultaneously. Additionally, Aqua Demo enables you to save your recording gameplay with various media formats such as AVI, MKV, MP4, WEBM, and more. Try the Aqua Demo now!
Step 1. Download and Install the Game Recorder
First, download the Aqua Demo’s installer file by clicking the above download button. Once downloaded, proceed to the installation process. You only need to accept all the wizard prompts on your screen. After installation, the recording software will automatically launch on your screen.

Step 2. Customize the Settings
Click the Video Recorder drop-down menu on the main interface and change it to Game Recorder. Afterward, go to Settings and modify it to your preference. This includes video and audio format and quality, output format, output location, etc. Then, don’t forget to click the OK button to save the change you’ve made.

Step 3. Start to Record Game on Steam
Next, click on the Select Game Window drop-down and choose Steam. Then, enable the webcam and Microphone audio if you want to include yourself and make commentary while playing. Afterward, click the big red REC button, and it will start recording after the 3-second countdown.

Step 4. Preview and Share the Recording
Once the gameplay is finished, click the small red box on the taskbar to end the recording. The preview window will appear on your screen, where you can playback the recorded Steam gameplay. If satisfied, you can locate the file on the output location you set earlier and share it.

Record Gameplay on Steam With its Built-In Recorder
| Ease of Use | Easy |
| System Performance | Very low impact |
| Best For | Quick Steam gameplay clips |
As of November 2024, Steam has introduced a built-in game recording feature, allowing users to capture and share their gameplay without relying on third-party software. It comes with Background Recording mode, meaning players can continuously record their sessions and select the desired sections to save and share later. Likewise, Steam's built-in recording also has Steam Timeline and Event Makers, which help you find key moments in the recorded gameplay, which is also why it stands out among others. Furthermore, it also allows you to manually or automatically record your gameplay on Steam. Moreover, you can use this built-in Steam recorder to record non-Steam games by simply adding the game to the timeline. However, the quality of the recordings may not be as high as that of dedicated recording software.
Step 1. Enable the Recording Feature
To start, click Steam Menu in the upper left corner and select Settings in the pop-up window. Then, go to the Interface panel and find the Client Beta Participation option. Here, click the drop-down menu beside it, choose Steam Beta Update, and click the Restart button to update. Once done, scroll down to the left side panel, and you will see the Game Recording option there.

Step 2. Start Recording Your Steam Gameplay
Next, choose your preferred game recording option, whether Record in Background or Manually Recording. When you select Record in Background, the recording will start once you play. On the other hand, press Ctrl+F11 on your keyboard to start and stop for Manual Recording.

Step 3. Preview the Recorded File
After recording, go to the Steam Menu again and select the View option. Here, choose the Recordings and Screenshots option to find the recorded file, screenshot, and clip you’ve made. Finally, you can view, edit, and share your Steam gameplay directly from this menu.

When enabled by the user, Steam Game Recording will capture your gameplay footage of games played through the Steam Client.
It will not capture video of your desktop or other programs.
Capture Steam Gameplay with Windows Game Bar
| Ease of Use | Easy |
| System Performance | Low impact |
| Best For | Casual recording with minimal setup |
Record Steam gameplay Windows 10 and 11 with Windows Game Bar! It is a built-in screen recording software that helps you record, capture, and monitor gameplay or other activities. One of the best features of this tool that makes it relevant is its real-time stats like CPU, GPU, and RAM usage. This helps you check if your game is running smoothly or slowing down your PC. Additionally, Windows Game Bar is easy to access; you can press the Win+G keys, and it will automatically launch. Furthermore, the tool provides Audio Controls, which you can use to adjust the volume of different apps while gaming, making it a handy option if you also want to record Minecraft smoothly. Likewise, it also allows you to live stream your game on game streaming platforms like Twitch. On top of that, enabling the Game Mode will give your game more resources for better performance and reduce background tasks to make gaming smoother.
Step 1. Launch the Built-in Recorder
To open the Windows Game Bar, press the Windows + G keys. On the other hand, go to the Start menu and search Windows Game Bar. Once the Game Bar is open, you can customize it and change the recording settings, such as audio, broadcasting, and more.

Step 2. Record Gameplay on Steam
Then, go to your Steam Library and open the game you want to record. When you're ready to record, press the Windows key + Alt + R to begin the recording. Alternatively, you can click the REC button on the Game Bar toolbar. Then, a small recording bar will appear on the screen, showing the timer and stop button.

Step 3. Stop and Find Your Recording
Next, click the STOP button on the recording bar or press Windows + Alt + R again to end the recording. Then, you can access your recorded video by going to the Videos > Captures folder in File Explorer. Lastly, preview your recorded gameplay and share it with everyone.

Record Steam Gameplay With OBS Studio
| Ease of Use | Difficult |
| System Performance | High impact if not optimized |
| Best For | Professional recording & streaming |
OBS Studio is a powerful, free tool for recording and streaming. The tool lets you record the entire screen, a specific window, or a game. This is great for creating gameplay videos, tutorials, or presentations. Additionally, OBS allows you to create multiple scenes with various sources, such as games, webcams, overlays, etc., and switch between them like a pro. Besides, it provides HD or 4K with advanced settings like bitrate control, frame rate adjustment, and multiple format options like MP4 and MKV. Moreover, this Steam gameplay recorder stands out for its live streaming feature, allowing you to stream directly to Twitch, YouTube, and Facebook. You can also customize the stream settings to ensure smooth, high-quality streams. However, record with OBS is not as straightforward as it may seem because it requires advanced learning to use it effectively. Also, that’s why it is not recommended for beginners.
Step 1. Install and Set Up OBS
First, you need to install OBS Studio. Go to the official website and download the latest version. Once downloaded, install the software and open it. When you launch OBS for the first time, it may ask you how you want to use it. Then, adjust the settings to your liking, such as resolution, recording format, bitrate, etc.

Step 2. Add Steam as a Source
Next, in the Sources box at the bottom, click the + button and choose Game Capture. Then, name your source (e.g., "Steam Game") and click OK. After that, enable the game audio, select Capture Specific Window to record a specific game, or Capture Any Fullscreen Application if your game is fullscreen. Lastly, click OK, and you're ready to record your game.

Step 3. Start Recording
Once everything is set up, ensure your game runs in OBS. Then, click Start Recording at the bottom-right of the OBS window and play your game as usual. To stop recording, go back to OBS and click Stop Recording. The recorded file will be saved automatically on the output location you choose. Now, you can watch, edit, or share your gameplay.

Tips for Optimal Game Recording
Whatever game recording software you use, following these tips will help you get the best recording quality while keeping your game running smoothly.
1. Best Settings for High-Quality Recording
To make your recordings look sharp and smooth, adjust these settings:
- Resolution: Match the recording resolution to your screen (e.g., 1920x1080 for Full HD). If your PC struggles, lower it to 1280x720.
- Frame Rate (FPS): Use 60 FPS for smooth and fast gameplay (best for action games). On the other hand, use 30 FPS if your PC is not powerful or if you want smaller file sizes.
- Bitrate: For 1080p with 60n FPS videos, the bitrate ranges from 15,000 to 20,000 Kbps, while for 1080p with 30 FPS, it ranges from 10,000 to 15,000 Kbps. For 720p with 50 FPS videos, the bitrate is between 5,000 and 10,000 Kbps.
- Recording Format: You can choose either MP4, which is widely supported, or MKV, which helps prevent file loss in case the recording crashes.
- Encoder Choice: A GPU encoder like NVENC, AMD VCE, or Intel Quick Sync is the best choice for performance, especially when using OBS, Bandicam, or ShadowPlay. On the other hand, a CPU encoder like x264 should only be used if you have a powerful CPU and no good GPU for encoding.
2. Reduce Lag & Improve Performance
Recording can slow down your game, so try these tricks:
- Close Unnecessary Apps: Shut down browsers, music players, and other background programs before recording.
- Use Game Mode (Windows): Simply go to Settings → Gaming → Game Mode and turn it ON to boost performance.
- Lower In-Game Graphics: If your game lags while recording, reduce shadows, reflections, and anti-aliasing.
- Use a Fast Storage Drive: Save recordings on an SSD or a separate hard drive to avoid stuttering.
- Monitor CPU & GPU Usage: Lower your recording resolution or FPS if your usage is too high.
3. Test & Adjust Before Recording
- Always do a short test recording to check video quality, smoothness, and audio levels.
- If the video looks blurry, increase the bitrate or resolution.
- If the recording lags, lower FPS or change the encoder to GPU-based encoding.
- Ensure your microphone and game audio are correctly balanced in the recorder’s audio settings.

FAQs About Steam
Is there a way to record gameplay on Steam?
Yes, you can record Steam gameplay using tools like Aqua Demo, OBS Studio, and Windows Game Bar. Also, Steam itself has a built-in recorder that you can utilize. These tools let you capture high-quality gameplay and save it as a video.

Can I play Steam games without the internet?
You can play many Steam games offline by using Steam's Offline Mode. To do this, open Steam while connected to the internet, enable Offline Mode in the settings, and restart Steam. However, some games need an internet connection for multiplayer or DRM checks.
Is the Steam game recording good?
Steam's built-in Game Recording is good for casual recording since it's easy to use and works directly in the Steam Overlay. However, it has fewer customization options than tools like OBS Studio and Aqua Demo, which offer better control over resolution, FPS, and bitrate. Third-party software is still the better choice if you need high-quality recordings with advanced settings.
Conclusion
Recording gameplay on Steam is now easier than ever, thanks to its built-in Game Recording feature and third-party tools like OBS Studio, Aqua Demo, and Windows Game Bar. Whether you need simple background recording or high-quality 4K footage, plenty of options exist. Steam’s built-in tool is great for quick captures. Still, advanced users may prefer third-party software for more control over resolution, FPS, and bitrate. To get the best results, ensure to adjust your recording settings, close unnecessary apps, and test your setup before starting. Additionally, experiment with different tools to see which works best for your needs. Moreover, no matter your chosen method, Steam Recording gameplay will help you capture and share your best gaming moments effortlessly!