Recording gameplay on a Mac is essential for many reasons. Gamers often want to share their exciting moments, impressive skills, and game achievements with friends or a broader audience. It’s also a way to create content for YouTube, Twitch, or social media platforms, building a personal brand or community. Additionally, recording gameplay can help players analyze their performance, identify mistakes, and improve their strategies. For developers and testers, recording gameplay provides valuable insights into game functionality and user experience. Moreover, Mac users can access various tools and software that make capturing and sharing gameplay straightforward. This article provides multiple screen recording tools to record gameplay on Mac.
Below, you will see a chart that compares each tool's disadvantages.
| Game Recorders | Disadvantages |
|---|---|
| QuickTime Player | It cannot natively record internal audio without additional software. |
| Screenshot Toolbar | The Screenshot Toolbar offers only basic screen capture and recording features. |
| Aqua Demo | Aqua Demo is a paid software, which might not be ideal for users looking for free options. |
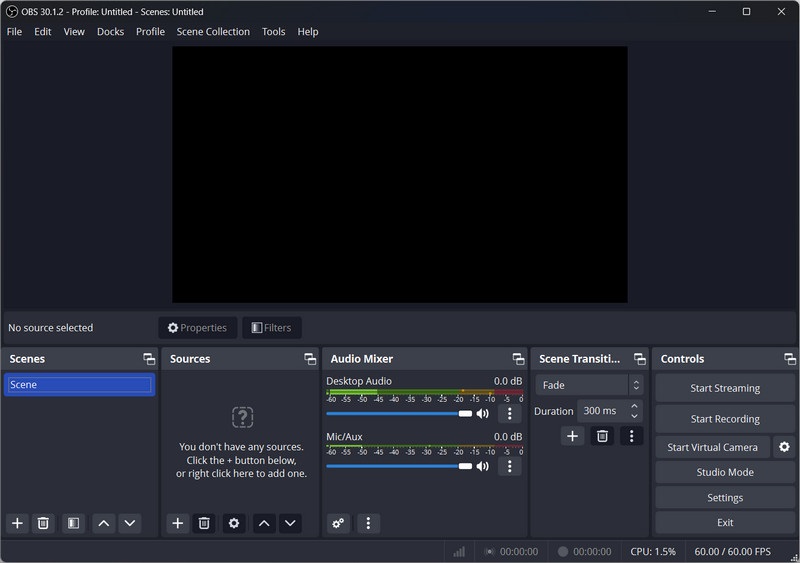
| OBS Studio | OBS Studio has a complex interface that can be overwhelming for beginners. |
| ScreenFlow | The software may consume many resources, potentially slowing down older or lower-spec Macs when performing intensive editing tasks. |
After learning about each disadvantage, let's dive into more detail about each tool. We'll list some steps for built-in recorders on Mac. Also, this article provides the key features of each tool and some tips for having a professional look at recorded gameplay.
| Solutions | Brief Information | Read More |
|---|---|---|
| Built-in Screen Recorder for Game Capture on Mac | Two built-in screen recorders for Mac with simple steps to use | Learn More |
| Third-Party Software for Advanced Recording | Three alternative game recorders with advanced recording features | Learn More |
| Setting Up Your Recording Environment | Some preparations you need to acquire before recording gameplay | Learn More |
| Best Practices for Optimizing Your Recording | Improve your recording by following these practices | Learn More |
| Extra Tips: Editing and Enhancing Your Gameplay Recordings | Enhance you recorded gameplay by editing it using iMovie | Learn More |
| Frequently Asked Questions | Questions and answers that are commonly asked when recording gameplay using built-in tools | Learn More |
Built-in Screen Recorder for Game Capture on Mac
1. QuickTime Player
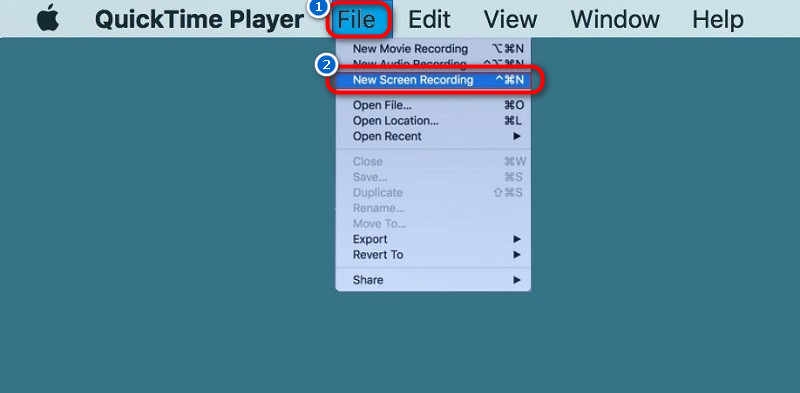
One of the most accessible and built-in screen recording software for Mac users is the QuickTime Player. Its features make it a suitable choice for capturing gameplay or other on-screen activities. One key feature of this built-in tool is its ability to record the whole screen or specific region. Additionally, it captures computer audio using an external source and microphone so that you can screen record with game sound or voice narration. Furthermore, aside from recording, QuickTime Player also supports basic video editing capabilities, allowing users to trim, split, or annotate the recorded footage.
User Guide:
- Launch the QuickTime Player on your Mac, then on the menu bar, click "File." After that, choose the "New Screen Recording" option. After that, a Screen Recording window will appear.
- In the Screen Recording window, click the drop-down menu next to the record button to reveal the recording options. Choose an audio source to include voiceover or game sounds.
- Once you're all set, you can hit the "Record" button. You will be prompted to choose the area of the screen you want to record. Then, the recording will commence after the 3-second countdown.
2. Screenshot Toolbar
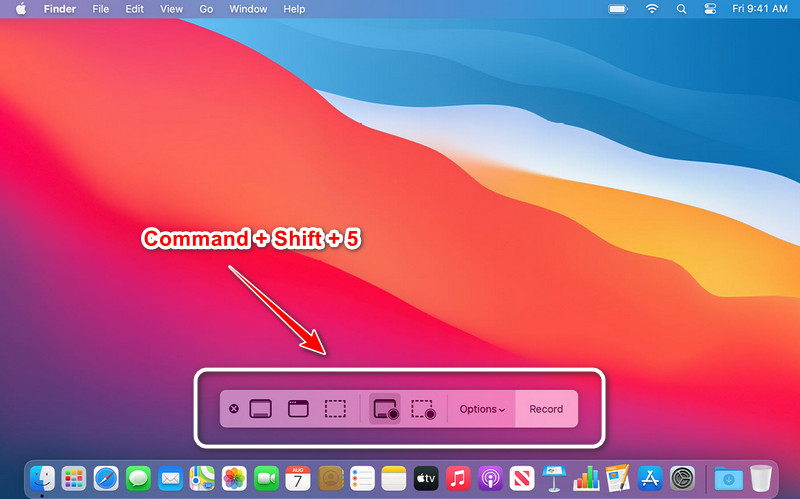
The Screenshot Toolbar is another useful game recorder for Mac users. Like QuickTime Player, it offers both full-screen and region capture options. Furthermore, you can easily access this built-in tool using the shortcut keys "Command + Shift + 5." Also, it can capture your audio from a microphone but doesn't support recording internal audio. Additionally, Screen Toolbar is only available on macOS Mojave and later, as it's integrated into the operating system. Furthermore, you can see the guide below to leverage this tool for recording gameplay or other activities on your Mac.
User Guide:
- To begin with, launch the tool by pressing Command + Shift + 5 keys on your keyboard. The Screenshot Toolbar will then appear on the screen, and there will be various options for capturing screenshots and recording videos.
- Next, click the Options tab to customize the recording settings, such as microphone, save location, and more. Once the settings are configured, choose between the full screen or the selected portion of the screen for capture.
- Afterward, go to your gameplay and press the Record option on the Screenshot Toolbar. The recording will start depending on the countdown you set up earlier. When you're done, tap the stop button to stop the recording.
Third-Party Software for Advanced Recording
1. Aqua Demo
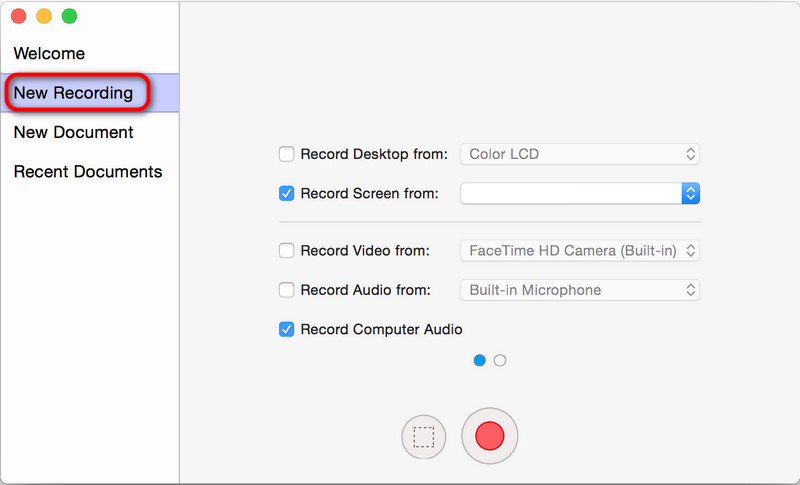
Aqua Demo excels in capturing high-quality gameplay footage on Mac. It supports recording at various resolutions, including Full HD and even 4K, ensuring your gameplay is captured in stunning detail. Additionally, the software's "Game Recording" mode utilizes advanced encoding algorithms to minimize performance impact while maintaining superb video quality. With this recording mode, you can capture steady gameplay, making it one of the best screen recorders for Mac gaming. Aside from that, unlike the built-in recorders of Mac, Aqua Demo can screen record gameplay on Mac with sound, including internal audio and microphone input. Moreover, it delivers a streamlined experience without noticeable frame drops or lags by optimizing the frame rate settings.
Key Features:
- It supports different video formats (MP4, WMV, F4V, MOV, GIF, and more) for your recording, making it accessible on multiple devices.
- You can schedule your recordings using its Task Scheduling feature, so you don't need to set them up manually.
- Enjoy its annotation tools, such as arrows, shapes, highlights, etc.
2. OBS Studio
When finding the best game recording software for Mac, OBS Studio stands out as a powerful and versatile tool. As open-source software, it presents many features and customization options, making it a favorite among streamers, gamers, and content creators. With this advanced screen recording tool, you can record Mac screen with audio, both internal audio and microphone. Besides, it allows you to create multiple scenes from different sources and switch between them during recording. Furthermore, regarding its recording quality, this tool will enable you to adjust bitrate, fps, and resolution to achieve the desired output.
Key Features:
- Aside from recording, OBS also has a streaming feature that you can use to broadcast your gameplay to platforms like Twitch, YouTube, or any other platform.
- It supports capturing screens, individual windows, webcams, and other sources.
- You can use its hotkeys to access the most common functions and controls.
3. ScreenFlow
ScreenFlow is a powerful macOS screen recording and video editing tool that offers several features that are ideal for recording gameplay. One of the key advantages of ScreenFlow is its ability to record multiple screens simultaneously and capture video from external devices like webcams. Additionally, it provides robust editing capabilities, allowing you to trim, splice, and enhance the recorded footage with annotations, callouts, and overlays. Furthermore, customize your recording screen as it can record an application, window, or a specific or full screen, and you can also record internal audio Mac.
Key Features:
- It allows you to animate graphics, titles, and logos with video, image, and text animations.
- This game recording software for Mac enables users to publish videos directly on Wistia, YouTube, and more.
- ScreenFlow allows you to apply effects such as zoom, pan, and slow motion to enhance your video.
Setting Up Your Recording Environment
1. Prepare Your Screen
- Clean up your desktop by closing unnecessary applications and files to avoid distractions and make your content look professional. Then, ensure the game you plan to record is open and properly set up.
2. Install and Configure Aqua Demo Settings
- If you want an advanced screen recorder instead of built-in recorders on Mac. In this case, you can download and install Aqua Demo. After installing, open the screen recording tool and adjust the recording settings. Set the resolution and frame rate from there to match your desired quality. Also, enable system sound and microphone to capture game sounds and your voice if needed.
3. Set Up Your Recording Space
- To avoid background noise, ensure you’re in a quiet environment. Also, if you’re using a microphone, position it close to you for clear audio capture. Furthermore, ensure your lighting is good if you include a webcam feed. And lastly, check that your computer is running efficiently to avoid any performance issues during recording.
4. Start Recording Gameplay
- Once you are all set up, proceed to select a recording area. You can choose whether it is on full screen, in a selected potion, or a specific window. After that, click the Record button, which will start after the 3-second countdown.
Best Practices for Optimizing Your Recording
Following best practices to improve the final product's quality and effectiveness is essential to ensuring a successful screen-recording gameplay experience.
1. Choosing the Right Format and Codec
It is important to select a video format and codec that balances quality and file size. In fact, the common choices are MP4 for video format and H.264 for codec, as they provide good quality and are widely supported.
2. Managing Storage Space
Before you start recording, it's crucial to check that your computer has sufficient free storage. Large video files can easily eat up your disk space, so having a plan is wise. This plan may include saving recordings to an external drive or cloud storage if necessary. Also, this preparation will keep you organized and ready to capture your gameplay.
3. Finishing the Recording
When you're done recording, stop the capture by clicking the stop button in Aqua Demo. Then, another window will appear on your PC screen, along with the recorded gameplay. From there, review your recording to ensure it's clear and complete. Next, you don't need to save it manually since the recorded video will automatically be saved in the output folder.
Extra Tips: Editing and Enhancing Your Gameplay Recordings
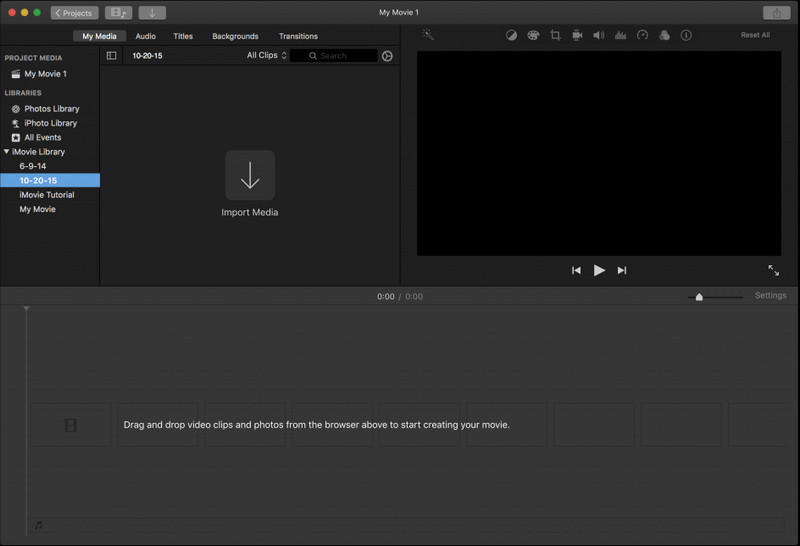
If you want to enhance and edit your recorded gameplay, iMovie is a great tool. iMovie is a video editor developed by Apple. It is designed for Mac computers and iOS devices like iPhones and iPads. In fact, it has many features to offer for video editing, which can be very useful for editing your gameplay recordings. One of the key features of iMovie is its simple and intuitive interface with a drag-and-drop interface for easy video editing. Additionally, it provides a lot of transitions, effects, and themes that can be applied to your video to give it a professional look. Moreover, this video editor lets you adjust the speed of the video clips for dramatic effects. Another feature you would love is that iMovie can export your edited videos in 4K high-resolution format.
User Guide:
- Begin by opening iMovie and creating a new project. Next, click the "Import Media" button to select recorded gameplay from your computer or connected devices. Once imported, the media will appear in the project's library and be ready for editing.
- Now, drag the imported clips from the media library to the timeline. From there, you can start trimming, splitting, or rearranging clips by clicking and dragging the edges or using the toolbar options. You can easily incorporate transitions, titles, and effects by simply selecting them from the menu and dragging them onto the timeline as needed.
- After editing, review the video to ensure everything is in place and make any necessary adjustments. Next, click the "Share" button in the upper-right corner to choose export options. Lastly, select the desired format and settings, then click "Next" to finalize and export your edited video.
Frequently Asked Questions
Why is there no sound when I record on my Mac?
There might be an issue with your microphone settings or the microphone itself. Please check if the microphone is properly connected and selected as the input device in your sound settings.

Can QuickTime record internal audio?
No, QuickTime cannot natively record internal audio on a Mac. Third-party software, like Soundflower or Loopback, would help you capture internal audio while recording with QuickTime.

Why can't I record on my Mac?
If you can't record on your Mac, it might be due to insufficient storage space or lack of necessary permissions. Check your storage capacity and ensure that the recording app has permission to access your microphone and camera.

Aqua Demo is an excellent Screen Recorder
I like the Aqua Demo user interface while recording the video and I like it very much like its tutorials and step-by-step help when we get stuck while using it.


