Recording high-quality audio for YouTube is just as important as having great video. The clear sound makes your content more professional and engaging. Whether you’re creating tutorials, vlogs, podcasts, or gaming videos, good audio helps your audience stay interested. In this guide, we’ll show you step-by-step instructions on how to record audio for YouTube. You’ll learn about the best microphones, recording software, and simple tips to improve sound quality. Even if you’re a beginner, you can get great audio with the right setup. We’ll also cover ways to reduce background noise, adjust volume levels, and make your voice sound clear and natural. Good audio can make a big difference in how people enjoy your videos. By the end, you’ll know how to record, edit, and enhance your audio for a professional touch. Let’s dive in and improve your YouTube sound quality!
| Sections | Brief Information |
|---|---|
| Best App to Record Audio for YouTube | See the best audio recording software to record high-quality audio for YouTube Learn More |
| Best Way to Record Voice for YouTube | Another high-quality audio recorder for recording voice overs Learn More |
| Alternative Tools to Record Audio for YouTube | Review of the three recording software that can be used to record audio for YouTube Learn More |
| How to Choose the Right Microphone for Recording Audio for YouTube | List of features to look for to find the best microphone for you Learn More |
| Frequently Asked Questions | Some questions and answers commonly asked about the topic Learn More |
| Conclusion | Summary of the key points of the whole article Learn More |
Best App to Record Audio for YouTube
| Effectiveness | High |
| Ease of Use | Easy |
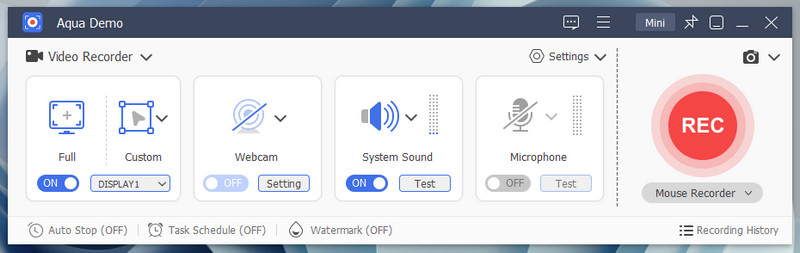
Aqua Demo is a video recording software that captures high-quality videos on your computer screen. But did you know that this versatile tool can also be your voice recorder for YouTube? Yes! Aqua Demo can record audio only from your microphone, providing a user-friendly experience to create clean, studio-quality audio tracks. Moreover, this tool has various recording options, including Audio Recorder. It lets you simultaneously record high-quality internal audio and microphone audio to overlay commentary easily or back music with your video. What makes this tool relevant is that it already has microphone noise cancellation and microphone enhancement, so you can ensure that you get a crystal-clear audio recording session for your YouTube videos. On top of that, Aqua Demo provides features to edit the recorded audio, adjust the volume, and export the recorded audio file in various formats like MP3, WAV, and more.
Step 1. Get the Audio Recorder
To start, get the installer file of Aqua Demo by choosing any download button above, depending on your OS. Next, proceed to the installation process and follow the prompts pop-ups on your screen for successful installation. Once done, the Aqua Demo will launch automatically on your computer screen. Afterward, click the Video Recorder drop-down and choose Audio Recorder to access the audio tools.

Step 2. Change Settings
Go to the Settings menu and visit the Sound option. Here, select your microphone from the drop-down menu and adjust the input volume to ensure the best recording levels. Then, tick the box for Microphone Noise Cancellation and Microphone Enhancement to get crystal-clear audio. Afterward, hit the OK button below to save your changes.

Step 3. Record Your Audio
Once everything is set, turn on the microphone on the Audio Recorder window. Then, when you are ready, click on the Record button to start recording your audio for your YouTube video. After finishing recording, hit the Stop button to end the session.

Step 4. Preview and Edit
Once you stop the recording, the preview window with the recorded audio clip will appear on your screen. Feel free to play it and make any necessary edits, like trimming the audio clip's starting and ending points if you want. Lastly, you can locate the recorded audio in the designated output folder since Aqua Demo automatically saves it once you stop the recording.

Best Way to Record Voice for YouTube
| Effectiveness | High |
| Ease of Use | Easy |
Another way to do voiceover is using Aqua Sound, a powerful audio recording software that delivers studio-quality results. One of the best features of this tool, and why it makes it stand out, is that it lets you select the audio quality you prefer, ranging from lowest to lossless. In that case, you can ensure that the recorded audio file has the right balance between file size and audio quality. In addition, Aqua Sound supports various output formats such as MP3, AAC, WMA, and M4A, making it easy to choose the file type that suits your needs the most. Besides, you can adjust the input volume for your microphone audio and system sound while recording. This is very useful to turn up your mic levels so that your voiceover comes out clear and audible.
Step 1. Install Aqua Sound
To get started, download Aqua Sound’s installer file from the website. Alternatively, you can hit the download button above. After downloading, follow the instructions on the installation wizard to install it on your computer successfully. The tool will then launch automatically after installation.

Step 2. Customize Audio Recording Settings
Once Aqua Sound opens, click on the Settings icon at the top right of the window. From here, you can select the output audio format, audio quality, input microphone, and more. After making your changes, hit the OK button to save them.

Step 3. Record Your Voice Over
After modifying the Settings, enable the Microphone option before starting recording. Once all set, click the red Record button to capture your audio. While recording, you can adjust the volume of the system sound and microphone sound to avoid overdriving or getting too low audio. When you’re done with the recording, click the Stop button.

Step 4. Stop and Save the Recording
Then, the preview window will appear for you to review the recorded audio. If satisfied, click the Save button and select an output folder you prefer to keep the audio file. Finally, you can now attach your voiceover for your YouTube video.

Alternative Tools to Record Audio for YouTube
1. Audacity
| Effectiveness | High |
| Ease of Use | Moderate |
Audacity is a free and powerful audio recorder for YouTube videos that works on Windows, Mac, and Linux. It offers many features to help YouTubers record and edit high-quality audio. One of these is its multi-track recording, where you can record multiple audio tracks separately and mix them later, which also stands out. This is useful for adding background music, voiceovers, or sound effects. Audacity also provides a Noise Reduction feature that removes background noise like fan sounds, hums, or static, making your voice clearer and more professional. Apart from that, this recording software has basic audio editing tools, including cut, copy, and paste for easy editing. Besides, it also has fade-in, fade-out, and silence features for smooth transitions. Furthermore, Audacity also allows you to adjust input volume to prevent distortion or low-quality sound, which helps balance the loud and soft sections of your recording.

2. OBS Studio
| Effectiveness | High |
| Ease of Use | Difficult |
The next alternative tool for YouTube to record audio is OBS Studio. It is one of the popular 1080P recording tools that offers high-quality audio and video recording. Additionally, it lets you capture audio from multiple sources like microphones, system sound, and external devices. Besides, it has live monitoring and audio sync features that allow you to listen to your audio while recording to ensure quality. What makes OBS unique is its Noise Suppression and Noise Gate. These features help remove unwanted background noise, and the noise gate feature mutes the mic when you’re not speaking, improving clarity. Apart from that, this audio recording software provides audio mixing and filters like compression, equalization, and gain control for balanced sound. Not only that, but OBS Studio supports WAV, MP3, AAC, and more for professional-quality sound.

3. Rev Online Voice Recorder
| Effectiveness | Moderate |
| Ease of Use | Easy |
If you prefer an online audio recorder for your voice over for YouTube videos, go for Rev Online Voice Recorder. It is a browser-based voice recorder that is easy to use and requires no downloads or installations. Besides, you can use it on any device, like smartphones, tablets, and computers. The key advantage of this tool is that it automatically transcribes your recordings to text. However, a fee is involved if you want to access the transcripts, which costs $1.99 per minute. Furthermore, Rev Online Voice Recorder provides basic editing features like trimming, splitting, and merging audio clips. Likewise, it also allows the download of the recorded audio file in MP3 format. On top of that, Rev works on various browsers. Still, they recommend using Google Chrome for desktop and Android phones and Safari for iOS devices.

How to Choose the Right Microphone for Recording Audio for YouTube
Picking the right microphone is the first step to recording great audio for YouTube. A good mic helps make your voice clear and professional while reducing background noise. Here’s how to choose the best one for your needs:
1. Types of Microphones
- USB Microphones – These are easy to use because they plug directly into your computer without extra equipment. They offer good sound quality and are perfect for beginners. For example, Blue Yeti and Audio-Technica AT2020 USB.
- XLR Microphones – These devices offer superior audio quality but necessitate an audio interface for connection to your computer. They are best for professional recordings and advanced users. For example, Shure SM7B and Rode NT1.
- Lavalier (Clip-on) Mics – Small and lightweight, these clips attach to your clothing and are perfect for interviews or vlogs. They capture clear speech while allowing hands-free movement.
- Shotgun Microphones – These are long, narrow mics focusing on sound from a specific direction. They work well for filmmaking and outdoor recordings, reducing background noise.
USB models connect directly to your computer via USB, eliminating the need for extra audio interfaces or mixers.
Their simplicity and ease of use make them a top choice for YouTubers involved in voiceovers, podcasting, or gaming commentary.
2. Budget vs. Quality
- If you’re starting, a USB mic is a great balance between price and quality.
- For studio-quality sound, consider an XLR mic with an audio interface.
3. Extra Features to Look For
- Noise reduction helps block out unwanted background sounds, making your voice clearer. This is useful if you record in a noisy environment.
- Directional pickup (Cardioid pattern) means the mic focuses on sound from one direction while ignoring background noise. This feature is great for voiceovers and podcasts.
- Durability is important if you plan to use the mic regularly. A sturdy, well-built microphone will last longer and maintain consistent sound quality.
A good microphone makes a big difference in your YouTube videos. Pick the one that fits your needs, and you’ll have clear, professional audio!

Frequently Asked Questions
How do you record your voice for YouTube videos?
You can capture your voice using a microphone connected to your computer or phone. Software like Aqua Demo, Aqua Sound, Audacity, OBS, or Rev Online Voice Recorder helps capture and edit audio. Make sure to record in a quiet space to get the best sound quality.

How do YouTubers get good audio?
YouTubers use high-quality microphones and record in quiet places to reduce background noise. They also use software with noise reduction and audio enhancement features to improve clarity. Proper mic placement and post-editing also help make the sound clear and professional.
What device do YouTubers use to record?
YouTubers use devices like USB or XLR microphones, smartphones, and digital voice recorders to capture audio. Many also use computers with recording software to edit and enhance their sound. Some use cameras with built-in mics for convenience, but external mics provide better quality.
Conclusion
To sum up, recording high-quality audio for YouTube is essential for making your videos clear, professional, and engaging. Choosing the right microphone, using good recording software, and minimizing background noise can greatly improve your sound. Furthermore, tools like Aqua Demo, Aqua Sound, Audacity, OBS, and Rev Online Voice Recorder help capture and enhance audio effectively. Moreover, the more you practice, the better your audio quality will become. We recommend experimenting with different settings, microphone placements, and editing techniques to find what works best. Don’t be afraid to adjust and refine your recordings for the best results. Likewise, to achieve professional sound, always record in a quiet space, use noise reduction tools, and balance your audio levels. Good audio can make a big difference in how your audience experiences your content. You can create high-quality audio that engages viewers with the right setup and techniques!