Recording your screen and audio on Windows 10 is essential for various tasks, from creating tutorials to capturing gameplay. This feature allows you to demonstrate processes or save memorable moments with sound visually. Windows 10 offers robust screen and audio recording capabilities, catering to different needs. You can utilize built-in tools like the Xbox Game Bar for straightforward recordings, ideal for gamers and casual users. For more advanced options, third-party software provides additional features such as editing and higher customization. Whether you're showcasing software workflows, preserving video chats, or capturing online lessons, recording screen and audio on Windows 10 ensures you can easily share and revisit content. These tools empower users to document activities comprehensively, enhancing productivity and communication across various applications and industries. This article will present multiple screen recording tools you can use to record screen and audio Windows 10.
| Solutions | Brief Information |
|---|---|
| Xbox Game Bar - Built-In Recorder on Windows 10 | Windows 10 and 11 have an inbuilt screen recording tool called Xbox Game Bar Learn More |
| Third-Party Screen Recording Tools With Audio | Aqua Demo, OBS Studio, and ScreenPal are screen recorders that can capture both screen and audio on Windows 10 Learn More |
| Techniques for Effective Screen Recording | Important techniques to have high-quality recording with clear visuals and sounds Learn More |
| Frequently Asked Questions | Some questions that are usually asked when screen recording with audio in Windows 10 Learn More |
| Conclusion | Summary and last saying about recording screen with audio on Windows10 Learn More |
Xbox Game Bar - Built-In Recorder on Windows 10
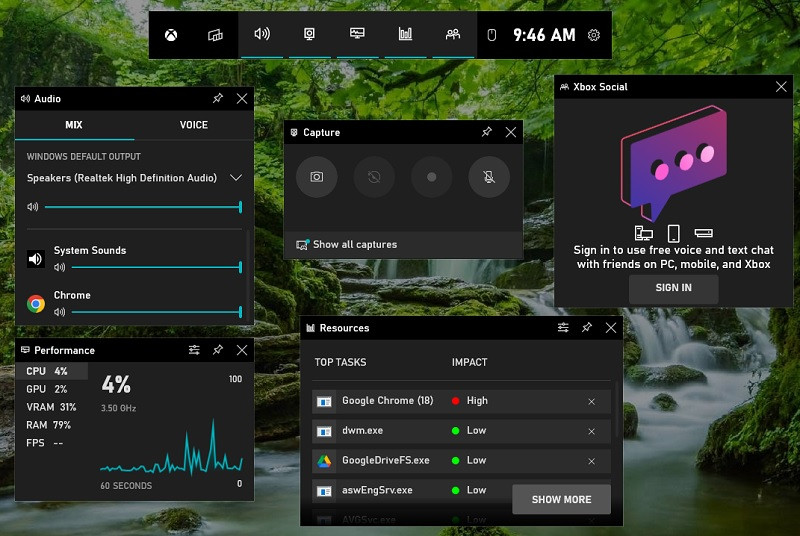
The Xbox Game Bar is an inbuilt screen recording feature of Windows 10 designed for gamers to enhance their gaming experience. It offers tools like screen recording, screenshot capture, and system performance monitoring without needing to exit games. In addition, you can easily adjust the system's sound volume. The Xbox Game Bar also shows real-time performance metrics, such as CPU, frame rate, and system temperature, allowing you to monitor your system's performance while gaming. However, its functionality mainly focuses on gaming-related activities. This means that it doesn't have advanced features like extensive video editing or customization options in dedicated software. Nor does it provide the flexibility to record internal audio on Windows outside of gaming scenarios.
How to Enable Xbox Game Bar
To enable the Xbox Game Bar, press Win + G while in a game or go to Settings > Gaming > Xbox Game Bar and toggle it on. Once enabled, you can access its features by pressing Win + G anytime during gameplay or other applications. After accessing the tool, you can follow the guide below on how to screen record on Windows 10 with audio.
Step 1. Modify Recorder Settings
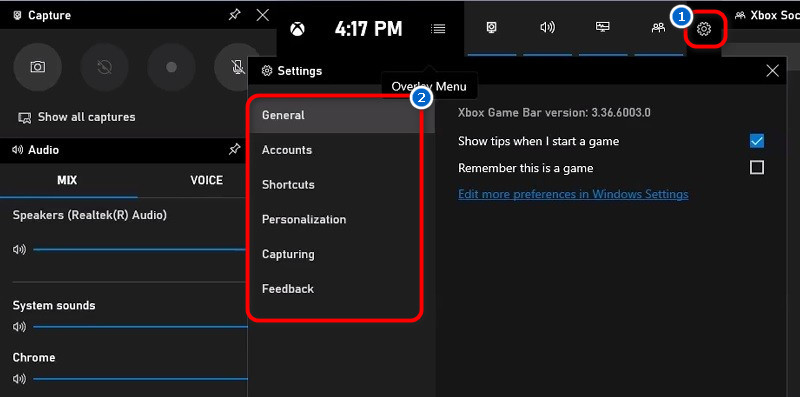
On the main UI of the screen recorder, click the Settings icon beside the time. Then, modify its Settings depending on your preference from General to Audio. Once configured, open the application or game you wish to record screen with audio Windows 10.
Step 2. Start Recording
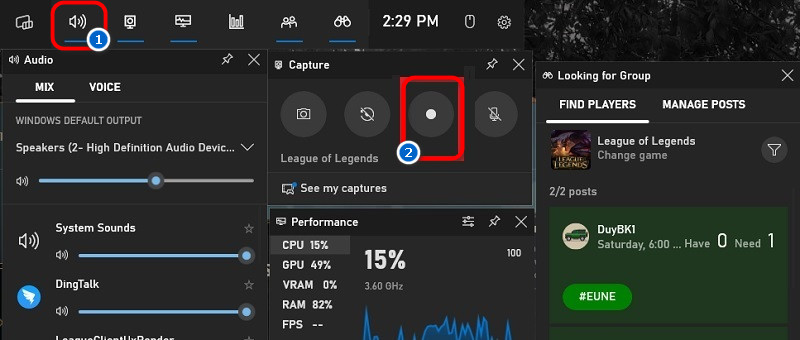
Press the Record icon on the Game Bar to begin the screen capture process. Alternatively, you can use the Win + Alt + R keyboard shortcut to initiate recording. Apart from system audio, you can also enable the microphone to record your voice during the session.
Step 3. Review the Recorded Video
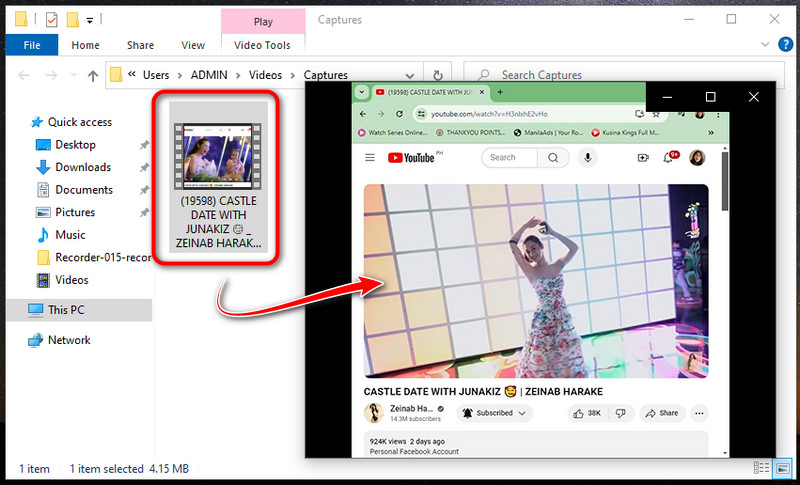
After completing the recording, click the Stop icon or press Win + Alt + R again to stop. The recording video will then automatically be saved to your files. From there, you can locate and preview the recorded video to check if the screen capture and audio were recorded properly.
Third-Party Screen Recording Tools With Audio
1. Aqua Demo
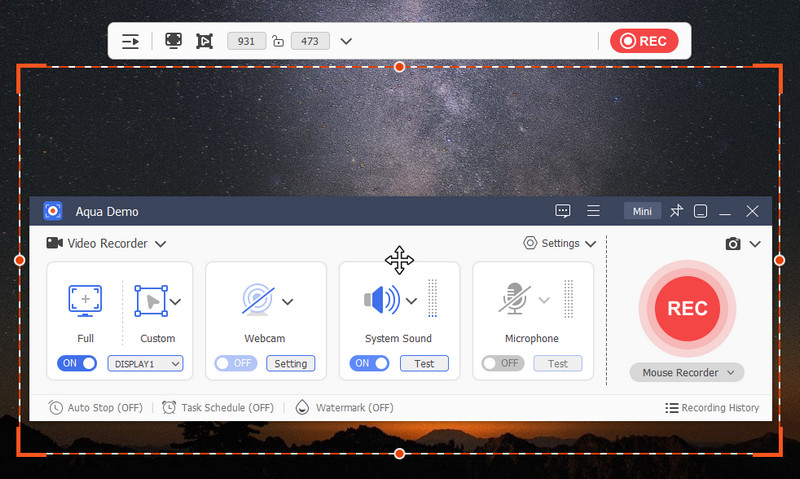
If you are looking for a screen recorder with voice for Windows 10 and Mac, Aqua Demo is for you! It is one of the most reliable screen recording tools and has many useful features. One of the notable features of this tool is its high-quality recordings. You can choose from various resolutions available, from 720p to 1080p and up to 4K resolution. Aside from that, this software can also record up to 60fps (framerate per second), enabling you to create smooth visuals with clear sound. Additionally, it lets you record audio from system sound and microphone. Moreover, this screen recorder has drawing tools such as lines, shapes, arrows, and more, allowing you to annotate your recording in real-time.
Key Features:
- It allows you to adjust the recording mode from full screen or a selected region.
- The tool has a Task Scheduler feature, which allows you to automatically set specific starting and ending times to start and stop the recording.
- It can also provide mouse and click effects.
- Aqua Demo also supports multiple media formats such as MP4, AVI, WMV, and more popular formats.
- It has a straightforward, clean UI that is perfect for beginners and professionals.
Step 1. Install the Screen Recording Tool
To record screen with audio Windows 10, first click the necessary download button below to get the installer file of Aqua Demo. Once downloaded, install the tool by following the prompts on your screen. The software will launch automatically after the successful installation.
Step 2. Customize the Aqua Demo's Settings
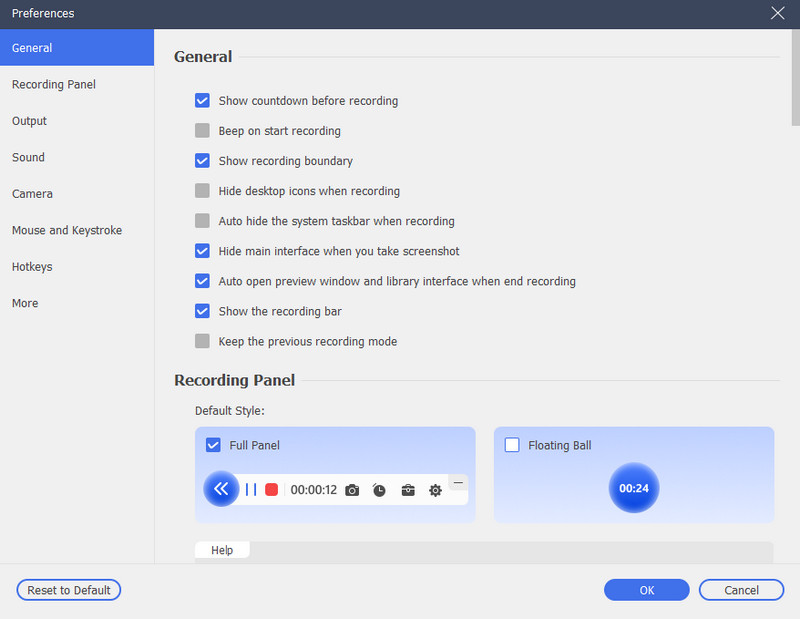
After installing the recorder, you must configure its settings according to your liking. Simply click the Settings option and choose Record Settings from the drop-down menu. From there, you can start modifying it, including the general settings, sounds, output, recording settings, and more. Afterward, save the changes by clicking the OK option.
Step 3. Start Recording PC's Activity
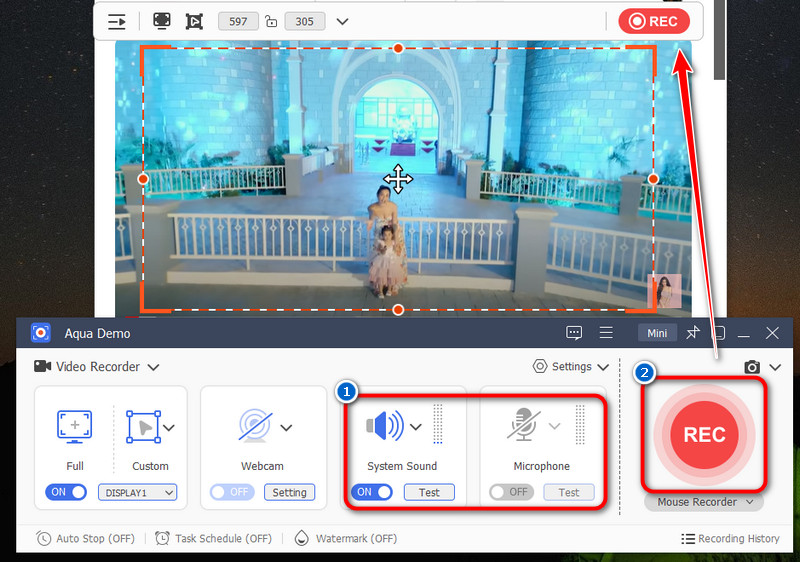
Go to the activity you want to record, whether a game or video. Then, set the recording area to fit on the screen. Then, turn on the system sounds and microphone to ensure that the recording has audio. Afterward, click the REC button and start playing the game or video after the 3-second recording countdown.
Step 4. Preview and Share the Recorded File
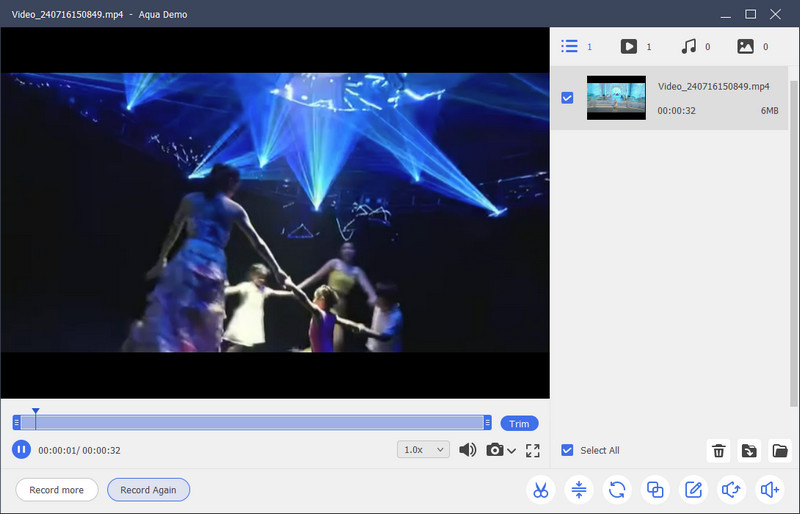
If you wish to stop the recording progress, tap the Stop icon. Then, the Preview panel will appear on your screen, allowing you to playback the recorded activity. You can also cut or trim the unnecessary parts of the recorded file from the preview panel. Afterward, you don't need to save the video manually because the tool automatically saves it in the designated folder you chose earlier. Lastly, you can share the recorded video on your social media accounts to share it with your friends.
2. OBS Studio
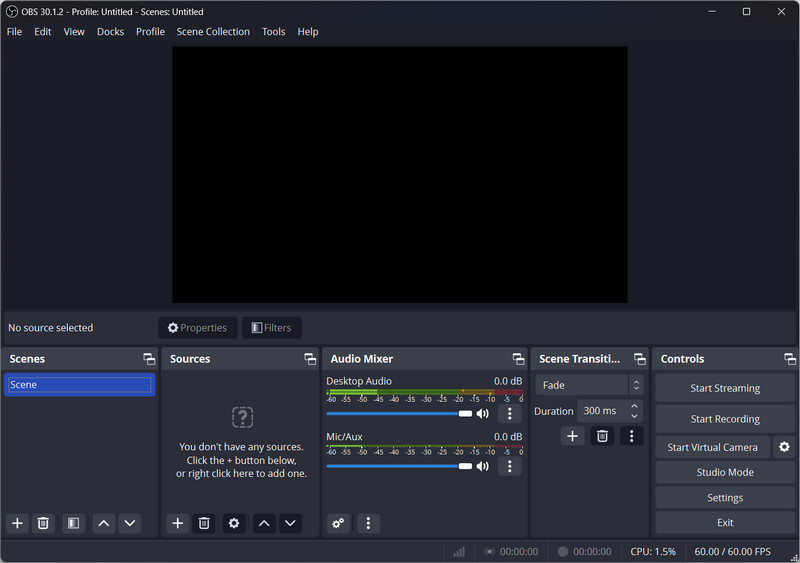
OBS Studio is another popular screen and audio recorder Windows 10, a free and open-source screen recorder software. The tool runs on Windows, Mac, and Linux, enabling you to record in 1080p HD or capture your webcam. Also, it has a high-performance real-time video/audio capture and mixing capability. It can also record multiple sources and scenes, allowing you to record various screens simultaneously. Also, it can capture high quality and higher fps ranging from 30 to 60 FPS. However, its interface can be quite complex for beginners but provides many flexibility and customization options for more advanced users.
Key Features:
- Extensible with plugins and scripts for additional functionality and customization.
- Provides advanced audio mixing capabilities with filters and sources for mic, desktop audio, etc.
- It allows high-quality recording and live streaming to Twitch, YouTube, and more.
- The recordings can be saved in FLV, MKV, MP4, and MOV formats.
3. ScreenPal (formerly Screencast-O-Matic)
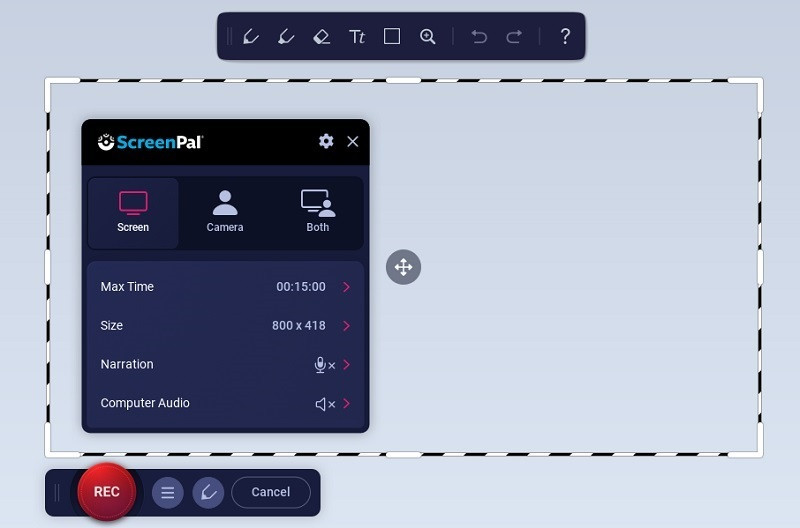
The last recommended screen and sound recorder Windows 10 is ScreenPal, formerly Screencast-O-Matic. It’s a simple and easy-to-use screen capture tool that can record your screen with audio. ScreenPal can record both system audio and microphone at the same time. Additionally, the software allows you to edit and enhance your recording afterward. These include adding annotations, text, and callouts. Furthermore, it can also capture video from your webcam and combine it with your screen recording. Also, it has a free version with unlimited features like screen recording for up to 15 minutes and 1080p HD quality outputs.
Key Features:
- Allows recording of full screen, specific windows, or custom areas.
- The tool will enable you to automatically set timers to start and stop recordings.
- Directly saves recordings to cloud services like Google Drive or Dropbox.
- Provides basic video editing tools to remove background, trim, cut, or add annotations.
Techniques for Effective Screen Recording
Producing high-quality screen recordings with effective learning outcomes requires some techniques and best practices. These techniques empower users to create professional-quality tutorials, gameplay videos, presentations, and demonstrations precisely and easily. It’s also important to know how to troubleshoot no sound in recordings, ensuring your videos are both clear and engaging. Additionally, you can explore other techniques for effective screen recording.
- Recording Specific Windows or Regions: You can capture precise content by selecting specific application windows or custom screen regions.
- Adding Webcam Overlay: Integrate a webcam feed onto your screen recording for personalized touch or instructional purposes.
- Using Hotkeys for Efficient Recording: Streamline the recording process with customizable hotkeys for starting, pausing, and stopping recordings without interrupting your workflow.
- Audio Management: Adjust audio sources, such as system sound and microphone input, to achieve optimal recording quality and clarity.
- Annotation and Highlighting: Enhance recordings with real-time annotations, text overlays, arrows, and highlights to emphasize key points or actions.
- Scheduled and Automated Recording: Set timers or schedules to initiate and conclude recordings automatically, which is ideal for capturing time-sensitive content.
Frequently Asked Questions
How do I record myself with audio on Windows 10?
To record yourself with audio on Windows 10, ensure that your recording tool supports capturing both webcam and computer screen. Also, before recording yourself, make sure the microphone is enabled. This will allow you to record your voice, including yourself.

Can I record specific windows or applications with audio in Windows 10?
Yes, you can record specific windows or applications with audio in Windows 10 using screen recorders. Simply select the window or application you want to record, adjust audio settings, and start recording.

What are the best practices for recording screen and audio in Windows 10?
The best practices for recording screen and audio in Windows 10 include checking the audio settings and adjusting the recording quality based on your preferences and available storage space. Additionally, it's important to consider using an external microphone for better audio quality and closing any unnecessary applications to optimize performance during the recording.

Conclusion
In conclusion, recording screen and audio in Windows 10 is a powerful capability for creating tutorials, gameplay videos, presentations, and more. We've explored key points such as using built-in tools like the Xbox Game Bar or third-party software such as Aqua Demo, OBS, and ScreenPal for versatile recording options. Also, selecting the right tool based on your specific needs is crucial, whether for simplicity, advanced features, or professional-grade recording. Lastly, we encourage you to explore different methods and tools to find the best. By doing so, experimenting with various techniques can significantly enhance your recording skills and productivity.


