On This Page
If you use RingCentral, you probably already know it's more than just a video meeting tool. It's a complete communication platform that brings together messaging, phone calls, and video meetings all in one place. Many teams and businesses rely on it every day to stay connected and keep projects moving. But what happens when someone misses a meeting or you need to revisit an important detail? That's where the recording feature comes in handy. Recording a RingCentral meeting makes it easy to document conversations, review discussions later, or share the session with teammates who couldn't attend. It helps ensure that no one misses out on key points or decisions. However, it's important to note that not everyone in the meeting can record. In other words, only the host or someone with permission can start and save recordings. That's why in this article, we will present you with a reliable tool that lets you record RingCentral meeting without the host's permission. But always remember, recording without permission may raise privacy concerns, so use any tool responsibly and inform others when possible. Let's get started!
| Feature | Built-in RingCentral Recording | Aqua Demo | Free Online Screen Recorder (AceThinker) |
|---|---|---|---|
| Who Can Record | Only host and assigned moderators | Anyone | Anyone |
| Need host permission? | Yes | No | No |
| Ease of Use | Simple but limited only to the host meeting | User-friendly with advanced options | Very easy, just run in browser |
| Extra Features | Automatic cloud storage, meeting playback | Scheduled recording, annotations, multiple formats | No install needed, quick sharing |
An Overview of RingCentral’s Recording Feature
Before you start using the recording feature, it's helpful to understand how RingCentral record meeting options work. Knowing who can record, the types of recordings available, where they are stored, and the privacy rules around them will help you avoid mistakes and use the feature responsibly. Let’s go over the basics in simple terms.
Who can record meetings?
Like other conferencing platforms, RingCentral also cannot allow everyone to record the meeting. By default, only the host of the meeting has the right to record. However, the host can also assign moderator roles to certain participants to record. This helps keep control over who records, ensuring that only trusted people capture the session. If you are not the host or a moderator, you’ll need permission first. This rule helps protect privacy while still giving flexibility for important meetings.
RingCentral Meetings allows you to record or enable Automatic recording in your online account. The Record button will appear on your In-Meetings Dashboard when enabled. This feature is OFF by default.
Types of RingCentral Recordings Supported
When you use the recording features of RingCentral, you can capture different formats like MP4, M4A, and even text transcripts depending on your needs. The platform allows full video recording of the meeting, audio-only recording for those who prefer smaller files, and even recording of screen-sharing sessions. This variety is useful because it lets you choose how to save your content. For example, a video file may be best for team presentations, while audio-only might work better for quick reviews. Therefore, having these options ensures that recordings match the purpose of your meeting.
Recording Storage Options
RingCentral gives you flexibility in how your recordings are stored. You can save them directly to your local device, like a computer or laptop, for easy access and backup. If your admin has enabled it, you can also use cloud recording, which keeps your files online and accessible from anywhere. Cloud storage is especially helpful for teams working remotely, as it makes sharing recordings much easier. However, local storage gives you full control if you want to manage files on your own system. Both options make it convenient to keep track of important meetings.
Legal and Privacy Considerations
When you record VooV Meeting, RingCentral, and other video conferencing platforms, it’s important to think about legal and privacy rules. In many regions, recording a conversation without consent may be against the law. That’s why it’s always best to inform participants before you start recording. Businesses should also review their company policies and compliance guidelines to ensure they’re following proper standards. By keeping these considerations in mind, you can use the recording feature safely and responsibly.

How to Record a RingCentral Meeting as the Host
In this section, we’ll guide you through the steps for both computer and mobile app recordings so you can save your meetings conveniently and efficiently.
Record Ring Central Meeting on Desktop and Web App
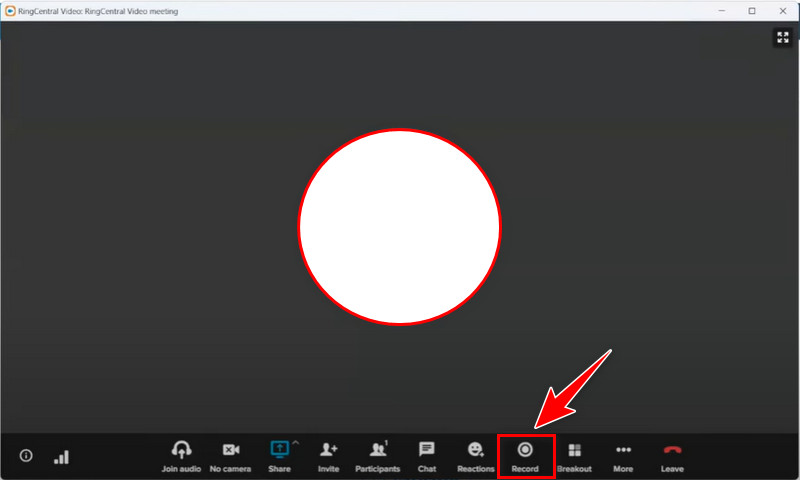
- To begin, log in or create an account on RingCentral. Then, start a meeting with a person or a team on the Message panel. Next, click the "Start Video Call" on the message panel. Suppose there is only one person in the conversation. In that case, the call will begin immediately. In contrast, for groups, a pop-up window will appear asking to confirm the participants.
- Once the meeting starts, locate the "Record" button at the bottom navigation bar and click it to initiate the recording. Then, choose whether you want to record video, audio, or screen sharing. After that, the recording will start, and you'll see a small recording icon on the screen.
- All participants were also notified that the meeting had been recorded. While recording, you can also pause and continue the recording at any time. To stop, click Stop Recording from the toolbar below. The file will be saved to your local device or cloud if enabled.
Record RingCentral Video Call on its Mobile App
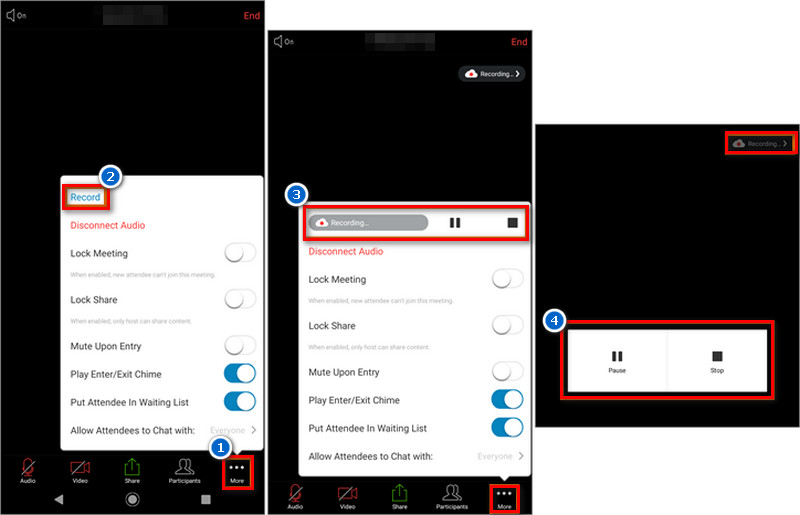
- Log in to your account and start the meeting with the person or team. Then, tap the Video icon to initiate the call. As with the desktop, if only one person is in the conversation, the call will start immediately. For groups, a pop-up window will appear asking to confirm the participants.
- Next, once the meeting has commenced, locate the "More" button, typically represented by three dots. From there, click the "Start Recording" and the recording bar will appear at the top right corner. While recording, you can pause and resume by accessing the "More" menu and clicking the recording icon.
- Once the meeting ends, access the recording feature again on the "More" menu and click it to stop. Alternatively, you can simply end the meeting, and the recording will stop automatically.
How to Access and Manage Your Recorded Meetings
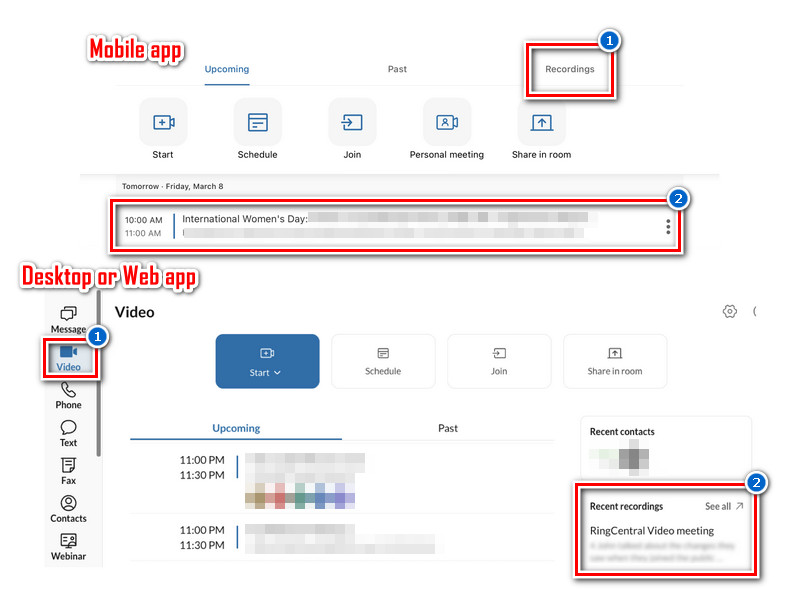
- On the desktop or web app, navigate to the Video menu bar on the left side panel. Here, you will see the lists of your recordings in the Recent Recordings section. Then, click the See All button to reveal all the recordings you made.
- On the other hand, on the RingCentral mobile app, go to the Video menu bar and tap the "Recordings" tab to access your previously recorded meetings.
From this section, you can manage all your recordings, including options to download, share, or delete them, ensuring efficient post-meeting data handling. Also, please note that if the recording is longer than an hour, it will display in your recordings within 24 hours.
Alternative Tools to do RingCentral Meeting Recording Without Host Permission
By default, only the host or participants assigned as moderators can RingCentral record meetings. This means if you’re a regular attendee, you cannot start a recording directly within RingCentral. Luckily, there are third-party screen recording tools you can use to capture meetings without the host permission.
1. Aqua Demo
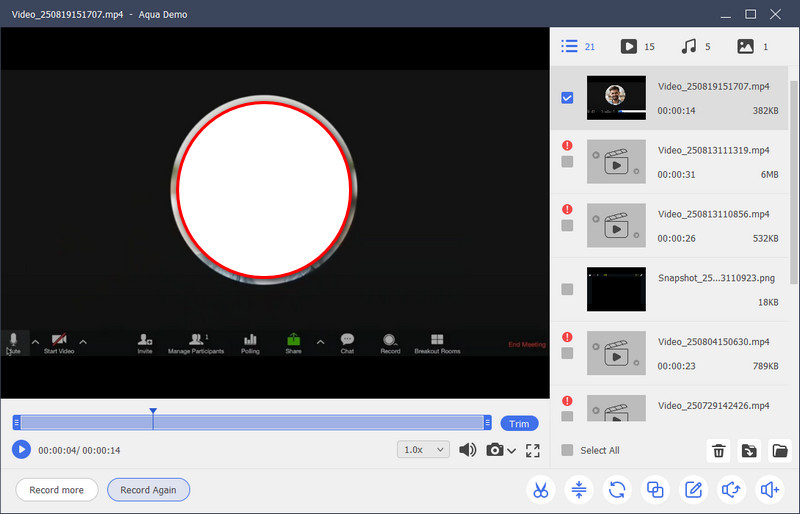
Aqua Demo is one of the best screen recording tools for capturing video on your PC, including activities like meetings. The tool comes with various features that can make recordings seamless. One of the best features of the software is its high-quality capture capabilities. That said, you can record Zoom in multiple resolutions, including 4K for clearer recordings. Besides, Aqua Demo can save your recordings automatically in your preferred format, such as MP4, MKV, AVI, and more. It also supports capturing internal system audio, microphone input, and webcam footage, giving you full control over what’s recorded. Furthermore, the tool stands out with its Schedule recording feature. Meaning, you can set a specific time and date for Aqua Demo to automatically start and stop recording, which is particularly useful for unattended meeting capture. Plus, it comes with annotation tools to use during your recording sessions to highlight key points or add notes in real-time. On top of that, Aqua Demo lets you choose whether to record the RingCentral meeting on full screen or the specific area shared, ensuring everyone’s privacy. Here’s how to do it.
Step 1. Install the Third-Party Screen Recorder
Start by downloading the Aqua Demo file using the Download buttons above. Then, locate and begin to install it by following the prompts on your screen. Once done, Aqua Demo will launch automatically after installation.

Step 2. Tweak the Recorder Settings
Next, start customizing the Recorder Settings according to your preferences. Navigate to the Settings dropdown menu and select Recorder Settings. Then, a pop-up window will appear, which lets you start customizing. You can set your preferred recording quality to hotkeys from the pop-up window.

Step 3. Set Up the Recorder
After that, launch the RingCentral app and return to the recording tool. From there, customize the recording area you desire by adjusting the frame around the RingCentral meeting window, or select "Full Screen" to capture the entire display. Also, enable the system sound and microphone audio to capture all meeting discussions.
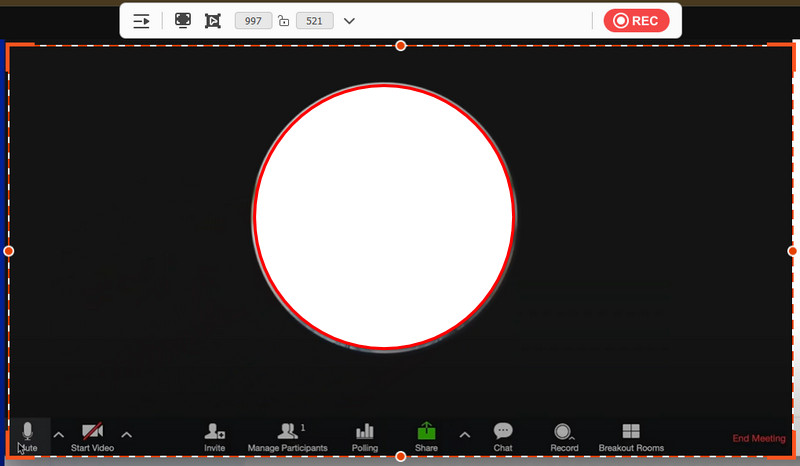
Step 4. Start Recording RingCentral Meeting
Once all is set, join the meeting on the video conferencing platform. Then, when the meeting starts, click the REC button on the toolbar of Aqua Demo, and the recording will begin after a 3-second countdown. Once the meeting ends, hit the Stop recording icon on the mini toolbar and preview the recorded meeting afterward.
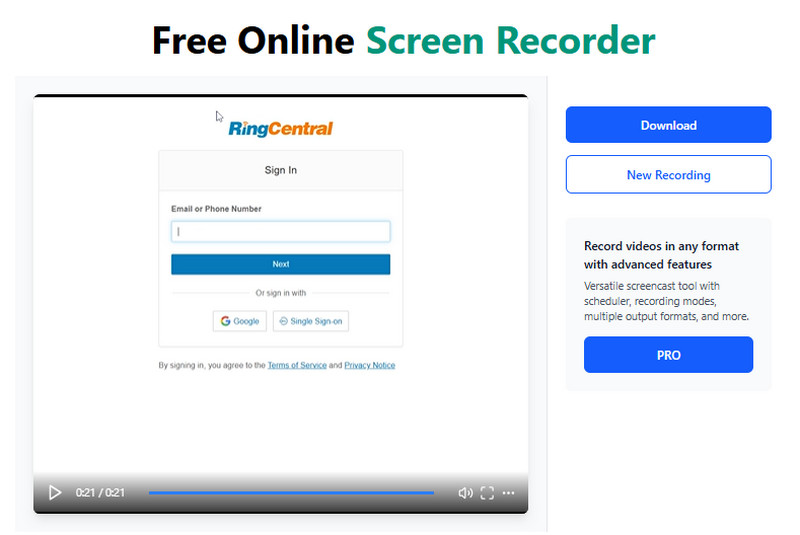
2. Free Online Screen Recorder from AceThinker
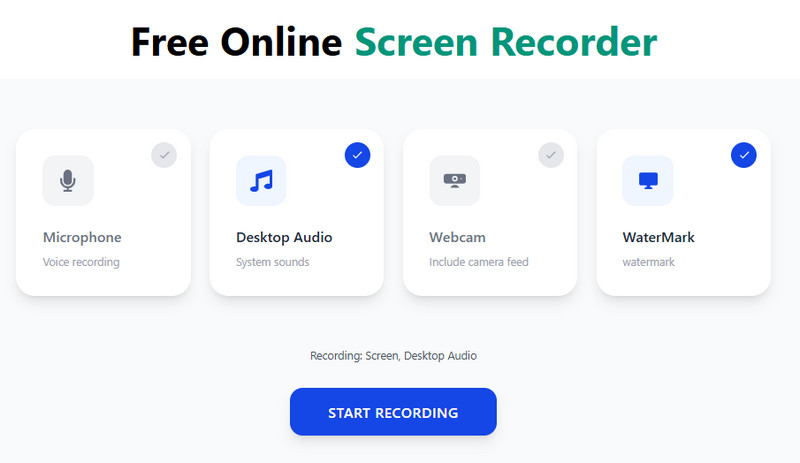
Another way to do RingCentral video recording is to use an online recorder. With that, we recommend using the free online screen recorder from AceThinker. The online tool works on any browser you have, such as Internet Explorer, Microsoft Edge, Google Chrome, and Mozilla Firefox. Plus, although it's accessible online, that doesn't mean it's limited to capturing on your browser. This screen recording tool can also record video on PC applications without any issues or extra steps. In addition, this web-based tool lets you capture the microphone audio, system sound, as well as webcam overlay, which is perfect for making tutorials. Furthermore, you can record for free and for an unlimited duration, making it a highly practical option for extended meeting captures. See the guide below.
Step 1. Access the Online Tool
On your computer browser, search for the AceThinker Free Online Screen Recorder tool. Then, select the appropriate web page from the search results. After that, you will see its main homepage, which provides a straightforward interface for initiating recordings.
Step 2. Set the Online Recorder
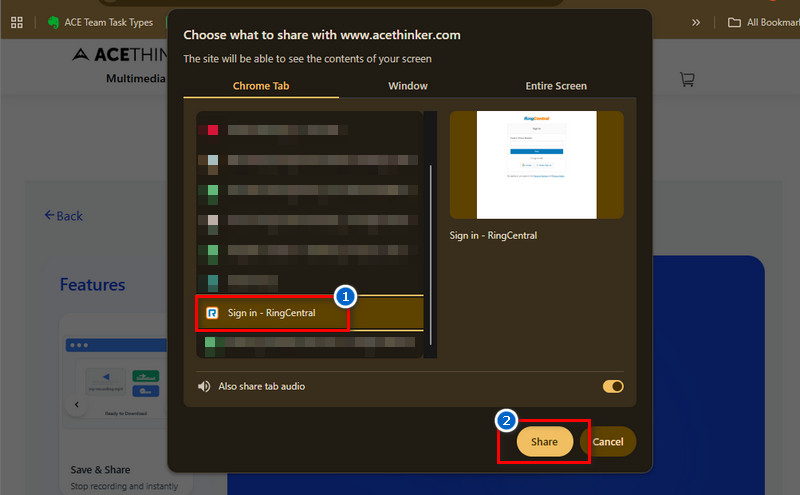
Next, enable the desktop audio and microphone audio before proceeding. Then, click the "Start Recording" button below, and a new window will appear. Here, select the RingCentral page or its desktop app, depending on what you are using. After that, click the "Share" button.
Step 3. Start to Record the RingCentral Meeting
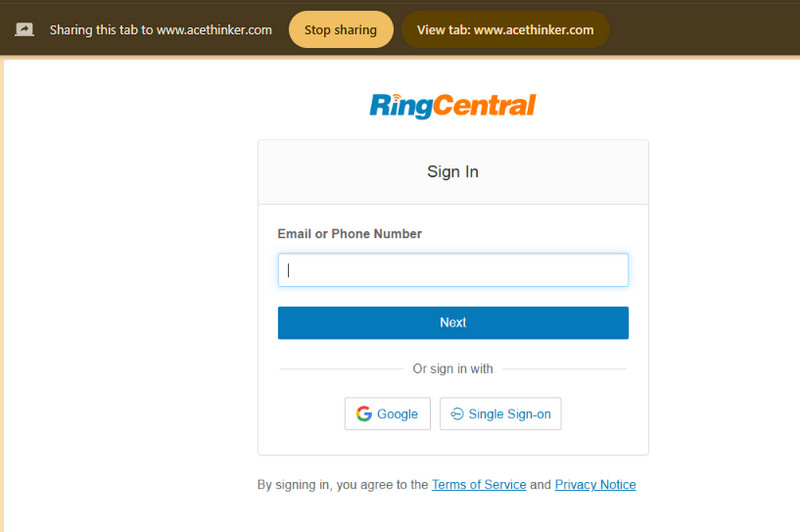
Once the "Share" button is clicked, the recording will commence automatically. Afterward, join the meeting to ensure all discussions and presentations are captured. After the meeting ends, you can click the "Stop Sharing" from above on your RingCentral screen and go back to the recording tool main homepage.
Step 4. Save the Recorded Meeting
From the recording tool main homepage, click the "Stop Recording" button to stop the recording fully. The recorded video will then be available for preview and download from the next window. Finally, save the recorded file on your local storage by clicking the "Download" button.
Frequently Asked Questions
What is RingCentral used for?
RingCentral is a communication platform that brings together phone calls, messaging, and video meetings in one place. It’s often used by businesses and teams to stay connected and work together more smoothly. With it, you can host online meetings, share screens, and manage conversations without switching between different apps.

How long does RingCentral keep recordings?
RingCentral keeps your cloud recordings for a certain period, usually up to one year, depending on your plan or admin settings. After that, they may be deleted automatically to free up storage. If you want to keep them longer, you can download the recordings to your computer.
Is RingCentral always recording?
No, RingCentral is not always recording your meetings. Recording only starts when the host or a moderator clicks the record button. This means you don’t have to worry about private conversations being saved without your knowledge. However, if the Automatic Call Recording is enabled, the recording will start at the beginning of the call.
Summary
Recording a RingCentral meeting doesn't have to be complicated. If you're the host or a moderator, you directly capture the meeting using RingCentral's built-in recorder. On the other hand, for participants without access to the record button, you can use tools like Aqua Demo or an online screen recorder as an alternative to save meetings without host permission. Still, it's always important to remember that recording should be done responsibly, with the right permissions, and in line with privacy or legal rules. Also, choosing the right method depends on your needs, whether you want quick cloud storage, offline copies, or flexible recording controls. No matter which option you use, recordings can be a powerful way to review discussions, share updates with teammates, and keep everyone on the same page. In the end, recording helps improve collaboration and makes meetings more productive.