Navigation
VooV is a popular video meeting app made by Tencent. Many people use it for work, school, and online events because it's easy to use and runs smoothly. Just like Zoom or Google Meet, VooV lets you talk, share screens, and chat with others online. In addition, recording a VooV meeting is helpful to review it later, share it with someone who missed it, or keep a copy for documentation. However, like the other meeting apps, only the host or co-host can use the built-in recording feature. If you're just a participant, that option won't be available to you. But don't worry! There are easy ways around this. You can use third-party screen recorders to save the meeting from your device, even if you're not the host. In this guide, we'll walk you through both methods so you can record VooV meeting without stress.
| Tools | Recording Quality | File Format Output | Storage Location |
|---|---|---|---|
| Voom Built-in Recorder | Up to 720p (standard quality) | MP4 | Cloud or PC |
| Aqua Demo | Up to 4K (adjustable settings) | MP4, WEBM, MOV, etc. | Local folder (customizable) |
| AceThinker Online Screencast | Up to 720p (browser-dependent) | WebM (browser-based) | Browser download folder |
| Android Built-in Recorder | 720p–1080p (depends on phone model) | MP4 | Phone Gallery |
| iOS Built-in Recorder | 720p–1080p (depends on device) | MOV | Photos app |
| Loom | 720p on free plan, 1080p+ on paid | MP4, AVI, MOV, WEBM, and more | Loom cloud account |
How to do VooV Recording Using Its Built-In Recorder
Like many video conferencing platforms, VooV also has a built-in screen recorder. With that, you can easily capture your meeting and save it on your cloud or local storage. Besides, the built-in recorder can record audio, video, and the shared screen. Also, it shows the timestamps and speaker names during playback. However, just like on how to record Google Meet, only the host or co-host has the privilege to record the meeting. Here's how to do it:
Step 1. Start a VooV Meeting
Initiate a VooV meeting as the host. To do it, simply click the "Start" button on the main interface. Next, go to the "Invite" tab below and click "Cop ID and Link" to copy the meeting link. Then, please send it to your group chat so they can join.
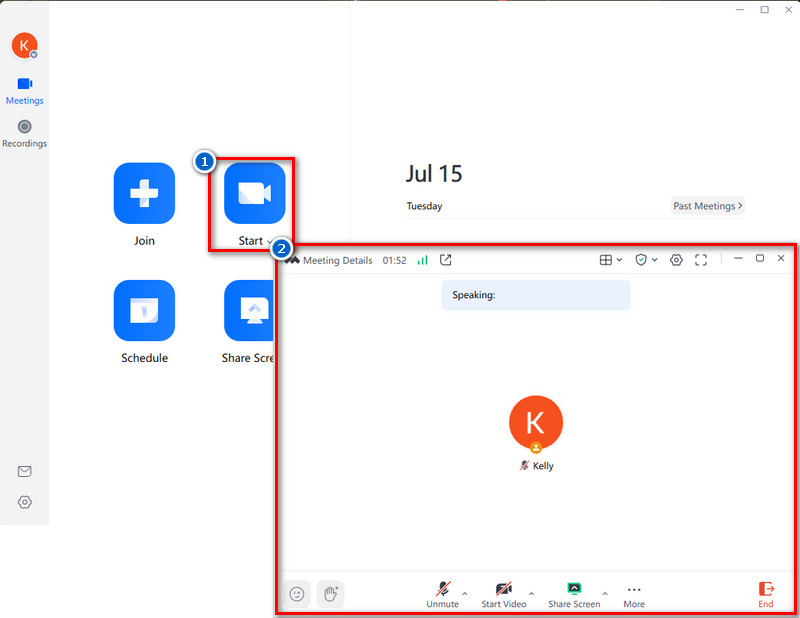
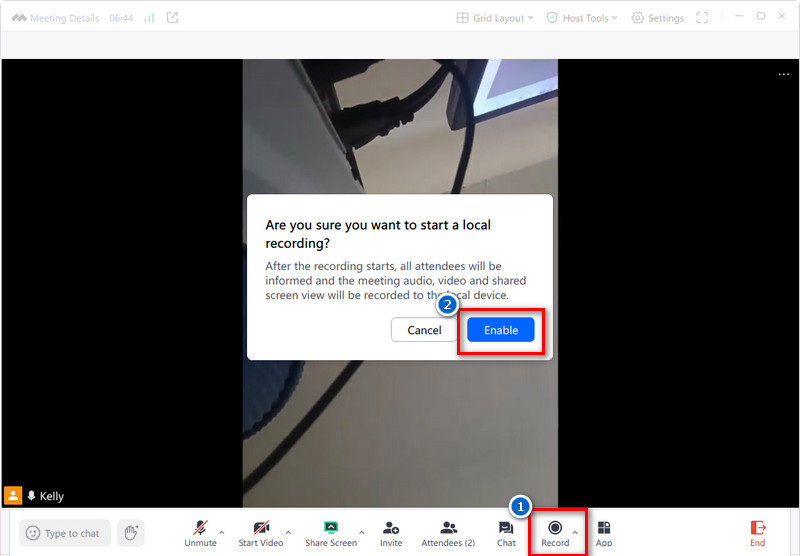
Step 2. Start the Recording
Once the meeting has commenced and all participants have joined, locate the "Record" button on the meeting control bar. Then, choose between Cloud or Local Recording from the pop-up menu. After that, click the "Enable" button on the new window to start the recording. You will see a recording indicator in the upper left corner of the screen.
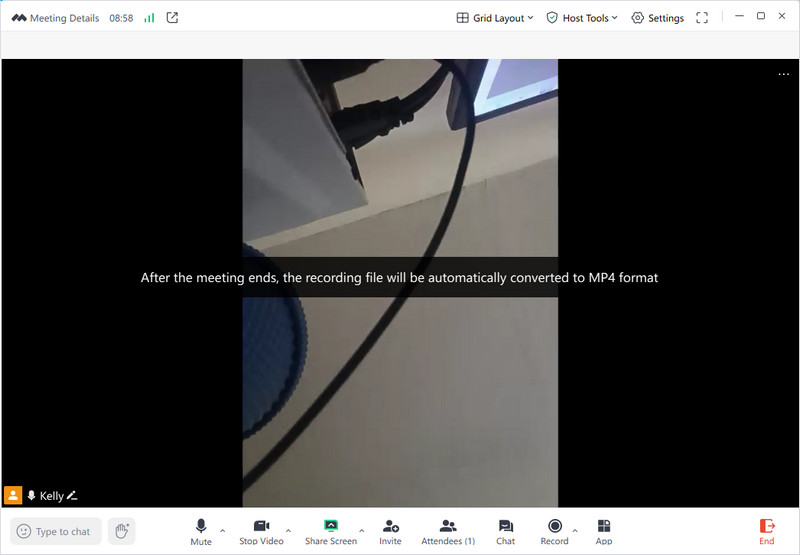
Step 3. Stop and Preview the Recorded Meeting
Once the meeting ends, click the "End" button to stop the recording. Then, leave the meeting or end the meeting afterwards. If you did a cloud recording, you will get an email when the recording is available. On the other hand, if you did a local recording, the file will be saved on your computer in MP4 format. Finally, locate the recorded VooV meeting and preview it.
VooV Meeting allows attendees to join meetings quickly on mobile phones, PCs, tablets, and webpages for a seamless conferencing experience across platforms.
Alternative Tools to Record a VooV Meeting
If you're only participating in the meeting and want to record it, there are alternative tools available. Apart from asking the host or co-host to give you permission to record a meeting, you can also capture the VooV meeting without them knowing. In this section, we'll review a software and an online recorder to help you record the Voov meeting or other meeting apps, as well as to record RingCentral and Windows.
1. Aqua Demo
Aqua Demo is an all-in-one screen recording software that can record any screen activities, including online meetings. It comes with various useful recording features that you can utilize to have perfect recordings. One of its key features is the ability to record audio from both system sound and the microphone, as well as video, or to record audio only. Besides, the tool lets you add a webcam overlay, which is perfect when you do a tutorial or online presentation for your meetings. Besides that, Aqua Demo allows you to record a custom region. It supports full screen, a specific window or tab, or drawing a custom region on your screen. What sets this tool apart from the built-in recorder of VooV is that Aqua Demo lets you annotate while recording. With that, you can add text, shapes, or arrows to highlight important parts through the presentation shared in your meeting. Not only that, but after you record the meeting, you can trim the unnecessary beginning and ending points of the meeting. See the guide we provide below.
Step 1. Get the Third-party Software
To begin, get the installer file of Aqua Demo using the download buttons above. After that, proceed to the installation process by following the setup wizard. Once installation is successful, the tool will launch automatically on your computer screen.

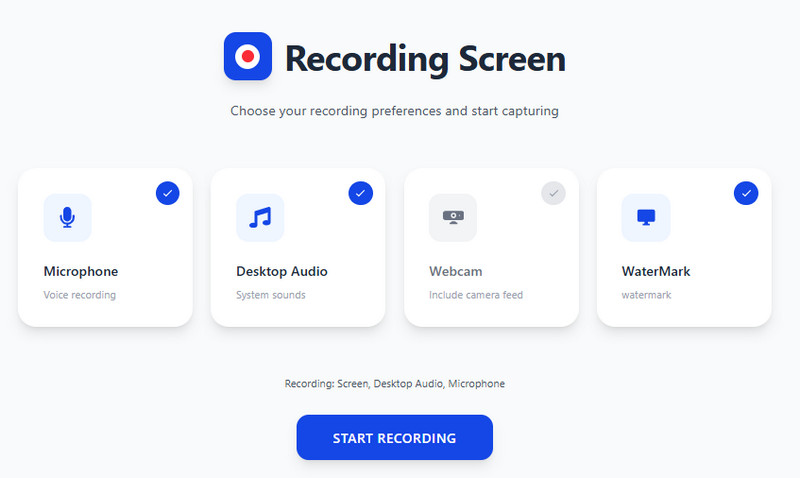
Step 2. Set up the Recording Preferences
From the main interface, enable the system sound and microphone to capture the audio of the meeting. Then, go to Settings and customize the video and audio output based on your preferences. After that, adjust the recording region based on your needs.

Step 3. Start VooV Meeting Video Recording
Once all set up, join the meeting you want to record on VooV. When the meeting starts, click the REC button on the taskbar to initiate the recording. Use the annotation tools to add some notes or highlights while recording. Once the meeting ends, hit the Stop button on the taskbar.

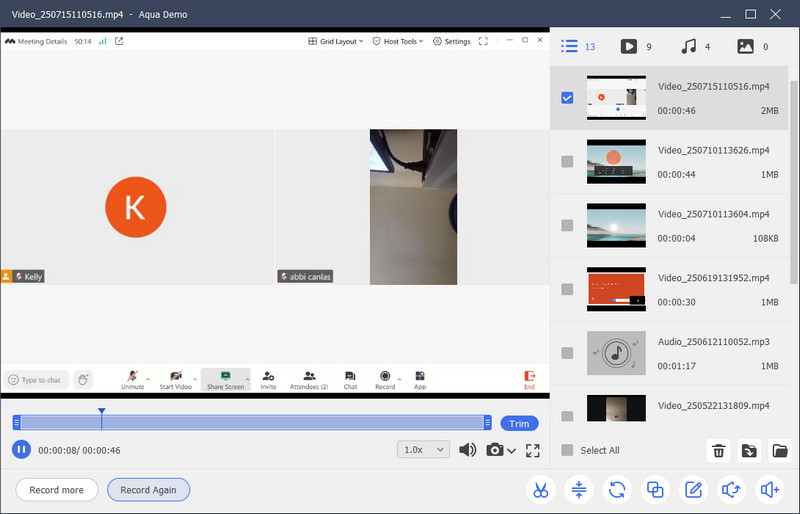
Step 4. Preview and Edit the Recorded Meeting
After the recording, the recorded meeting will automatically appear in the preview window. From there, you re-watch and trim the video to remove the unnecessary parts of the meeting. Also, you don’t need to save the recorded meeting because the tool automatically saves it, unless you do some editing, you need to export it by clicking the Save icon in the lower right corner.
2. AceThinker Online Screencast
For those who don’t want to install any software on their computer or prefer to use an online recorder, we recommend the AceThinker Online Screencast. This web-based app is compatible with most browsers, such as Chrome, Edge, and Firefox. Furthermore, it provides some of the recording capabilities of a desktop screen recorder. With this tool, you can record your microphone, system sound, and video from the webcam. Besides that, you can choose what window, application, or browser tab you want to record. More than that, AceThinker Online Screencast is free to use without any registration needed. However, the recorded video has a watermark, and no annotation tools are available, unlike the Aqua Demo. See the guide below to start using the online recorder.
Step 1. Access the Online Recorder
First, access the AceThinker Online Screencast on your browser. To access it quickly, you can click its name above to redirect you to its official website. Once you are on the main page, hit the Get Started button to launch the recording panel.
Step 2. Enable all the Necessary Sources
Next, verify all necessary sources for recording the meeting. You can check the desktop audio and microphone for the audio. Then, hit the Start Recording. From the pop-up tab, go to the Window tab and select VooV meeting.
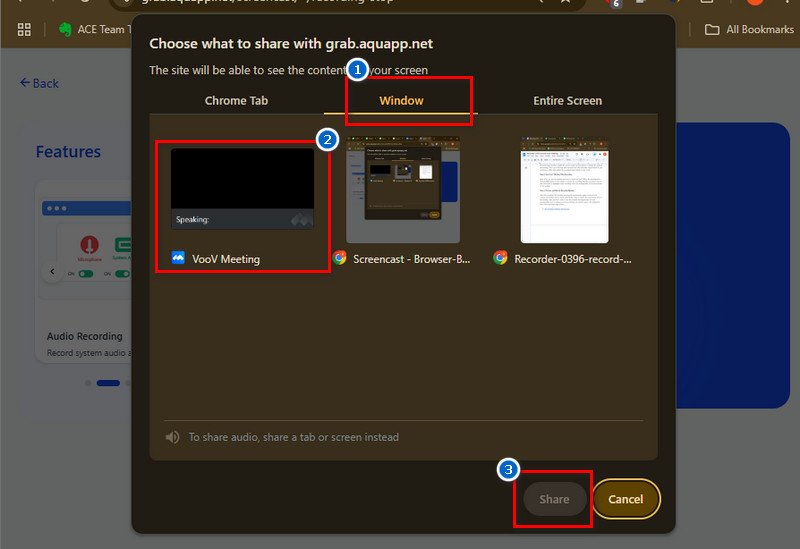
Step 3. Start the Recording
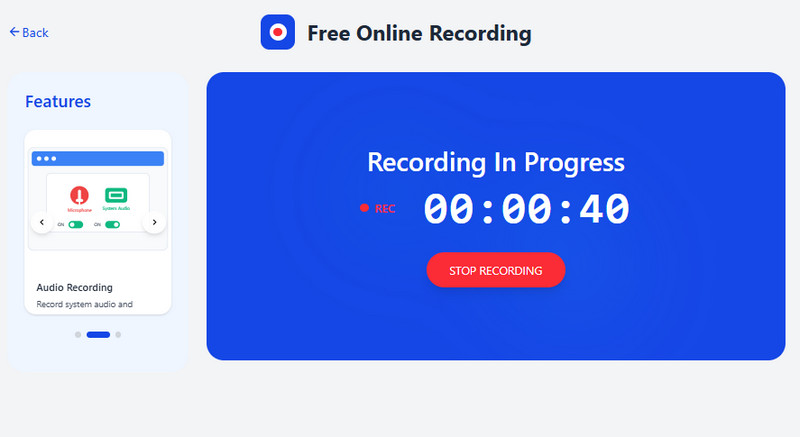
After selecting the window, hit the Share button below, and the tool will start recording the meeting automatically. Once the meeting ends, go back to the AceThinker Online Screencast panel and hit the Stop recording button.
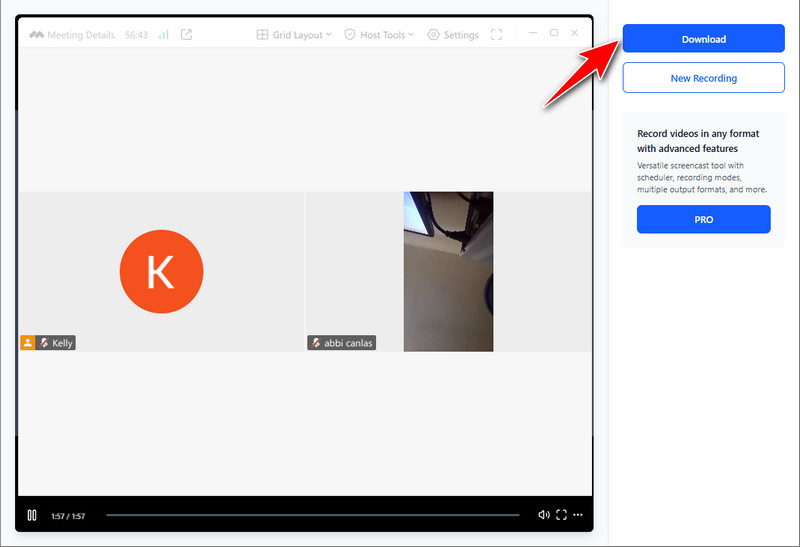
Step 4. Preview and Download the Meeting Recording
Finally, the recorded VooV meeting will instantly show on the panel. From there, you will preview the video to check the output. Once satisfied, hit the Download button above, rename the recorded meeting, and select the destination folder to save it to your computer.
How to VooV Record Meeting on Mobile Devices
Both iOS and Android phones have a built-in screen recording feature. But if you're using an older version, you might not see this option on your phone. Usually, Android 11 and above, as well as iOS 11 and later, support this feature. Suppose it's not available on your device. In that case, you can always install a third-party screen recorder to start recording meetings on your phone. This method works not just for VooV, but also if you want to record Webex meeting or other video calls directly from your screen.
3.1 How to Record VooV Meeting using Android Built-in Recorder
- To begin, access your Control Center by swiping down from the top of your screen. From other phones, you can swipe down from the top right corner of your screen. Then, find the Screen Recorder icon in the menu.
- Next, tap the recorder icon to pop up the recording preferences. After that, join the VooV meeting you want to record. Once the meeting starts, click the red circle button to start the recording.
- To stop the recording, tap the circle with the red box on your screen. Then, the recorded meeting will automatically be saved in your gallery. Lastly, locate the recorded meeting and share it with others.

3.2 Record Meeting on VooV Using iOS Built-in Recorder
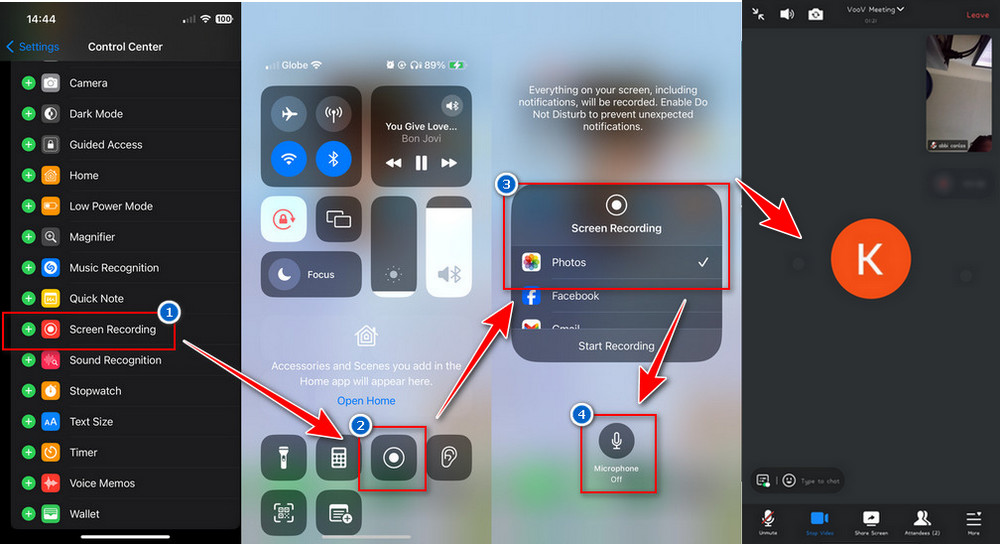
- On your iOS device, go to Settings, then tap the Control Center. From there, you need to add the screen recorder by tapping the plus icon next to the Screen Recording. By that, you can access the recorder tool from the Control Center. Once added, join a meeting on VooV.
- Then, before the meeting starts, access your Control Center by swiping down from the top right corner of your screen. For the lower version, you can swipe up from the bottom edge of any screen. Next, find the Screen Recorder icon in the menu. After that, tap the recorder icon and choose Photos as an output folder from the pop-up menu.
- Then, turn on the microphone to record the audio. Once ready, click the "Start Recording" again, and it will start automatically after a three-second countdown. Once done, go back to the Control Center and hit the recorder again to stop the recording. Lastly, find the recorded meeting on your Photos app.
3.3 Alternative Tool for Android and iOS Devices
Loom is another app that you can use to capture VooV meetings on your Android and iOS devices. You can record your screen, microphone sound, internal audio, as well as front camera overlay, which is great for tutorials, not only for recording meetings. More than that, this app offers cloud storage where all your recorded videos are saved to your Loom account, so you don't use up phone storage. Besides that, you can easily access your videos on any device. What makes Loom more interesting is that it gives you a shareable link right away, so that you don't need to save and upload it manually. However, Loom limits your recording to a maximum of 5 minutes in the free version. See the guide below on how to use it.
User Guide:
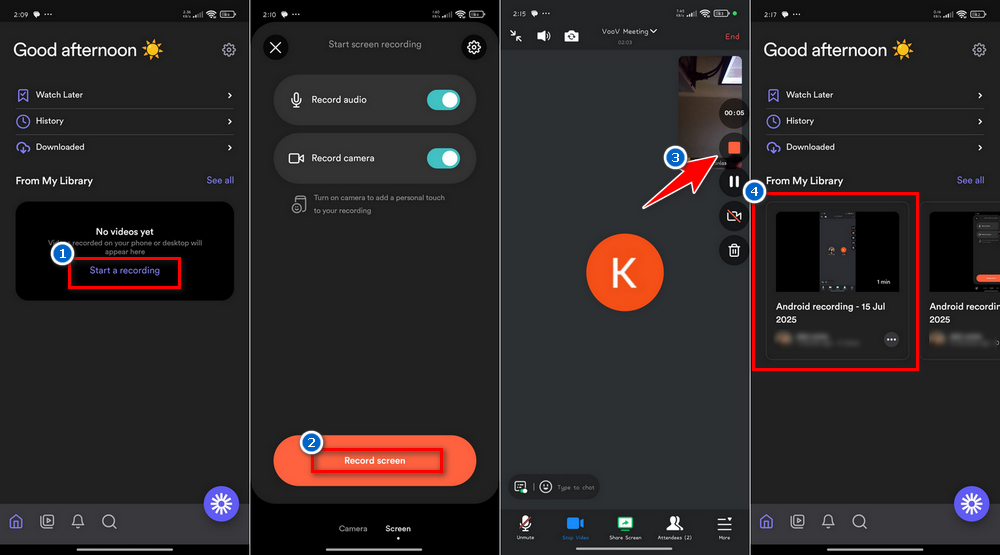
- Get the Loom app on your Android and iOS devices. Next, launch it and create a free account or sign in to start using it. Once logged in, tap the "Agree" button for all the permissions it requires to function. After that, check what you plan to use Loom, whether for work, education, or personal use, then allow all the permissions from your device.
- From its main interface, tap Start a Recording, and you will go to the recording menu. Navigate to the Screen tab below and select your recording preferences: with or without the camera, and with or without audio. After that, tap the Record Screen button below, then choose the Start button from the pop-up menu, and it will start the recording.
- Once all set, join the VooV meeting you want to record. When the meeting ends, tap the small box icon from the recording taskbar to end the recording. Or go back to the Loom app and tap the "Stop Recording" button there. Finally, the recorded video will automatically be uploaded to your Loom account.
3.4 Tips for Clear Audio When Recording Meetings on Mobile
To have a good recording on your mobile phone, here are some tips to make sure your meeting audio sounds clean and clear.
- Pick a quiet place – Try to stay in a spot with little to no background noise. No loud fans, music, or people talking nearby—this helps your voice come through clearly.
- Use earphones with a mic – Your phone's mic can pick up too much noise, so using wired or Bluetooth earphones with a built-in mic will make your voice sound much better.
- Stay close to your mic – Whether you're using the phone's mic or earphones, keep it close to your mouth and speak naturally. Don't mumble or talk too fast.
- Don't block the mic – Be careful not to cover the mic with your hand or phone case while recording. This can make your audio sound muffled.
- Test before the meeting – Do a quick sound check with your recording tool to make sure everything's working fine before the meeting starts.
Frequently Asked Questions
Is it allowed to record a meeting?
Yes, it’s allowed, but it depends on the meeting rules and the people involved. It’s always best to ask for permission before recording, especially in group or work meetings. This way, everyone stays informed and comfortable.

Does VooV have a time limit?
Yes, VooV does have a time limit, but only for users who have a free account. For free users, if there are just 2 participants, your meeting can go on for a full 24 hours. But when 3 to 100 people join, the meeting is limited to 60 minutes.
Is VooV a safe app?
Yes, VooV is made by Tencent and uses encryption to help protect your meetings and data. It’s trusted by many schools, companies, and users worldwide. Just make sure to use strong passwords and update the app to keep it extra safe.
Conclusion
Recording your VooV meeting is helpful, especially when you want to review key points later or share the session with someone who missed it. If you're the host or co-host, you can use VooV's built-in recording feature to capture everything right inside the app. But if you're just a participant, no worries, you can still record using trusted third-party tools like Aqua Demo or AceThinker Online Screencast, which are easy to use and work well. Always keep in mind to respect others' privacy and get their consent before recording, especially in work or school. Besides, following the rules makes sure everyone feels safe and respected during meetings. Moreover, the step-by-step guides above can help you capture important conversations with ease, whether you're on a computer or mobile device. Try them out so you don't miss any more VooV meetings!