On This Page
Ever record your screen and notice that the mouse cursor kept getting in the way? Whether it's flying across the screen or just sitting there blinking, it's distracting, especially when creating a tutorial, recording gameplay, or producing a professional video. There are times when you want your viewers to focus only on what's happening on the screen, rather than on the pointer moving around. That's why many people look for ways to screen record without mouse showing. It helps make the video cleaner and easier to follow. In this guide, we'll explore a few easy ways to hide or remove the mouse cursor while recording. Whether you're using built-in tools or third-party apps, we'll guide you through the right settings and tools to keep your cursor out of sight. Let's make your recordings look more polished and less distracting.
| Tools | Annotation Tools (During Recording) | Scheduled Recording | Output Formats |
|---|---|---|---|
| Xbox Game Bar | No | No | MP4 |
| QuickTime Player | No | No | MOV |
| Aqua Demo | Yes (draw, highlight, text, shapes, etc.) | Yes (set start time & duration) | MP4, WMV, MOV, AVI, etc. |
| Free Online Screencast from AceThinker | No | No | WEBM |
How to Hide the Mouse Cursor Using Built-in Tools
1. Xbox Game Bar
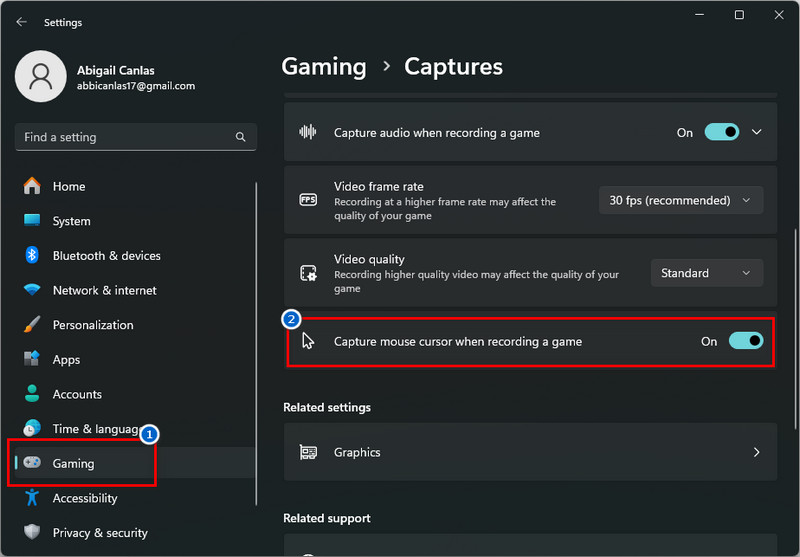
Most game players use the Xbox Game Bar to record their gameplay. It is a built-in tool for Windows 10 and 11 that allows you to easily record your screen, take screenshots, and even chat with friends while playing games or using apps. Additionally, this tool is designed to help you capture what’s happening on your screen without installing extra software. Furthermore, by pressing the Windows key and the G key simultaneously, you can easily access the tool, making it ideal for gamers, teachers, or anyone who wants to create videos or tutorials. Also, it allows you to control your audio and monitor your PC’s performance, all in one convenient overlay. On top of that, Xbox also lets you tweak its settings to record video without mouse. Here’s how to do it.
User Guide:
- First, open your computer Settings and navigate to the “Gaming” option. Next, under the gaming section, click on “Captures,” which will allow you to customize your recording settings. After that, scroll down through the options until you find the “Capture mouse cursor when recording a game” option.
- To deactivate it, uncheck the box or turn it off to hide the mouse cursor while you record your screen. Afterward, launch the Xbox Game Bar by pressing the “Windows + G” keys on your keyboard.
- Next, start recording your screen by pressing the “Record” icon or using the shortcut keys “Windows + Alt + R”. Once you are done, review the final output and verify that the mouse cursor is not visible in the video.
2. QuickTime Player
If you’re a Mac user and utilize the QuickTime Player to record your screen, there’s also a simple way to hide the mouse cursor. QuickTime Player is a popular video player that comes built into Mac computers. It’s more than just a player; you can also use it to record your screen, make basic edits, and save videos easily. Additionally, it’s great for creating tutorials, presentations, or simply saving moments from your screen without the need for extra tools like Xbox Game Bar. Plus, it’s easy to use, so even if you’re new to screen recording, you can quickly get started and create high-quality videos directly on your Mac. We provide a simple guide for QuickTime screen recording without mouse.
User Guide:
- On your Mac, locate the QuickTime Player in your Applications folder and open it. Or, press the “Command + Space” to open the Spotlight Search, then type QuickTime Player, and hit Enter.
- After that, go to the “File” menu located at the top of your screen. In the dropdown menu, select the “New Screen Recording” option to open the small recording window.
- From the small window, click the “Options” menu to view the available recording settings. Here, deselect the “Show Mouse Clicks” to hide the mouse cursor during the recording. Finally, you can now start recording without the mouse click showing on your recordings.
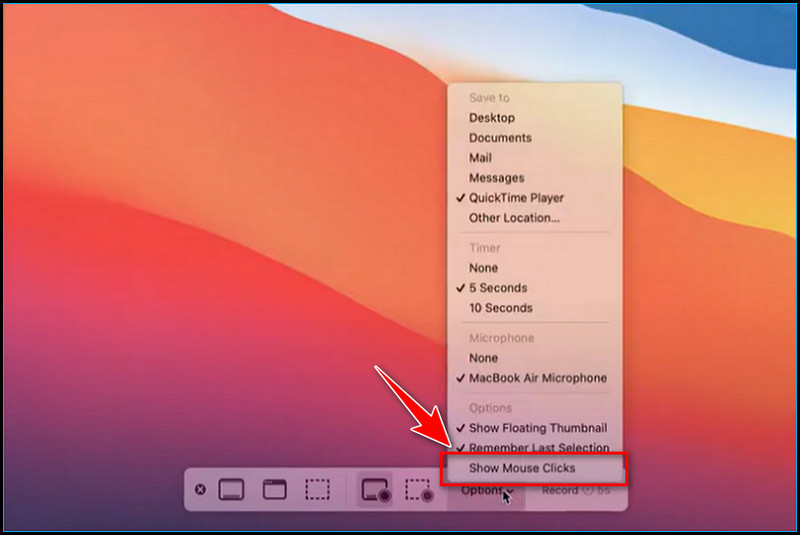
There is no "Show Cursor" under Options, only Show Mouse Clicks, and I have that unselected. This is MacOS 10.14.4.
Best Way to Record Screen Without Mouse (Windows/Mac)
If you prefer an advanced screen recording tool that allows you to record your screen without showing the mouse, try Aqua Demo. It is a powerful screen recorder with a simple interface, designed for all users. With it, you can record a video on your PC, create training videos, product demos, or presentations effortlessly. Furthermore, compared to built-in tools that are limited to tweaking their settings, Aqua Demo allows you to customize all recording settings. From the general settings, video and audio settings, camera settings, mouse effects, and hotkeys, you can make adjustments according to your preferences. Additionally, this tool features a basic editing function that allows you to trim or cut unnecessary starting and ending points from the final output, which is a very helpful feature. Unlike some recorders with annotation tools, Aqua Demo focuses on delivering clean recordings while still offering essential editing options. We create a detailed guide on how to record the screen without showing the mouse.
Step 1. Launch the Screen Recording Tool
To begin, you need to get the Aqua Demo first and install it on your computer. Click the download button above; it's either Windows or Mac. After that, proceed with the installation process and follow the on-screen prompts. Once done, the tool will launch automatically.

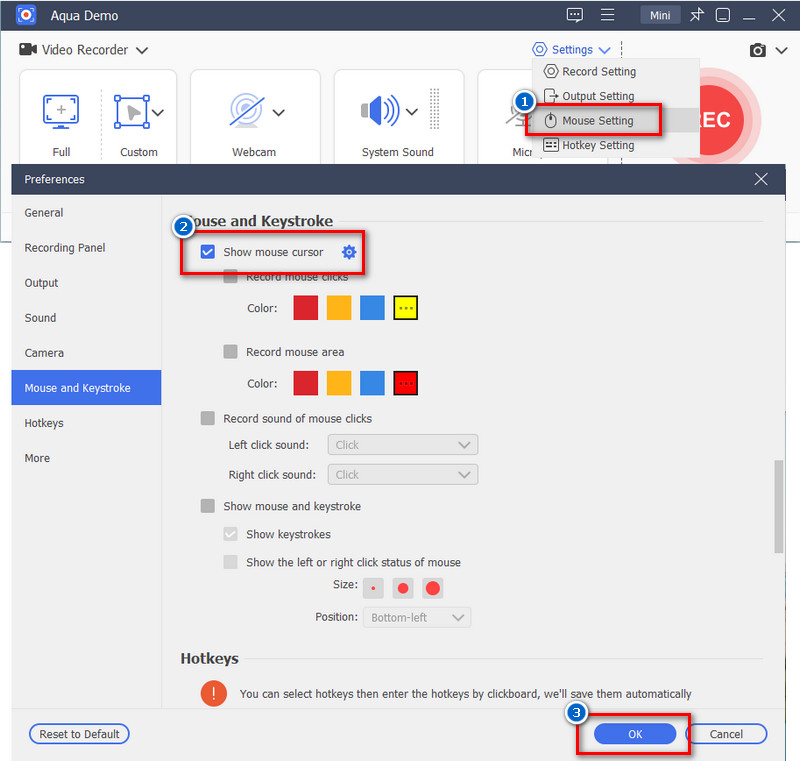
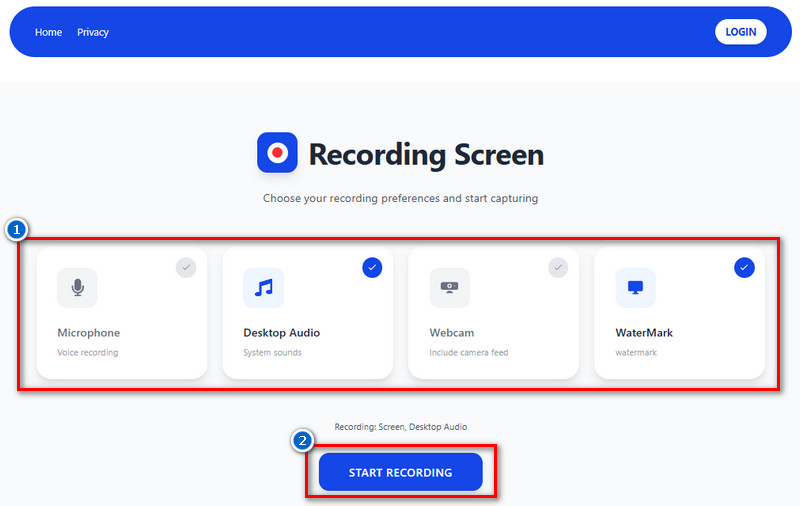
Step 2. Tweak the Settings
On the recording window, navigate to the Settings, and select "Mouse Settings" from the dropdown menu. On the next window, uncheck the "Sown Mouse Cursor" option, so your mouse will not appear when you're recording. You can also change the video, audio, and output settings to your desire. Afterward, hit the "OK" button below to save the changes.
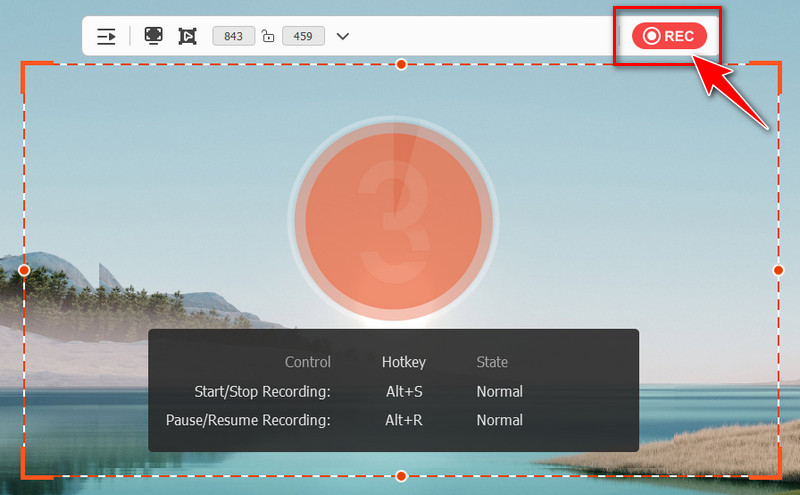
Step 3. Start Recording Your Screen
After customizing the settings, you can now start recording. Start by selecting the area you want to record, and turn on the system sound, microphone, and webcam (if you want to include your face and voice). Then, click the "REC" button to initiate the recording.
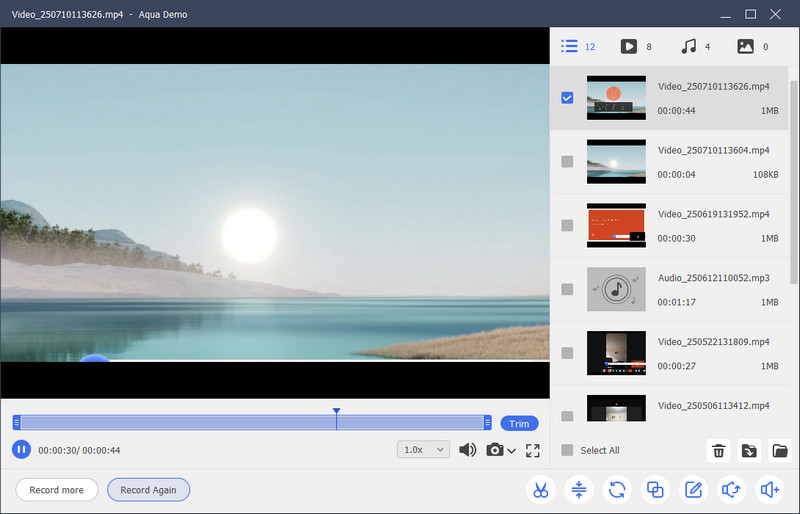
Step 4. Preview the Output
If you are done recording, hit the stop icon on the mini toolbar to end the recording. Then, the recording will automatically open for preview. Here, you can re-watch the output and check if the mouse is hidden.
How to Record Without Mouse Using Online Screen Recorder
Another way to record your screen without the mouse cursor showing is to use an online screen recorder. For this, we recommend using the Free Online Screencast from AceThinker. This tool is a web-based screen recorder that allows you to capture any activity directly in your browser. It lets you select either a specific window or the entire screen to record. Additionally, it enables you to add sound from the system, microphone, or both, as well as a webcam if you prefer to record yourself on Mac or Windows PC. Aside from that, you can also use this tool without signing up or providing your personal information. One more thing about this online tool is that you don’t need to worry about the mouse cursor, because it can’t capture it, even if you move your mouse on the recording screen. This makes it one of the most convenient tools for recording lectures and presentations online. Here’s how to use it.
Step 1. Search For the Tool
Open any browser you have, it's either Chrome, Firefox, Edge, etc. Next, please navigate to the search bar and enter 'AceThinker Free Online Screencast' to find it in the search results. Or, to easily access it, simply click its name with the hyperlink.
Step 2. Choose What to Share
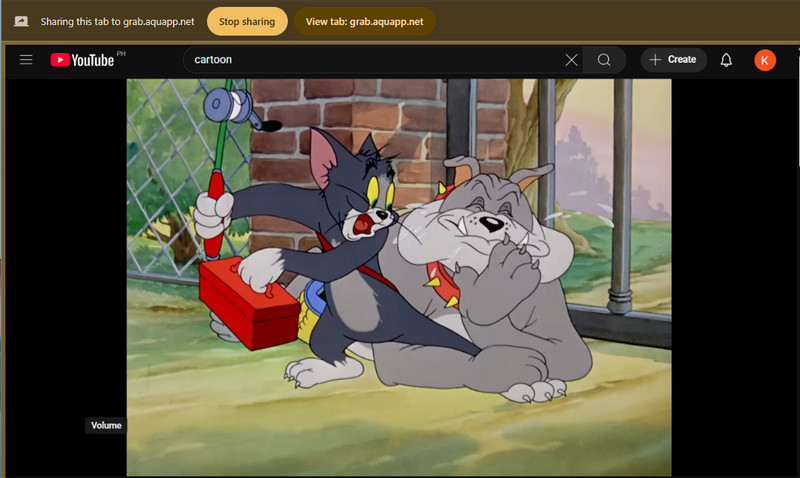
Once you are on the main page, click the "Get Started" button to launch the recorder. Then, check all the recording preferences you want to use, including the system sound, microphone, and webcam. After that, click "Start Recording" below and select the tab in your browser that you want to record.
Step 3. Start to Record
Once you select what you want to record, tap on the "Share" button, and the recording will start immediately. If you ever wish to end the recording, click the "Stop Sharing" above or below the screen you shared. Then, return to the online recorder and click "Stop Recording" to process the video.
Step 4. Preview and Download the Output
After that, you will proceed to the video preview tab, where you can view the final output. Once satisfied, click the "Download" button in the upper right corner. Then, it will automatically save to your Downloads folder in WEBM format.

Frequently Asked Questions
Can I remove the mouse cursor after recording the screen?
Once your screen recording is done, it’s a bit tricky to remove the mouse cursor if it’s already visible in the video. You’d need to use video editing software to blur or cover it up, which can take some time and effort. So, it’s usually easier to hide the cursor before or during recording rather than trying to fix it afterward.

Does QuickTime Player have an option to hide the mouse during recording?
QuickTime Player doesn’t exactly have a “hide cursor” button, but it does have a setting you can uncheck called “Show Mouse Clicks.” When this is off, the clicks won’t be highlighted, which helps reduce distraction. However, the actual mouse pointer will still appear, so it’s not a full cursor hide feature.
Which screen recording tools let me turn off the mouse cursor?
There are several screen recording tools that let you disable or hide the mouse cursor while recording. For example, Aqua Demo allows you to choose whether to display the cursor, resulting in cleaner-looking videos. Other popular options include OBS Studio, iTop Screen Recorder, and Screenflick on Mac, all of which have settings to hide the mouse pointer during recording.
Wrap Up
You have many choices when it comes to recording your screen without showing the mouse pointer. For basic recordings, you can use built-in tools like QuickTime Player on Macs or Xbox Game Bar on Windows. On the other hand, apps like Aqua Demo offer simple ways to hide the cursor, providing a cleaner look for your videos if you want more control. Additionally, online screen recorders that don't require installation are also available, which can't show the mouse cursor. We suggest that you experiment with various tools to determine which one suits you the best. Besides, the easiest way to find the ideal screen recorder that suits your style and consistently produces professional-looking videos is to experiment, whether you're looking for a quick capture or a more polished video with editing.