On This Page
Podcasting is more popular today. People love listening to podcasts while driving, working out, or just relaxing. It’s a great way to share stories, teach something new, or connect with an audience. Besides, podcasting can help promote your products, services, or personal brand by showing your personality and knowledge. If you want to start doing a podcast, you don’t need to be a pro or have expensive gear to start. In this article, we’ll show you how to record podcast on Mac step-by-step. We’ll review free and paid tools, basic equipment you might need, simple steps to get started, and tips for getting great audio. Our goal is to make it easy for you to record high-quality podcasts from the comfort of your own space.
| Tools | Pros/Cons | Price |
|---|---|---|
| GarageBand | ✅GarageBand offers ready-made templates for voice projects
❌ Can be complex for beginners |
Free |
| Aqua Demo | ✅It has a Task Scheduler, which is perfect for automatic recording
❌The free version has a watermark for screen recording |
With free version
1 Month - $19.95 |
| Zencastr | ✅The tool can generate ready-to-share social clips
❌ If your internet is not stable, it will drop the recordings |
With free 14-day trial
Standard - $20 |
| AceThinker Online Audio Recorder | ✅It automatically saves all your recordings to your local drive
❌ No advanced features like noise cancellation |
Free |
How to Record a Podcast on Mac With GarageBand
GarageBand is a built-in tool on macOS devices for recording and editing audio files, like podcasts. It lets you capture multiple tracks simultaneously, which is great if you have a guest on your podcast. Besides, each person’s voice has a separate track so that you can edit it later. Additionally, GarageBand includes helpful tools like noise reduction, compression, and EQ. These features help make your voice sound richer and remove background noise, so your recorded audio for your YouTube podcast podcast is high quality. What we like about this is its built-in loop library with free background music and sound effects. You can search by mood, instrument, or genre to add personality and energy to your podcast. Moreover, this recorder lets you directly upload your podcast to platforms like Spotify and Apple Podcasts in high-quality formats such as MP3 and AAC.
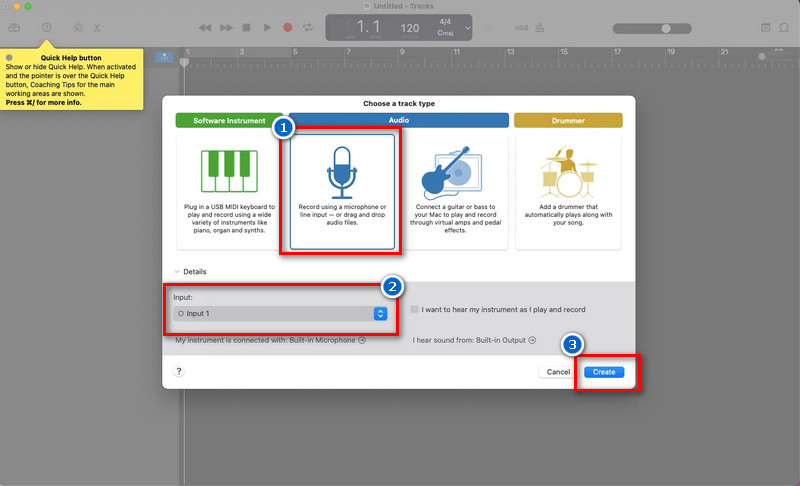
Step 1. Create a New Project
First, open the GarageBand tool and click the 'New Project' option on the left corner of the screen. Next, choose 'Microphone' as your track type and plug in your wired mic. Then select the right input source for your microphone and click the 'Create' button at the bottom right corner to create a new track.
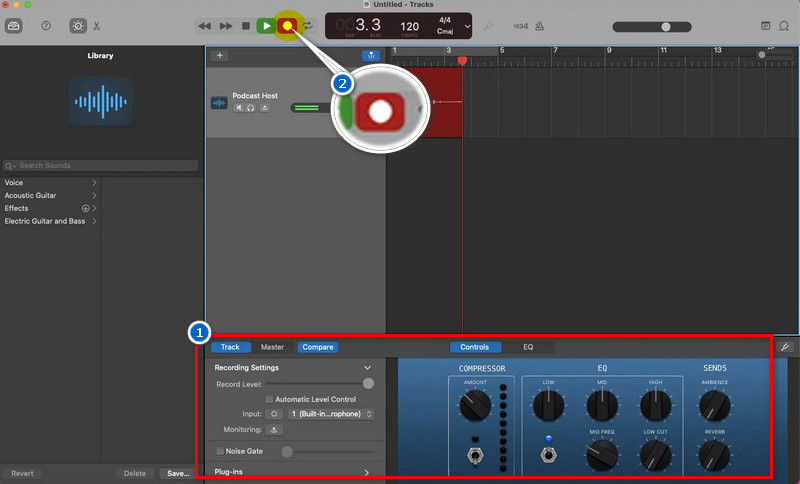
Step 2. Record Your Podcast
Then, you can see the waveform, control the volume, and set the recording in the recording interface. Also, ensure the metronome and count-in features are turned off to avoid unwanted beasts on your recording. You can adjust each option based on your preferences, and once you are ready, click the 'Record' icon above.
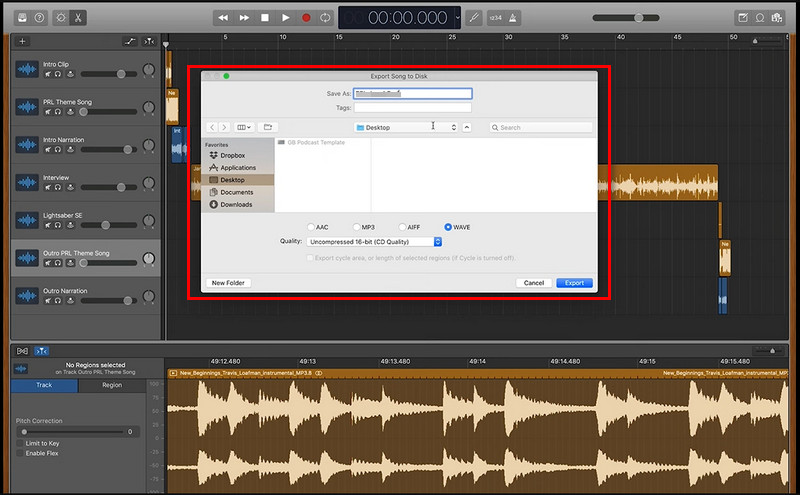
Step 3. Edit and Save Your Podcast
After recording, you can edit your podcast directly on the tool. You can trim unwanted sections, add background music, adjust the volume, and more. When you're happy with how it sounds, click Share > Export Song to Disk and save your podcast as an MP3 file ready to upload.
What is GarageBand?
GarageBand is a free music creation app that lets you play, record, edit and share music.
Best Way to Record Podcast on Mac - Aqua Demo
Another best podcast recording software for Mac you can opt for is Aqua Demo. It comes with numerous useful features that can make your recording smooth. Aside from being a screen recorder, this tool also can record audio only. Therefore, you can utilize Aqua Demo to record your podcast. One of the best things about this recorder is its Microphone noise cancellation and enhancement. These features allow you to capture your voice clearly and without distractions in the background. Not only that, but this app lets you adjust the volume in real time. Plus, it supports high-quality audio formats like MP3, AAC, WAV, FLAC, and more. Furthermore, Aqua Demo allows you to do a recording test before recording to check your Mic and Volume. Moreover, aside from being a screen and audio recorder, you can also use this tool as a screen recorder for gaming, tutorials, and other video recording needs.
Step 1. Download and Install the Aqua Demo
Go to Aqua Demo's official website to download the latest version of the software. Alternatively, click the download button above for Mac to quickly download its installer. Next, follow the on-screen prompts on your Mac screen to complete the installation process. Once you've done this, the app will automatically launch so you can start using it.

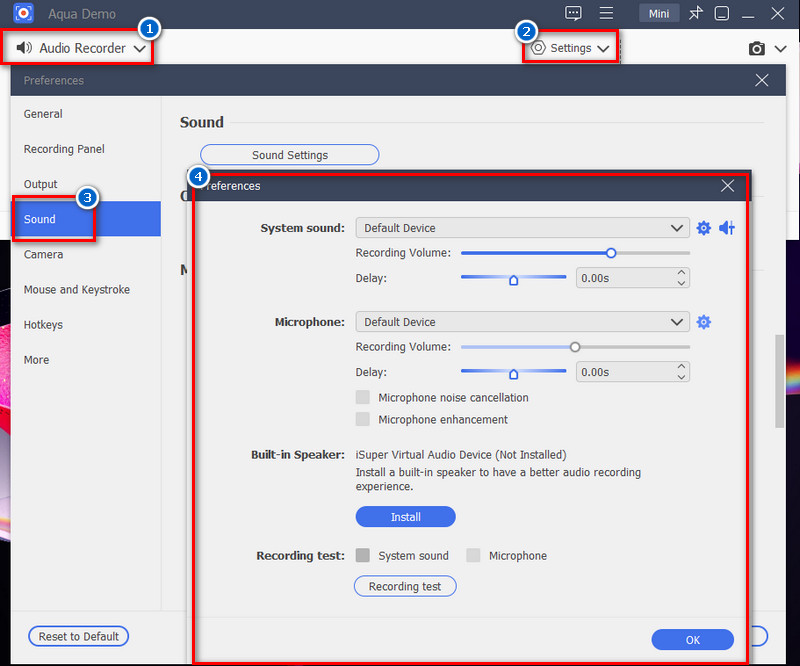
Step 2. Customize Sound Settings
On the main interface, navigate to the Video Recorder dropdown menu and change it to Audio Recorder. Next, plug in your microphone and choose it as your audio source. Then, navigate to Sound Settings and enable the Microphone noise cancellation and enhancement. After that, do a recording test to ensure your microphone works properly.
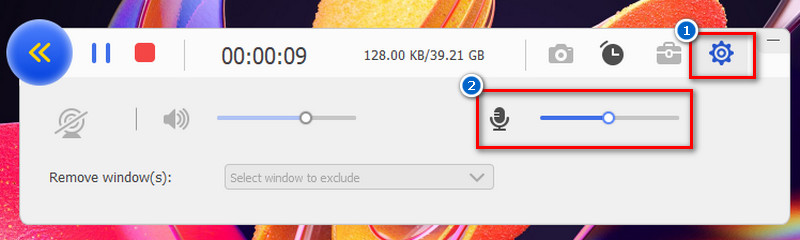
Step 3. Start to Record Your Podcast
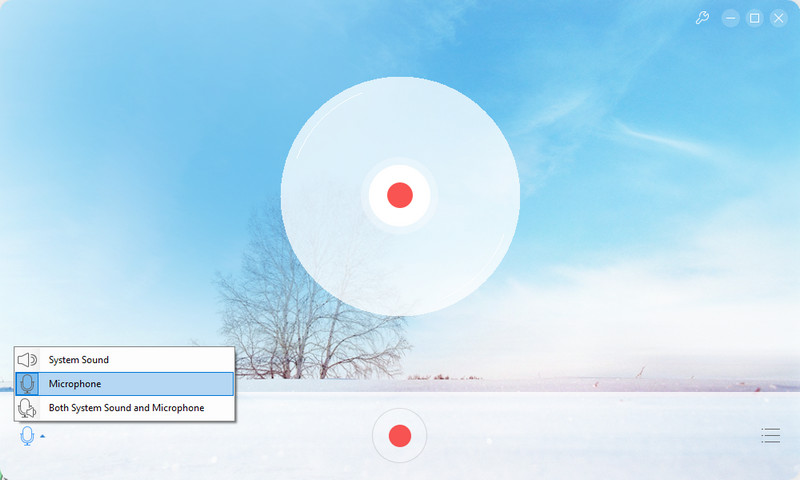
Once you're all set, go back to the main interface, turn off the System Sound, and turn on the Microphone option. Afterward, click the Record button to start recording your podcast. While recording, you can adjust the microphone volume; just click the gear icon beside it to do so.
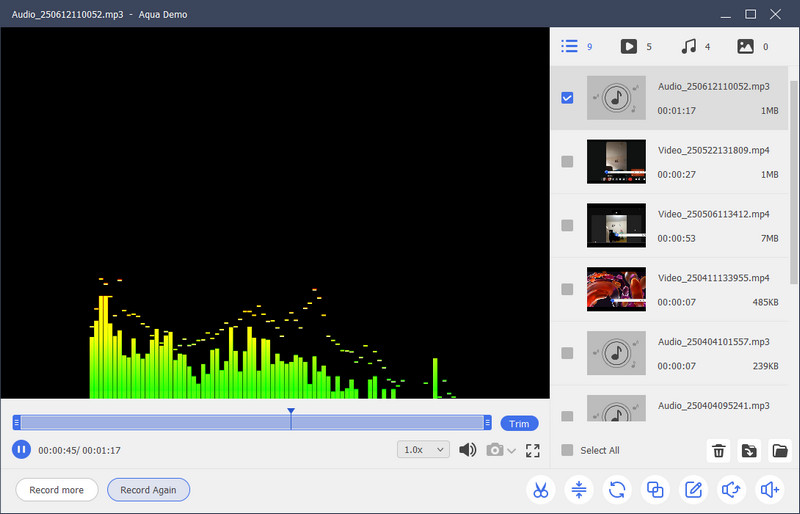
Step 4. Save Your Podcast
Once you're done, click the small red box from the toolbar to stop the recording. Next, you will be directed to the preview panel, where you can play your recorded podcast. Don't worry—the recorded podcast will be saved automatically. Just click the Open Folder button below to see the saved podcast.
Record Podcast on Mac Using Online Recorders
1. Zencastr
Zencastr is an online podcast recording app for Mac that records each guest separately and in studio quality. The quality of the audio recording it gives is from 128 kbps in MP3 format up to 16-bit 48kHZ WAV format, so your voice is clear. What we like about this online tool is that it offers AI-powered features such as noise-gate, hum reduction, loudness normalization, and more. These features will help you make professional audio perfect for podcasters. In addition, Zencastr has a built-in chat feature, so you and your guest can communicate during the recording. On top of that, Zencastr supports various integrations like Google Drive, Dropbox, Descript, and more. Aside from an online tool, there's also a mobile app for iOS, so you can record on the go.
User Guide:
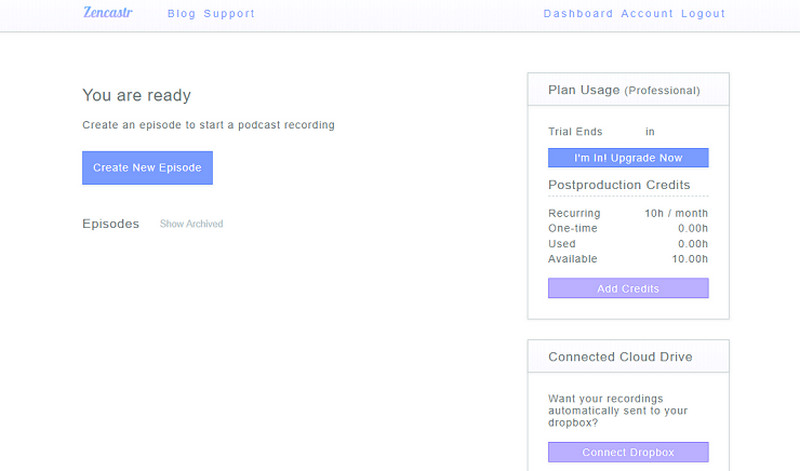
- To start, go to the Zencastr website and create an account or sign in if you already have one. Click the 'Create New Episode' button on your dashboard, give it a name, and click 'Create.' Next, you will go to the recording studio, where you can invite your guests.
- Connect your microphone to your Mac and select it as your audio source. Then, test your microphone to ensure that it is working properly. After that, copy the invite link and send it to your guest.
- Once everyone has joined, click the 'Start Recording' button. Zencastr will record each person's high-quality audio separately. When you're done, click 'Stop Recording,' then the files will be saved to your account.
2. AceThinker Online Audio Recorder
Another online audio recorder you can use to record podcasts for Mac is the AceThinker Online Audio Recorder. This recorder is simple and easy to use, so you will not have difficulty figuring out how it works. One of the best things about this tool is that it lets you personalize and organize your recordings with its IDT3 tag editor. This feature lets you manage your podcast recordings easily. Furthermore, it can also record internal audio on Mac or a microphone on your computer. In addition, this tool offers 128 kbps audio quality in MP3 format. However, this quality is not ideal for those who prefer a higher-quality recording. Not only that, but this tool is also safe to use since it utilizes SSL encryption protocol to protect your data from threats and attacks.
User Guide:
- First, find the official website of AceThinker Online Audio Recorder. Next, click the 'Start' button on its interface and download its launcher. Then, install the launcher and revisit the page to launch the tool afterward.
- Now, connect your microphone to your Mac and choose it as your audio source on the lower left side. Next, do a sample recording to check if the mic is working. Once you're all set, click the record button to start your podcast recording.
- When you're done, click the stop button, and the recorded audio will automatically saved on your local drive. Next, locate the file and listen to it. If you want to edit its ID3 tag, go to Recording History and click the Edit ID3 icon.
Tips: How to Get Clear Sound for Your Podcast
If you want your podcast to sound clear and professional, focusing on quality is important. Good audio keeps your listeners interested and makes your show more enjoyable. These tips will help you get better results with podcast recording on Mac using the right tools and setup.
A. Pick the Right Microphone: A good microphone makes a big difference in sound quality. USB microphones are easy to use and work well for beginners using podcast capture Mac tools. Also, choose one that fits your budget and offers clear, crisp audio.
B. Find a Quiet Place to Record: Record in a quiet room with soft furniture to absorb sound. Close windows and turn off noisy devices like fans or air conditioners to reduce background noise. Less background noise means a cleaner, more professional podcast.
C. Set Up Your Microphone Properly: Place the microphone 6–12 inches from your mouth. Then, speak clearly and avoid talking directly into it to prevent harsh sounds. You can also utilize a pop filter to reduce unwanted noise from breathing or strong "P" and "S" sounds.
D. Test Your Sound Before Recording: Before you start, always do a test recording to check your sound. Make sure your voice isn't too loud or too soft. Then, adjust the input levels in your podcast recording software Mac until it sounds just right.
E. Listen While Recording: Listen to your voice while recording using headphones. This helps you catch issues like background noise or mic problems right away. It's a simple way to ensure that everything sounds great from start to finish.

Frequently Asked Questions
What common issues do you encounter when recording a podcast?
One common problem is background noise, like traffic, fans, or people talking nearby. Another issue is low or uneven audio levels, which can make your voice too quiet or too loud. Sometimes, technical glitches with your mic or software can also cause trouble during the recording.

Is QuickTime Player also used to record podcasts?
Yes, you can use QuickTime Player to record your voice on a Mac. It’s a simple tool built into your Mac computer and is easy for beginners. While it doesn’t have many advanced features, it works fine for basic podcast recordings.
Where can I upload my recorded podcast?
You can upload your podcast to Spotify, Apple Podcasts, and Google Podcasts. But first, you’ll need to use a podcast hosting service like Buzzsprout, Anchor, or Podbean. These services help you share your episodes with listeners all around the world.
Conclusion
Recording a podcast on a Mac is easier than you think. Whether you use built-in tools like GarageBand, all-in-one apps like Aqua Demo, or online platforms like Zencastr and AceThinker Online AudioRecorder, there’s a method that fits your style and budget. Each tool has its own features, but they all help you record clear and engaging audio. Remember, great podcasts are not only about the content but also the sound quality. A quiet recording place, a decent mic, and a quick test run can make a huge difference. Plus, you can create a podcast worth listening to with a little practice and the right tools.