An incredible gaming achievement can make you want to remember it for a long time. These special moments might inspire you to share your progress, make funny video clips for friends, or even make content for others. Look no further than your NVIDIA graphics card! Inside GeForce Experience (GeForce Experience) are tools, Shadowplay, and Highlights for gamers to record their gameplay without losing quality or slowing down. Learn how to use these tools effectively with step-by-step instructions, no matter your gaming skills. You can have NVIDIA automatically save your best moments, like winning important levels or defeating bosses, and control how they're recorded for optimal quality and speed. Find out how to share your recordings with friends on social media or streaming sites. So, get ready, gamers lets learn how to record game with NVIDIA! Start recording your best moments to enjoy and share forever.
| Sections | Brief Information |
|---|---|
| Guideline on How to Setup NVIDIA Game Recorder | Detailed guide in screen recording gameplay from your computer while playing. Read More |
| Troubleshooting Common Issues | Different issues you may encounter while using NVIDIA Shadowplay for recording gameplay.Read More |
| Aqua Demo as Alternative Gameplay Recorder | One more excellent tool in recording your epic gameplays for memories. Read More |
| Conclusion | The summary and some tips about recording game with NVIDIA. Read More |
Guideline on How to Setup NVIDIA Game Recorder
For gamers, there's a special feeling when something amazing happens in a game - like a perfect move, a win at the last minute, or a funny mistake. But these moments are gone fast. Luckily, NVIDIA GeForce Experience has Shadowplay, a powerful tool that lets you record game with NVIDIA without slowing down your system. Shadowplay uses NVIDIA's technology to record smooth gameplay at high quality and speed so you don't miss anything. It saves your game in the background with a simple command, perfect for recording exciting moments. Besides, you can record in high detail, up to 8K HDR at 30 FPS or 4K HDR at 60 FPS, and easily share your recordings on social media or streaming sites. With Shadowplay, you can turn your gaming moments into something you can share and remember.
Step 1. Setting Up NVIDIA Game Capture GeForce Experience
If you haven't gotten around to it yet, check out the official NVIDIA website and grab the newest update for GeForce Experience. Setting it up is pretty easy; just follow the directions on the screen. Once it is up and running, you should sign in with your NVIDIA account. It's free to join and lets you unlock some cool extras.
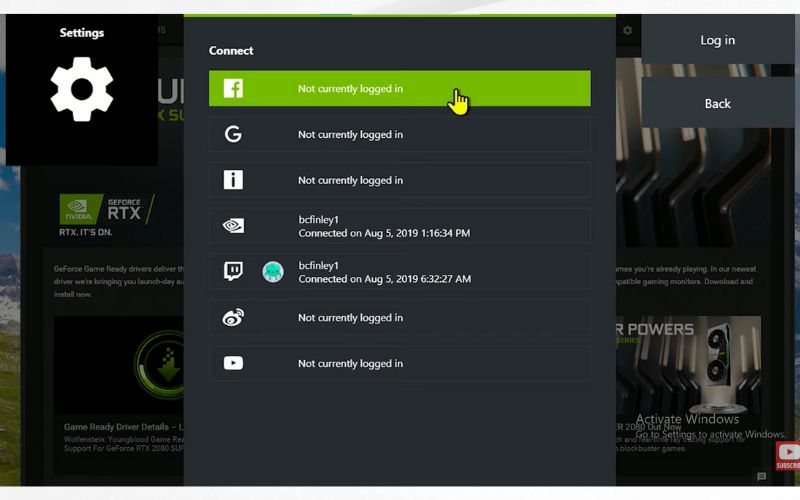
Step 2. Configuring Your Stage: NVIDIA Share Settings
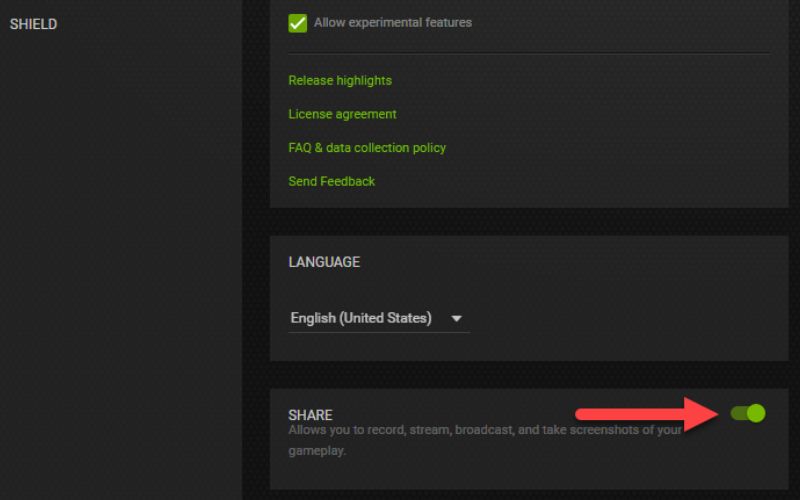
After that, click the Settings icon at the top right corner of GeForce Experience to access the Settings menu. In the Settings menu, locate the "Share" tab. This is where you'll configure all your recording preferences. Then, choose where you want your recordings to be saved. By default, they'll be stored in your Videos folder, but you can select a different location for better organization.
Step 3. Record Game With NVIDIA
A. Capturing the Unexpected: Using Instant Replay
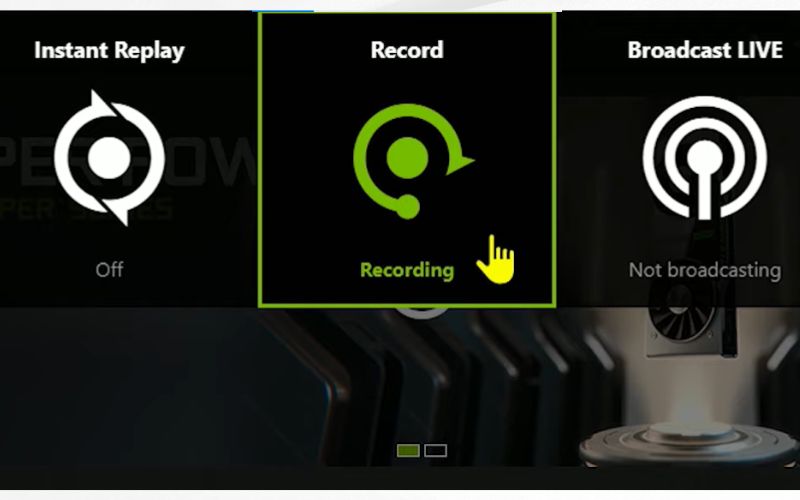
In the "Share" settings, ensure the "Instant Replay" toggle is switched on. Then, define the length of gameplay that Shadowplay will continuously record game with NVIDIA in the background. You can choose between the last 30 seconds and 20 minutes, depending on your choice and available storage space.
B. Taking Control: Manual Recording
Press the designated hotkey (again, configured in Settings) to initiate manual recording. Afterward, press the hotkey again to stop recording once you've captured the desired footage. Then, your gameplay will be saved according to your pre-defined location settings. These shortcuts are often referred to as NVIDIA recording hotkeys, giving you quick and convenient control over your gameplay captures.
Step 4. Capturing Stills: Taking Screenshots
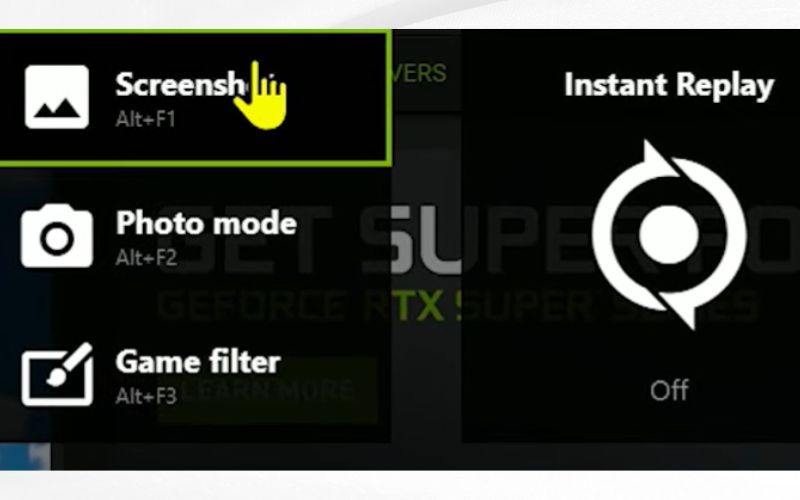
Press the designated screenshot hotkey in the settings to capture a high-resolution image of your current in-game view. Your screenshots will be saved in the same location you specified for recordings.
Troubleshooting Common Issues
Even the most powerful tools can occasionally encounter issues. Here's a breakdown of common problems you might face while recording with Shadowplay, along with solutions to get you back on track:
1. Dealing with Black Screen Issues
- Old Drivers: Ensure you have the newest NVIDIA graphics drivers on your computer. Old drivers can mess up how your game works and might even cause your screen to go black when you're recording. Visit the driver's website to download and put in the newest ones for your graphics card.
- Software Battles: A few apps not made by NVIDIA might get in the way of Shadowplay. Before you hit the record button, give any programs you don't need to close.
- Overlay Mayhem: Disabling in-game overlays like Discord or Steam can prevent conflicts with Shadowplay and stop black screens from appearing.
2. Fixing Audio Sync Issues
- Adjust Audio Track: Sometimes, the audio track might be slightly out of sync with the video. Use your recording software (such as Windows Video Editor or a third-party editor) and its audio editing tools to adjust the audio track and ensure it's in sync with the visuals.
- Restart and Retry: A simple restart of GeForce Experience or your PC can often solve temporary glitches causing audio sync issues.
3. Optimizing Performance for Smooth Recording
- Lower Recording Settings: If stuttering or frame drops disrupt your recording, try reducing the recording resolution, bitrate, or frame rate. This will lessen your system's workload, resulting in smoother gameplay capture.
- Background Resource Hogs: Closing unnecessary background applications can free up processing power for your game and Shadowplay, leading to smoother recordings.
- Game Settings Optimization: Adjusting in-game graphics settings can enhance your recording performance. Experiment with lowering settings like shadows, anti-aliasing, and texture quality to find the best balance.
The ideal balance between recording quality and performance varies depending on your system. Experiment with different settings to find the one that best suits you. If these solutions don't resolve your issues, consider searching online forums or contacting NVIDIA support for additional help. With some troubleshooting, you can ensure your recordings are flawless, capturing your gameplay experience.
Aqua Demo as Alternative Gameplay Recorder
While NVIDIA game recording Shadowplay is popular among gamers, some prefer adaptable option like Aqua Demo. Aqua Demo is a versatile screen recording tool and one of the best game recorders that goes beyond just gaming, allowing you to record not just gameplay but also your desktops or apps. Moreover, it's great for making tutorials, capturing special moments, and recording live streams. Unlike Shadowplay, Aqua Demo lets you choose where you want to record. For example, you can record just a part of your screen or desktop, focusing on a window or application while showing others. Besides, you can schedule recordings to catch important events even when you're not around. In addition, Aqua Demo also integrates webcam footage, letting you add reactions or commentary during gameplay, which is perfect for making tutorials or videos. It records audio from your system, microphone, or both, capturing all sounds and voices.
Step 1. Setting Up Aqua Demo
First, navigate to the buttons immediately above this step and select the one corresponding to your operating system. Subsequently, follow the instructions to complete setting up the app. After that, start the Aqua Demo app. Spend a few minutes checking out the app's layout and exploring all its features and options.
Step 2. Configuring Recording for Gameplay
First, find the section for setting the recording area and select the "Custom Area" option for gameplay recordings. Then, use your mouse to drag a selection box around the specific window you wish to capture. Next, move to the audio settings section. Here, you can pick to record system audio (which includes in-game sounds), microphone audio (for your commentary), or both. After that, once you have configured the recording area and audio settings, click the "Record" button to start capturing your gameplay.
Step 3. Capturing Your Gameplay
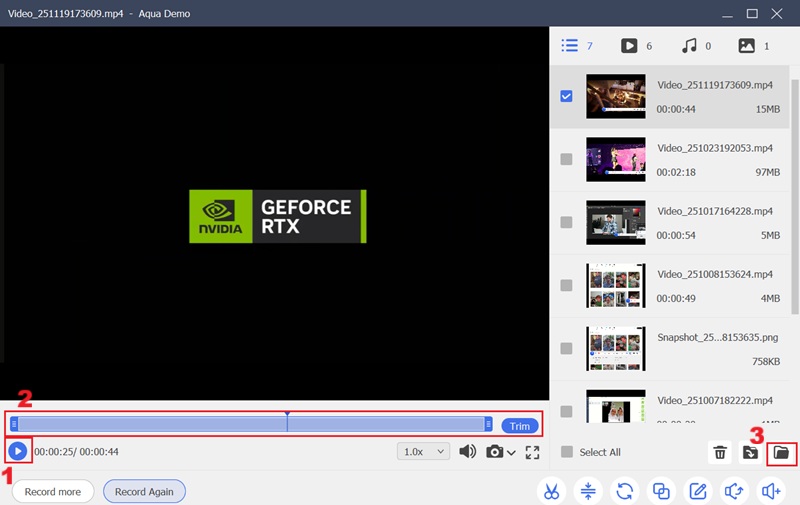
Once you've finished recording the segment you desire, click the "Stop" button. Then, the preview window will appear, where you can view the gameplay you recorded. You can also trim the gameplay or access your output folder.
Conclusion
In conclusion, capturing your gameplay with NVIDIA GeForce Experience is incredibly easy. All you need to do is download and install GeForce Experience, then head to the "Share" settings to adjust your recording preferences and set up hotkeys. From there, you can record game with NVIDIA using Instant Replay to capture the final moments of your gameplay or manual recording for more control. With NVIDIA Shadowplay, you get the best of both worlds: effortless recording that doesn't compromise performance, all thanks to hardware acceleration. Additionally, NVIDIA Shadowplay works seamlessly with GeForce Experience, eliminating the need for extra software downloads or installations. Alternatively, if you prefer more customization options, you can also record with OBS to fine-tune your gameplay captures. So, fire up your favorite game, let your inner game recorder shine, and begin creating content that will leave a lasting impression on the gaming community!


