On This Page
Recording your Photoshop process is a valuable way to teach, learn, and share creative workflows. It allows others to see how your designs come to life step by step. This makes your tutorials easier to follow and more engaging. Besides, by recording your work, you can also review your own progress, improve your techniques, and inspire others in the creative community. In that line, there are ways to record Photoshop process: recording Photoshop steps or actions inside the program, and capturing your screen with external video tools. Both techniques serve different purposes, depending on your goals. In this article, we'll explore how each option works, including Photoshop's built-in recording features and popular screen recording tools. We'll also provide easy step-by-step guides to help you start recording your own creative process smoothly and professionally.
How to Record an Action in Photoshop
As we explore how to record Photoshop processes, one of the best starting points is Photoshop's built-in Actions panel. This feature serves as the program's native tool for recording repetitive steps. It enables users to save time and maintain consistency in their work. With the Actions panel, you can record Photoshop processes, from applying filters and increasing photo resolution in Photoshop, to running batch processes on multiple files. This makes it perfect for tasks like batch processing numerous photos with the same edits.
Moreover, it's an excellent way to automate routine edits and speed up your workflow. However, it's important to note that the Actions panel does not allow you to capture live screen activity or voice narration. Instead, it only records the commands and steps you have taken, making it ideal for automation but not for creating full video tutorials or demonstrations. Here are the detailed steps on how to record Photoshop action, enabling users to streamline their post-processing.
Step 1: Launch Photoshop
To start, open Adobe Photoshop on your computer. If you have not downloaded the application, ensure you acquire it from Adobe's official website. After that, create your account and you have to subscribe to its premium option (starting from $19.99/month) to access its full suite of functionalities.
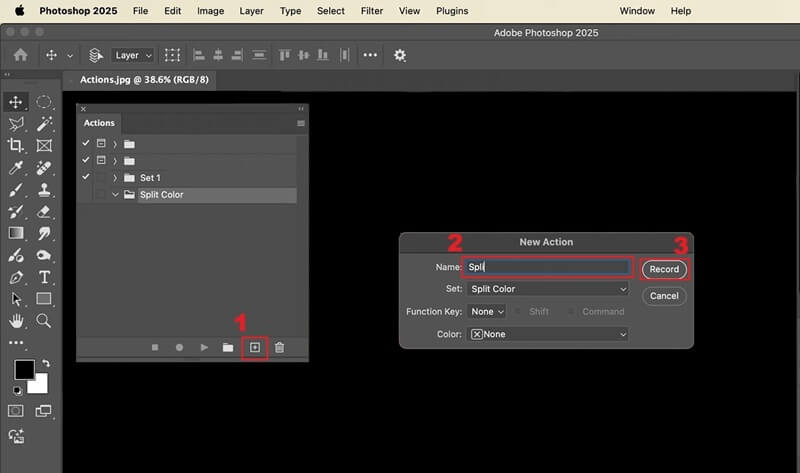
Step 2: Create a New Folder for Actions
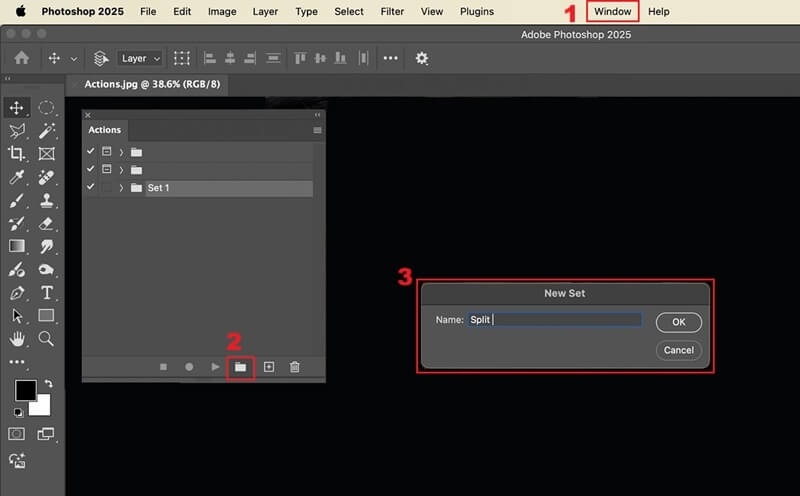
Once you have launched Photoshop, navigate to the "Window" menu at the top of the interface. In the drop-down menu, click the "Actions" and a small dialog box will appear. Here, you can create a new action by hitting the "Folder" icon to create a new folder for your actions.
Step 3: Record Photoshop Actions
After creating the folder, click the small square with a plus sign or the "Action" button to set the action's name. Then, hit the "Record" button beside the name of your action. This will allow you to record all the subsequent operations you perform within Photoshop, such as applying layers, filters, and more. When you are done, hit the "Stop" icon.
"Actions allows you to record tasks in Photoshop."
How to Screen Record Photoshop Workflow
While Photoshop’s built-in Actions are excellent for automating repetitive tasks, creating comprehensive tutorials requires you to have a screen recorder for Photoshop. That said, in this section, we will show you two powerful methods to capture your Photoshop workflow for educational purposes or demonstrations effectively.
Method 1: Using a Professional Video Recorder
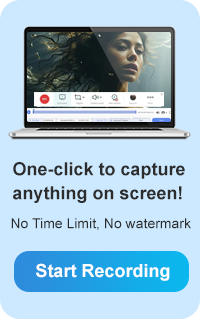
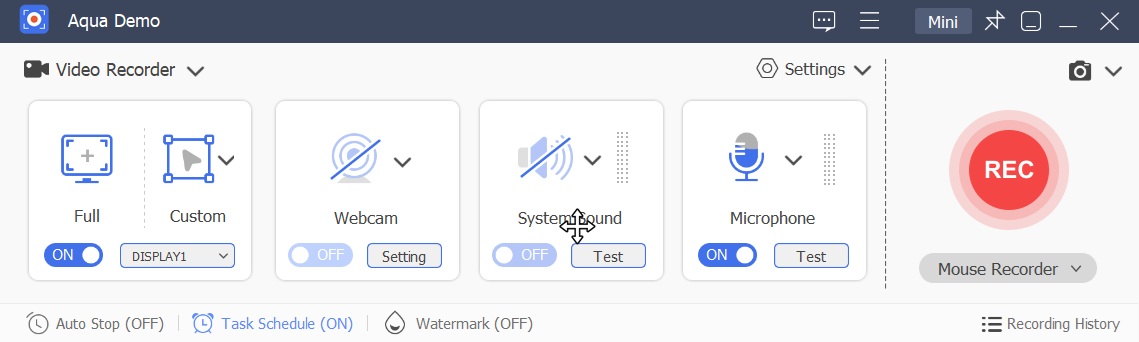
One of the most effective ways to produce high-quality tutorials is by utilizing a professional screen recorder. In that line, Aqua Demo stands out as a comprehensive solution to record Photoshop screen activities. As we tried to capture complex design processes, we found that it provides exceptional clarity and details. You can record your screen up to 4K resolution. Besides, it allows you to record your full screen, a specific window, or a specific/custom region, giving you the flexibility to choose the most appropriate capture area for your tutorial.
It also enables you to capture the system sound and your microphone input, which is crucial for explaining your steps verbally while demonstrating. You can also use the annotation tools to highlight key details and incorporate your webcam feed. On top of that, you can record video calls, games, webinars, and online meetings, making it a versatile tool for your digital content creation needs.However, please note that the free version of this video recorder includes a watermark. If you wish to avoid watermarks, a paid subscription is available for $19.95 per month. Here are the steps on how you can record the Photoshop process using Aqua Demo
Step 1: Acquire the Photoshop Recorder
To begin, download the Aqua Demo software by smashing the download button above. Once downloaded, install the Photoshop recorder by following the on-screen instructions to integrate it seamlessly into your system. Then, the application should launch automatically.
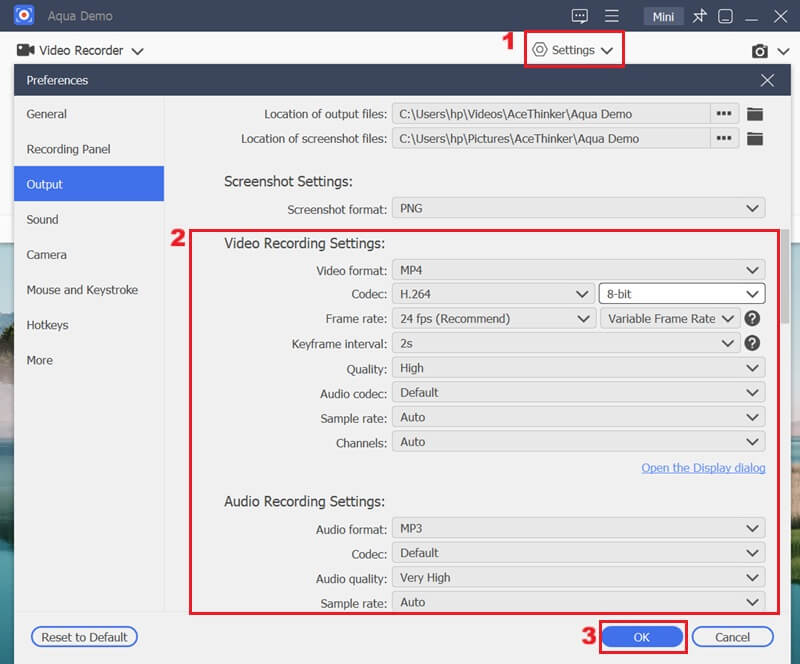
Step 2: Modify the Recording Settings
Before initiating the recording process, navigate to the "Settings" menu. From here, you can adjust various parameters such as resolution, frame rate, output format, and audio inputs. Once you have set all your desired configurations, hit the "OK" option to keep all the modifications you made.
Step 3: Record Photoshop Process
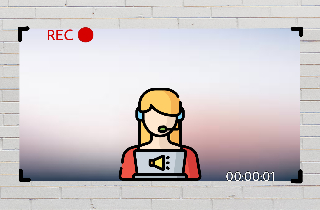
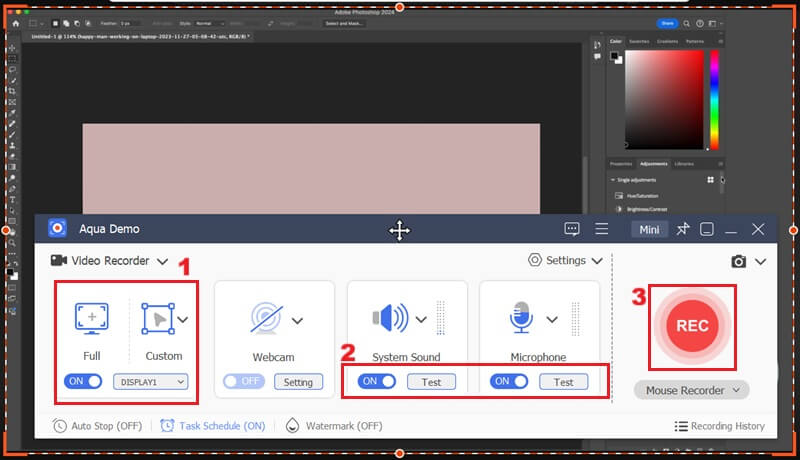
With your settings configured, you can now launch your Photoshop and select the capture area for your Photoshop recordings. Then, enable the sound system and your microphone by toggling the corresponding buttons to ensure comprehensive audio capture. Afterward, smash the "REC" option to start recording your Photoshop process.
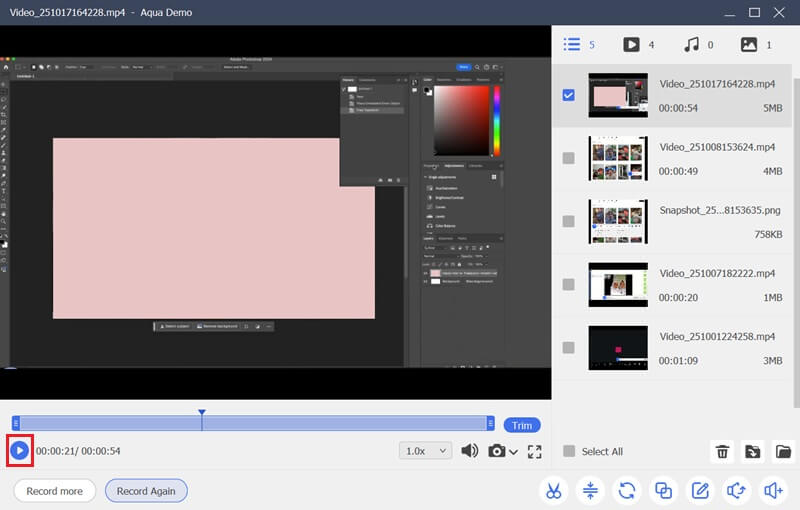
Step 4: Stop and Preview the Photoshop Recording
Once your demonstration is complete, click the "Stop" button to end your Photoshop recording. Subsequently, the preview window will automatically open, allowing you to review your capture in Photoshop. You can smash the "Play" icon to watch the recorded video.
Method 2: Using a Reliable Online Recorder
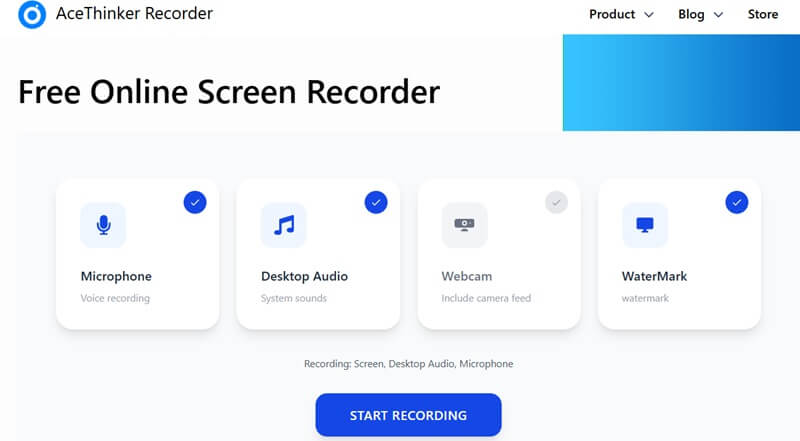
Suppose you don't want to download additional software; a reliable online screen recorder can be an excellent alternative for capturing your Photoshop workflow. One of the most user-friendly options you can use is the AceThinker Free Online Screen Recorder. This tool lets you capture high-quality footage directly from your web browser up to 1080p. Like Aqua Demo, it also supports recording in full screen, a specific tab, or a window, giving you the option to capture any video or application of your choice. You can easily capture multiple activities, such as recording Google Meet, vlogs, documentaries, games, and more.
Furthermore, you can also choose the sound recording source, whether you need system audio, microphone input, or both. This makes it an ideal option for quick demonstrations without the need for software installation. Additionally, this online screen recorder for Photoshop supports multiple browsers, like Chrome, Edge, Firefox, and more. Nonetheless, this online screen recorder does not offer various format options since it only exports WebM format. Below are the steps to capture a Photoshop workflow.
Step 1: Access Online Screen Recorder
With the browser of your choice, access the AceThinker Free Online Screen Recorder website. Then, you will see the clean and intuitive user interface, from which you can immediately proceed to configure your recording settings. Then, access your Photoshop application.
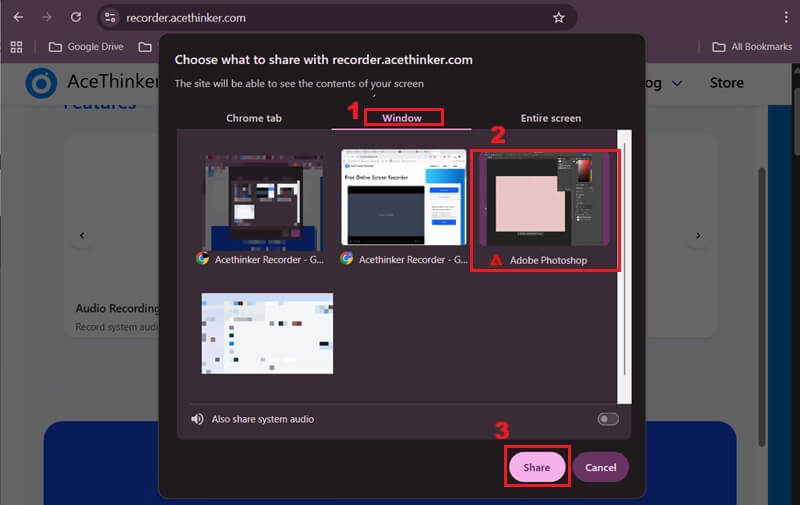
Step 2: Start Recording Photoshop
Once you have launched your Photoshop application, click the "Start Recording" option. After that, a new window will emerge on your screen. Here, click the "Window" option since Photoshop is a distinct application window. When the Photoshop window is selected, click "Share" to start recording your Photoshop workflow.
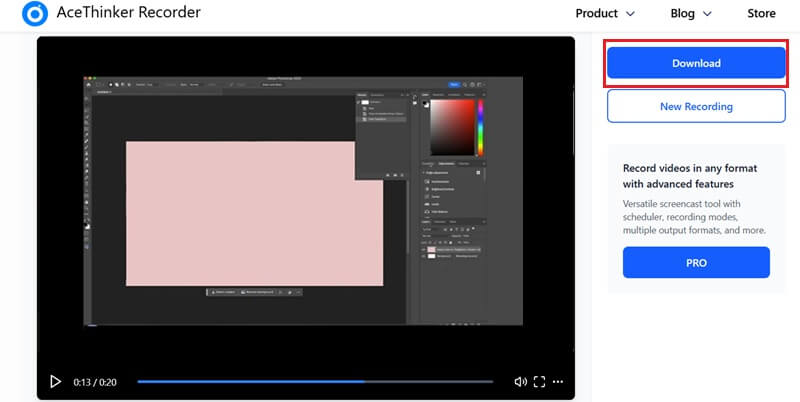
Step 3: Preview and Download the Photoshop Recording
Upon completion of your demonstration, click the "Stop Sharing" option on the webpage to terminate the recording process. Then, the online recorder will automatically display a preview of your captured Photoshop footage, allowing for immediate review before downloading. Finally, to save your recorded Photoshop footage, click the "Download" option on the right panel.
Frequently Asked Questions
How to record steps in Adobe Photoshop?
To record steps in Adobe Photoshop, you can utilize the Actions Panel. This built-in tool of the software enables the automation of repetitive tasks, allowing you to record the entire sequence of your operations. You can then play back these recorded actions to apply the same series of edits consistently.

Why should I record my Photoshop process?
Recording your Photoshop process helps you repeat tasks faster and share your workflow with others. It's also a great way to teach or review your own editing steps.
Can I edit or reuse my recorded actions?
Yes, you can rename, rearrange, or delete recorded steps in the Actions panel. This helps you organize your workflow and make your actions easier to use. You can also save them and apply them to future Photoshop projects.
Final Thoughts
In conclusion, there are two main ways to record Photoshop processes: using the Actions panel for automation and screen recording tools for creating tutorials. The Actions panel is perfect for saving time and keeping your edits consistent. At the same time, screen recorders are ideal for sharing your creative process through video. When recording, preparation and attention to detail are key to achieving professional results. In that line, always plan your steps carefully, check your settings, and review your recordings before sharing them. Moreover, don't hesitate to experiment with the recommended tools like Aqua Demo or the AceThinker Free Online Screen Recorder. By practicing and sharing your workflows, you can improve your skills and inspire other creatives in the Photoshop community.
| Method | What It Records | Best For | Limitations |
|---|---|---|---|
| Photoshop Actions Panel | Filters, adjustments, tool usage, and steps inside Photoshop. | Automating repetitive tasks and batch editing. | Doesn’t record live screen or voice narration. |
| Aqua Demo | Real-time video of your Photoshop workflow and edits. | Creating video tutorials or sharing your creative process. | Doesn’t record Photoshop commands or automate tasks. |
| AceThinker Free Online Screen Recorder | Screen activity plus spoken explanations. | Quick video recordings. | Doesn’t create editable Photoshop actions. |