The PS5 is available for a while now, and if you are lucky enough to purchase one, you've probably played around with its settings and features to give it your feel. A feature that has been ported over to PlayStation 4 PS4 is the capability to record your gameplay on the PS5. It functions similarly to the PS4 system. However, there are minor differences that you need to take note of. Fortunately, there are a few ways available to record PS5 gameplay. In this article, we will guide you through every possible process and let you know how to record gameplay PS5 effortlessly.
| Solutions | Brief Information |
|---|---|
| Record PS5 Gameplay: Built-in Recorder | It is a built-in recorder that can record gameplay on a PS5. Learn More |
| Capture PS5 Game: Aqua Demo | An advanced screen recorder that supports most gaming consoles to record any gameplay. Learn More |
| Conclusion and Comparison Chart | A summary of the article and a comparison of the screen recorder for PS5 are shown in a table. Learn More |
Record PS5 Gameplay: Built-in Recorder
As we stated at the beginning of this article, PS5 has an excellent recording function that allows players to capture files moving ahead as the player progresses through the game or record an earlier game. We'll now look at how to record games on PS5 by following these instructions.
User Guide:
- First, click the Create button on your DualSense controller when you are ready to begin your PS5 recording. After that, you will find a menu at the lower right of your screen.
- Next, click the "Capture Options" in the bottom right of the screen and choose the "Manual Recording Resolution" option. If you'd like to record your PS5 games and your voice, switch to the "Include Your Mic's Audio" option.
- After the settings are complete, select "Start New Recording" to start recording the game. Then, a white box with the timer appears right at the very top.
- Finally, when you want to stop the PS5 gaming recording, hit the "Create" icon again and select the "Stop Recording" option. Wait a couple of seconds while you save your footage on your hard disk.
NOTE: PlayStation 5 only allows you to grab your gameplay for up to 60 minutes in 1080P quality.
Capture PS5 Game: Aqua Demo
If you want to record your gameplay for more than 60 minutes or in better quality than 1080P, don't worry! In fact, Aqua Demo is a powerful yet simple-to-use program that supports most gaming consoles, such as PS5, PS4, PS3, Xbox One, Xbox 360, Nintendo Switch, Wii, Wii U, and more. With this all-purpose game recorder, you'll be able to record your game in up to 60 frames per second in 4K, with no time limitations. After you have recorded a PS5 game, you can easily export your saved video to MP4, FLV, SWF, MPEG, WebM, AVI, MKV, WMV, and other formats. Moreover, with its stunning user interface and an extensive set of customizable settings, AceThinker stands out as one of the best game recording software options for capturing PS5 gameplay perfectly in just a few clicks.
Salient Features:
- Get sound from your Windows or Mac computer system as well as the microphone.
- Record PS5 gameplay on the full screen or in a specific area in any size.
- Adjust the video resolution, quality, codec, frame rate, bitrate, etc.
- Support for a variety of output formats as well as editing capabilities.
- Make recordings of audio and video from any source without a watermark.
Step 1. Install PS5 Recorder
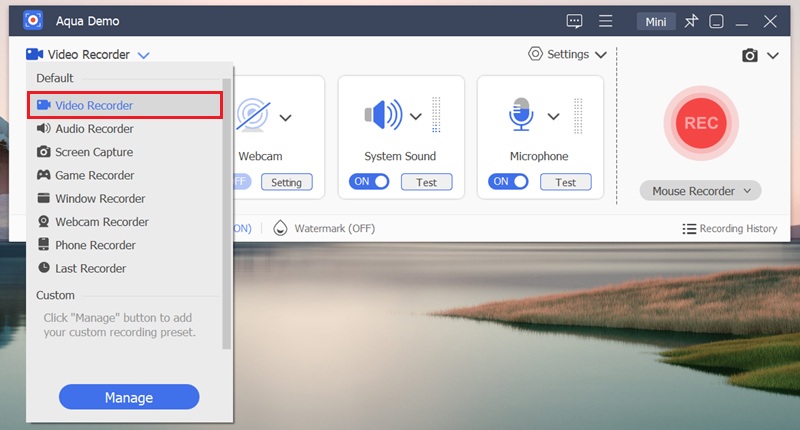
First, download the software and then run Aqua Demo on your PC. After installing the software, launch the app. On its interface, you can see the multiple recording options, by clicking the "Video Recorder." Then, choose the "Video Recorder."
Step 2. Setup Video Settings
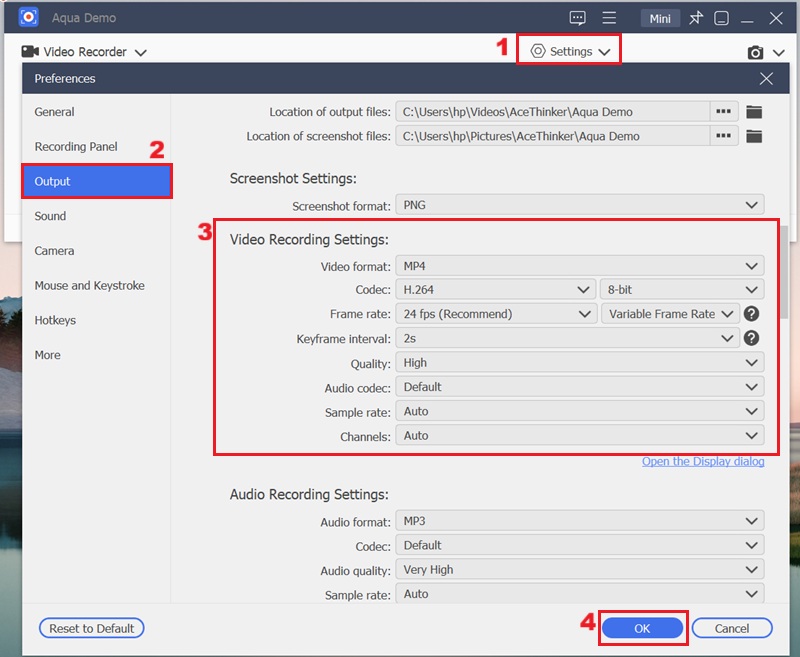
After that, click the "Settings" option and select Output on the next screen. Then, you can choose your Video format, codec, quality, frame rate, and keyframe interval. Also, you can set your Output Folder. Afterward, hit the OK button.
Step 3. Start to Record PS5 Gameplay
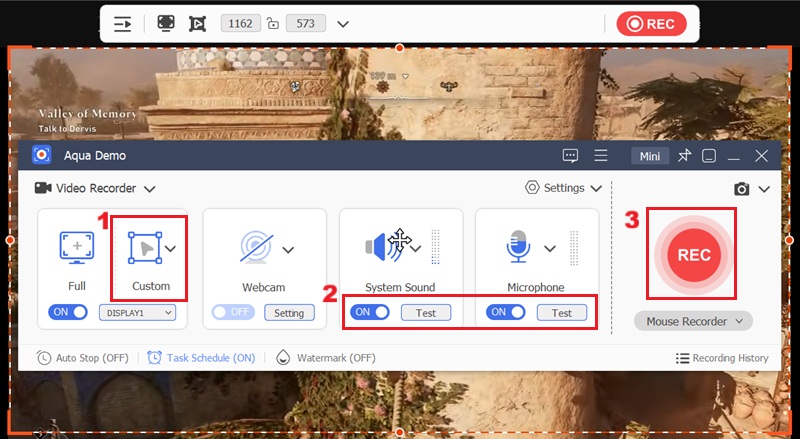
Subsequently, you can select the screen dimensions, choose Custom Mode, and maximize the recording box. Then, the "System Sound" option must be turned on if you wish to record music or online videos, or turn on the "Microphone" if you want to hear your voice on the recorded video. After that, click the "REC" option to start recording PS5 gameplay.
Step 4. Save the Recorded PS5 Gameplay
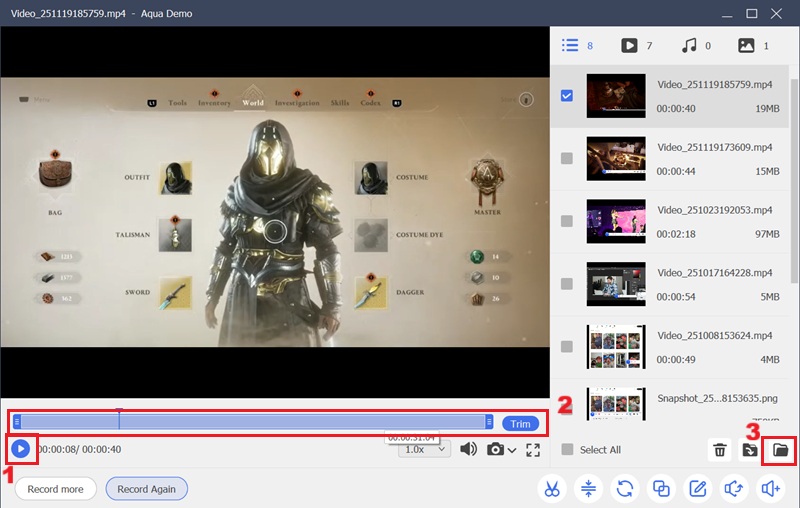
Once you're done recording PS4 gameplay, click the "Stop" icon. Then, the preview window will appear with the recorded PS5 gameplay. Here, you can also trim the video recorded or access the output folder.
Conclusion and Comparison Chart
As you can see in the table of comparisons created to assist you in making sure you can decide the best screen recorder to meet your needs. It is very safe to say that the built-in screen recorder feature on the PS5 offers a bit more convenience. In contrast, AceThinker Screen Recorder provides a wide range of features and allows you to create more custom recordings quickly.
| Features | PS5 Built-in Feature | AceThinker Screen Recorder |
|---|---|---|
| Time Limit | 60 minutes | No Limit |
| Supported Format | MP4, WebM | Supports all formats |
| Support 1080p/4K | Yes | Yes |
| Support 60fps | Yes | Yes |
| Take Screenshots | Yes | Yes |
| Record Audio | Yes | Yes |


